TECHNICAL DESIGN & PATTERNMAKING
KIZZI MENS AND BOYS SIZE CHART STANDARDIZATION
KIZZI was a company that prided itself on dance costumes that looked great and fit even better. We always had very low return rates; For our ladies, that is. Guys was a different story.
Because the sport of competitive dance skews so heavily towards girls, the guys costume market has always been an afterthought, even at the biggest dancewear companies. The same was true at KIZZI. We had a very limited selection of mens dancewear. All of it was made to measure. We had no official, standardized size chart to send to dance studios, and during the height of the season, we really didn't have time to spare creating custom patterns for every guy's order, no matter how infrequent. We were losing time and money in this area, and we needed a solution. Knowing about my experience in menswear and childrenswear, the head patternmaker at the time assigned me the massive task of creating entirely new size charts from scratch.
BEGINNING:
Internal youth size chart
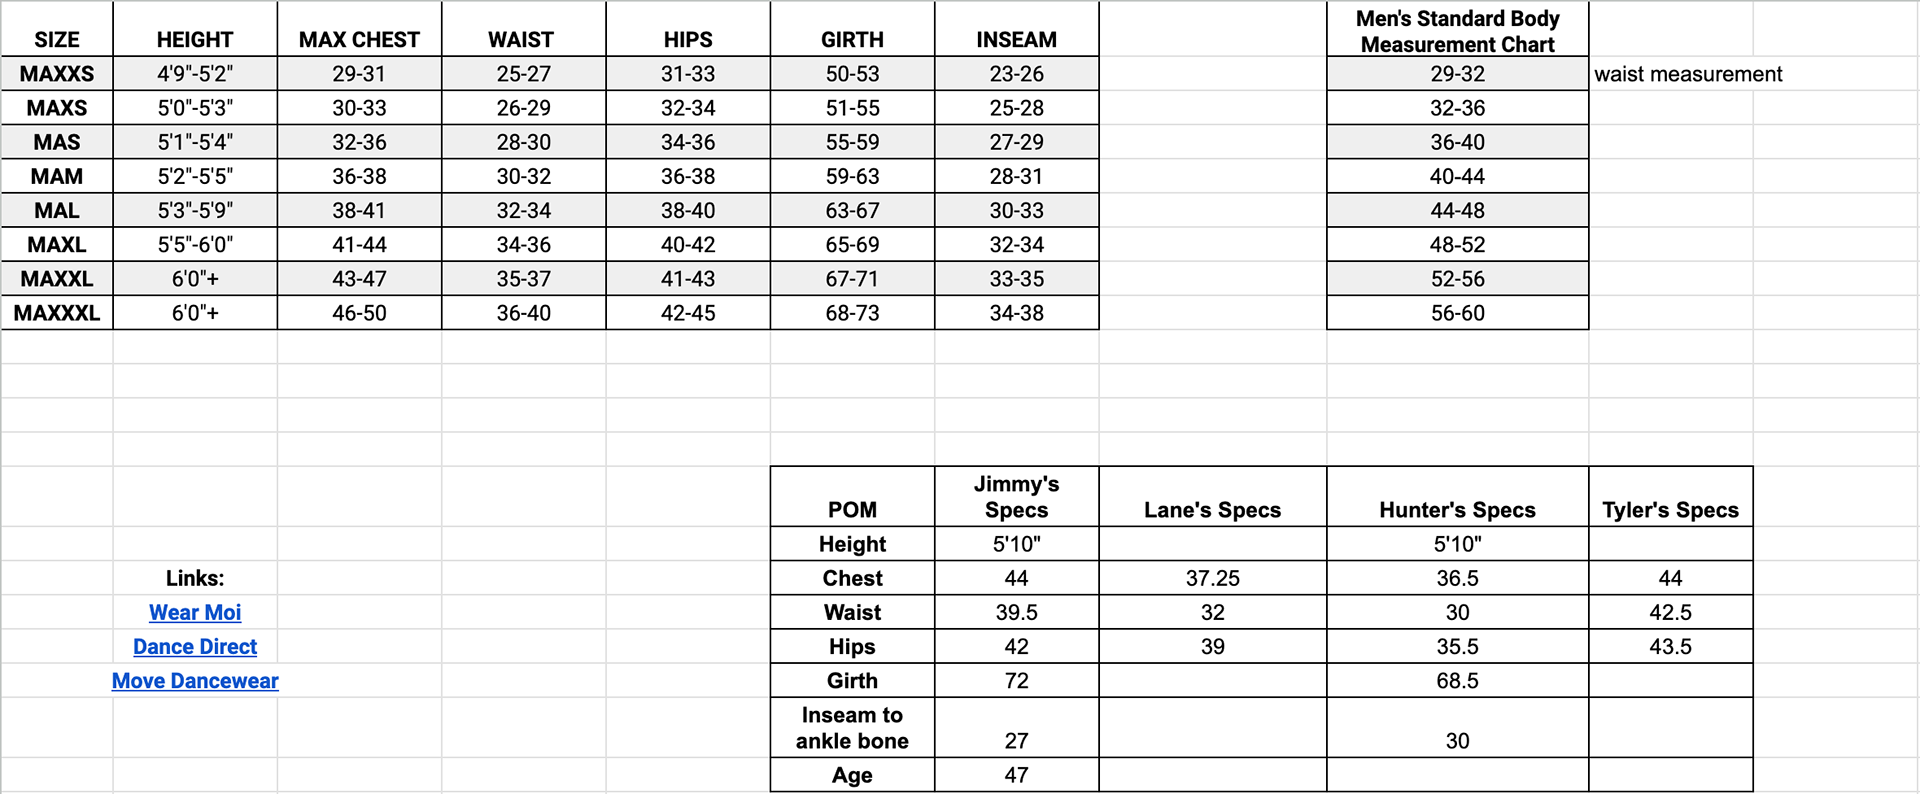
Internal adult size chart
A few customer's POM data
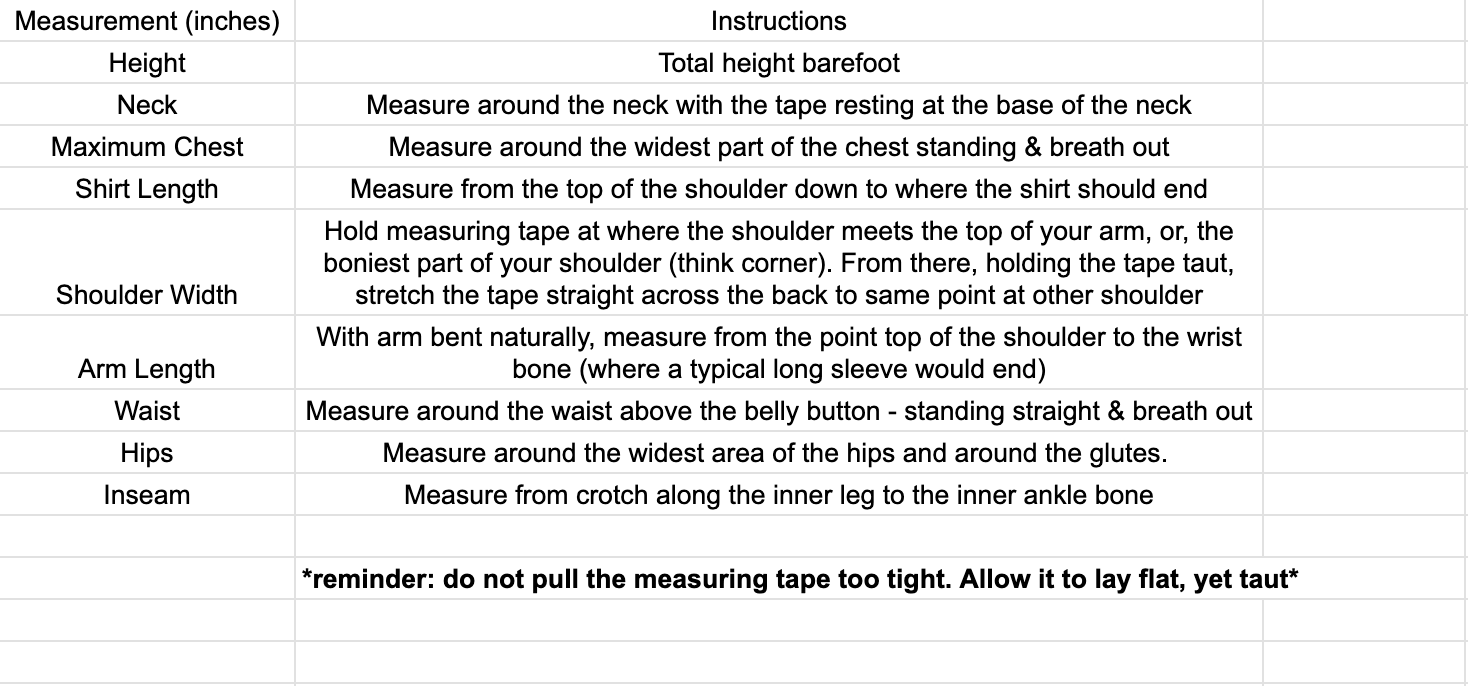
Measuring instructions given to dance studios
This is what I was working with. At the time our mens and boys size charts were internal, meaning we didn't have "official" size charts available to customers. We had a POM sheet that customers would fill out by taking measurements of their male dancers and sending it back to us. From these POMs, we approximated what size patterns to pull into AccuMark where they would be altered to fit. The whole process was incredibly inefficient and relied heavily on the people taking the measurements to be accurate, which they oftentimes were not. This caused many costumes to be returned, around 15% as opposed to our <1% return rate for our girls costumes.
To begin my overhaul, I combed through the POM data of our dancers and began grouping them together.
CONSOLIDATING & ANALYZING DATA:
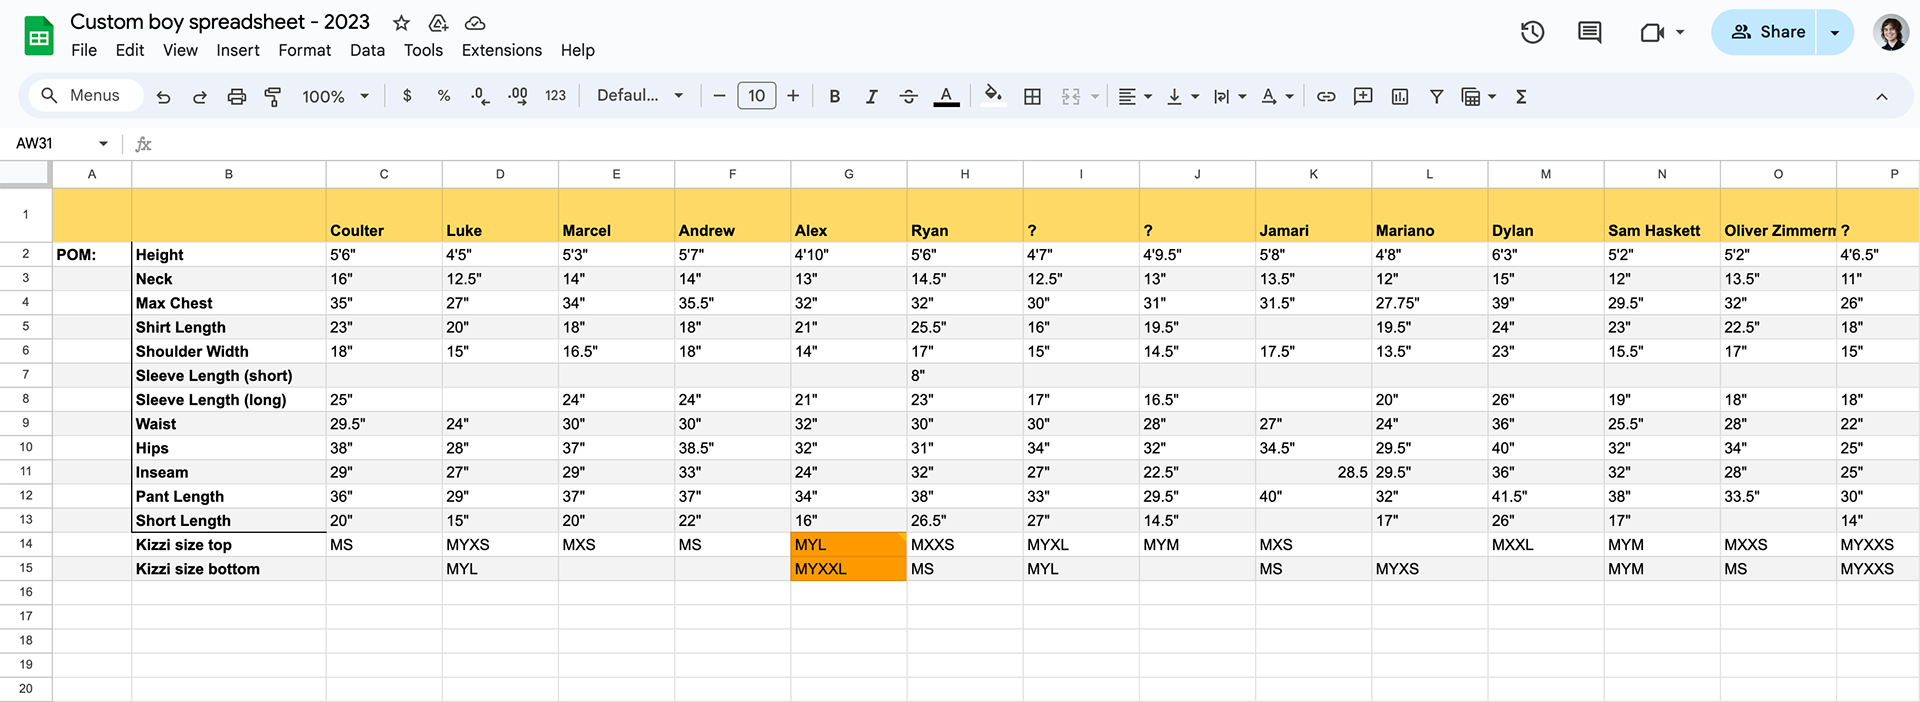
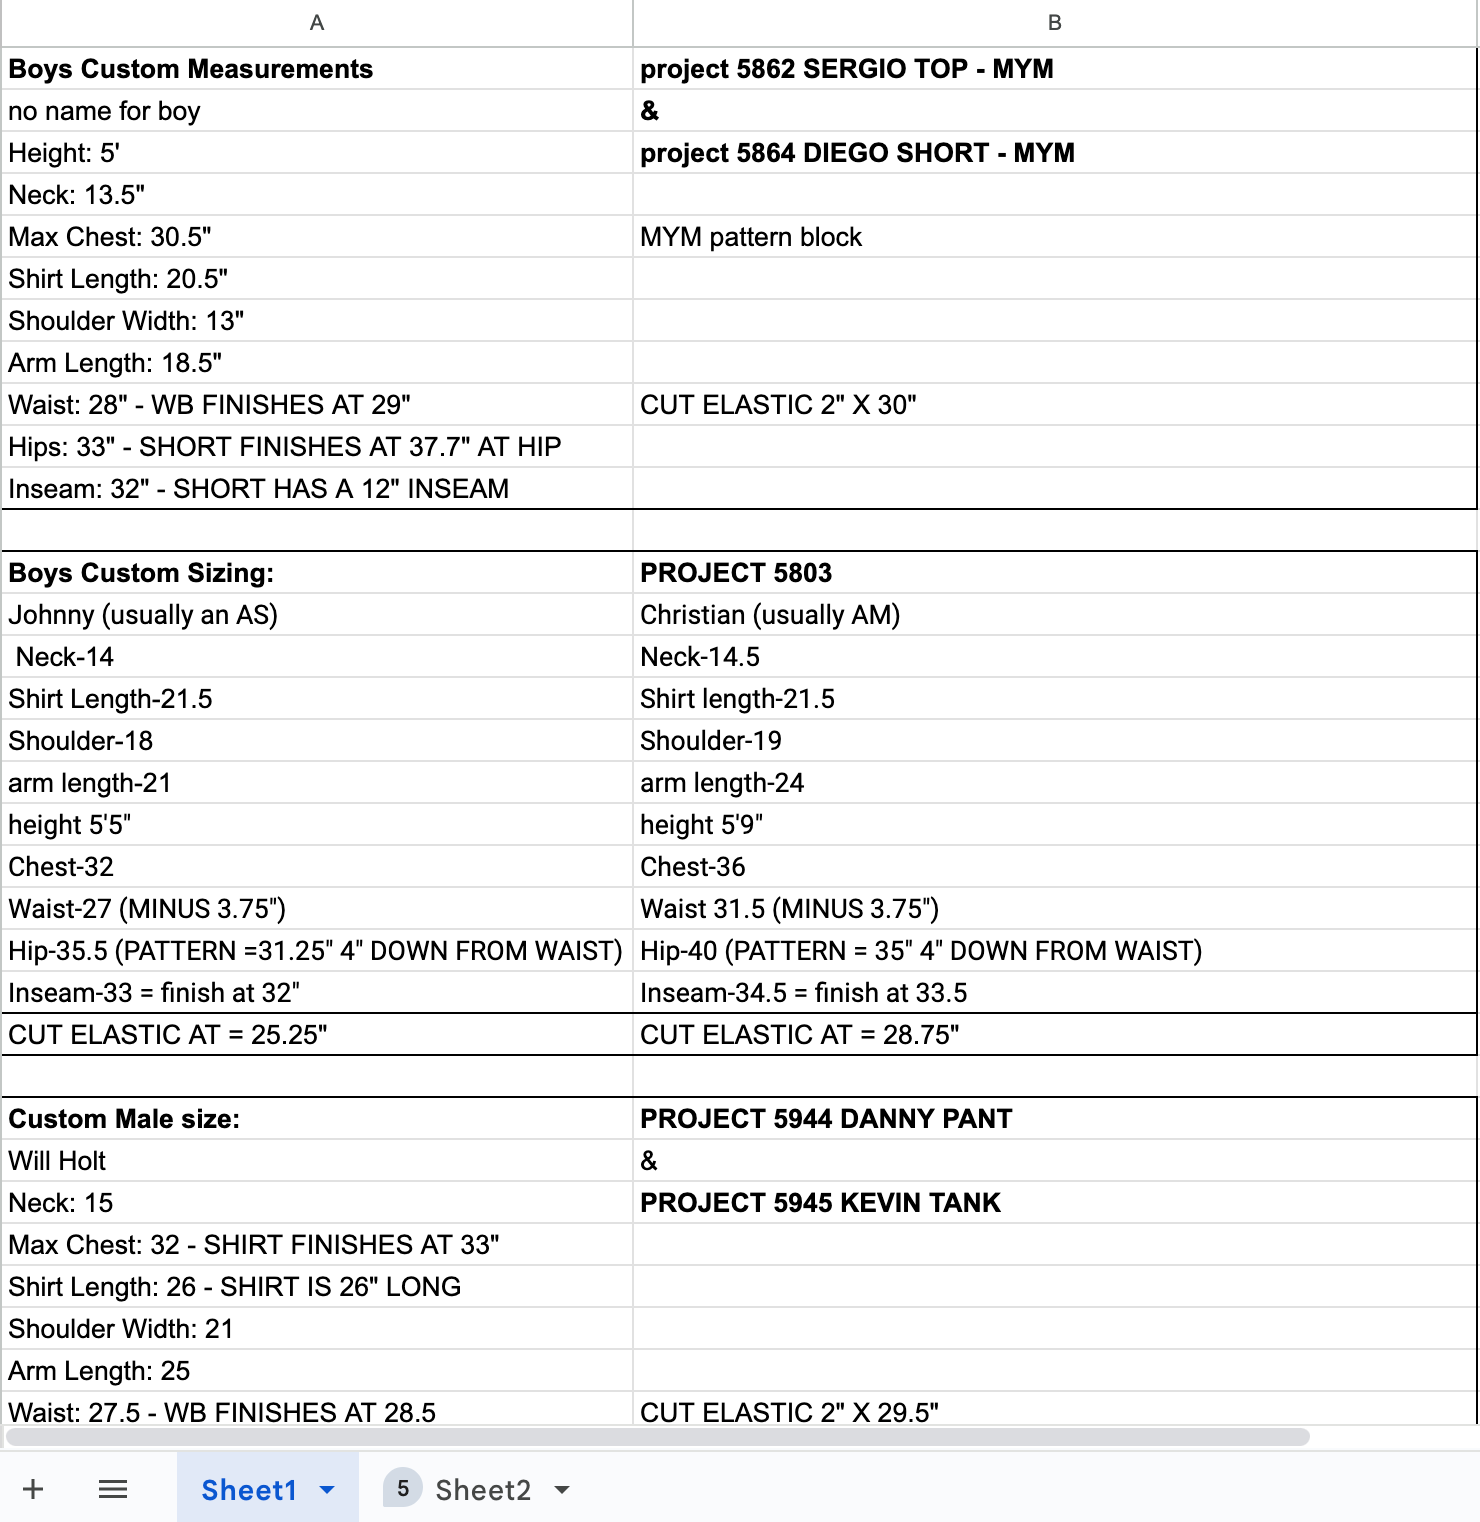
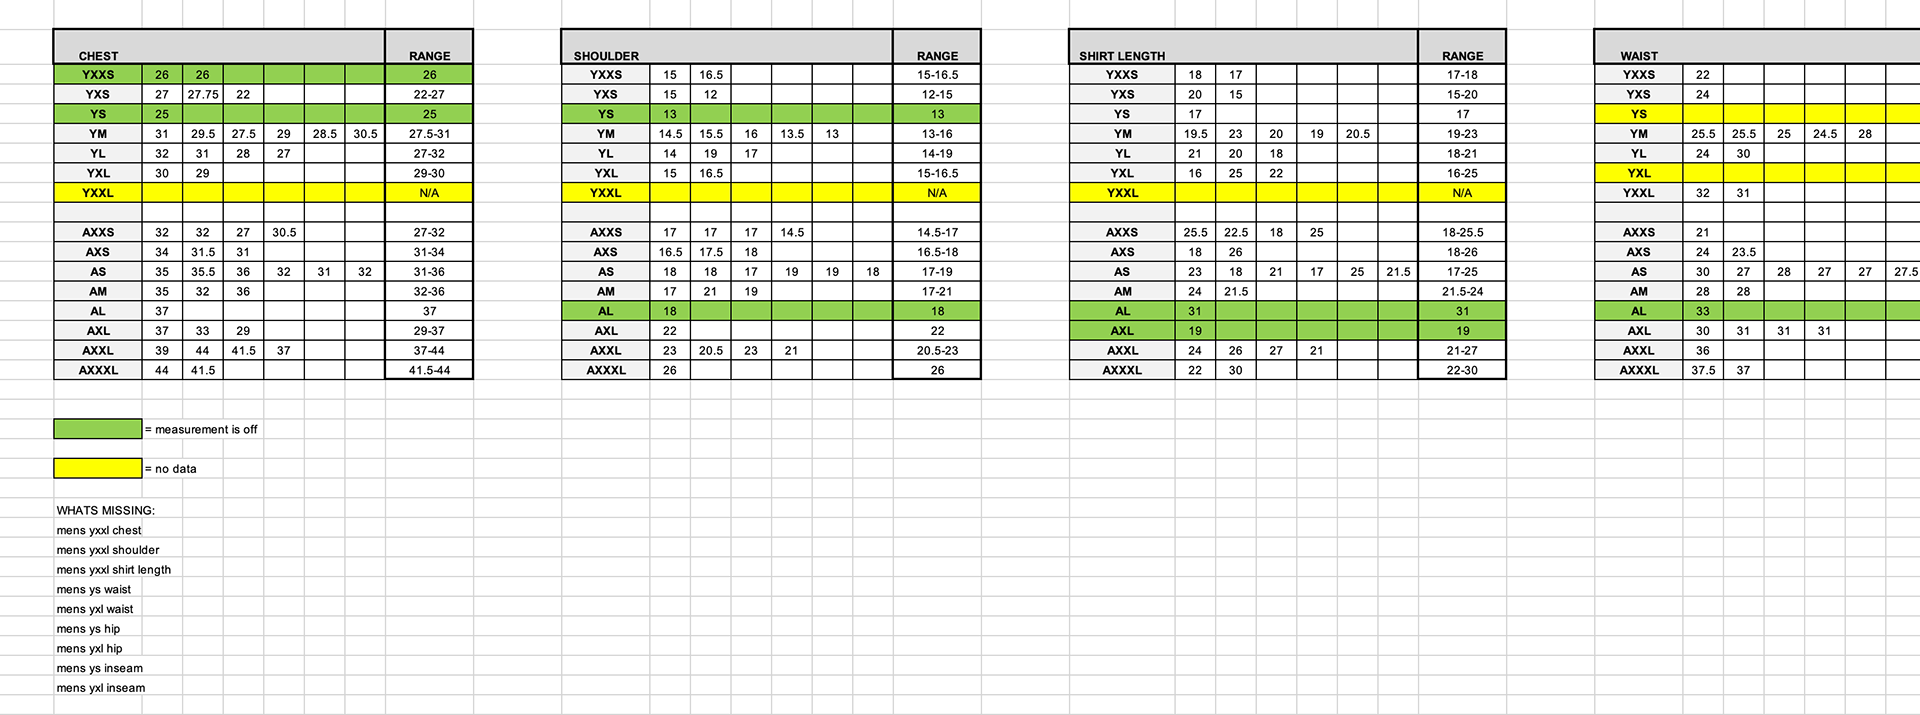
Initial data grouping
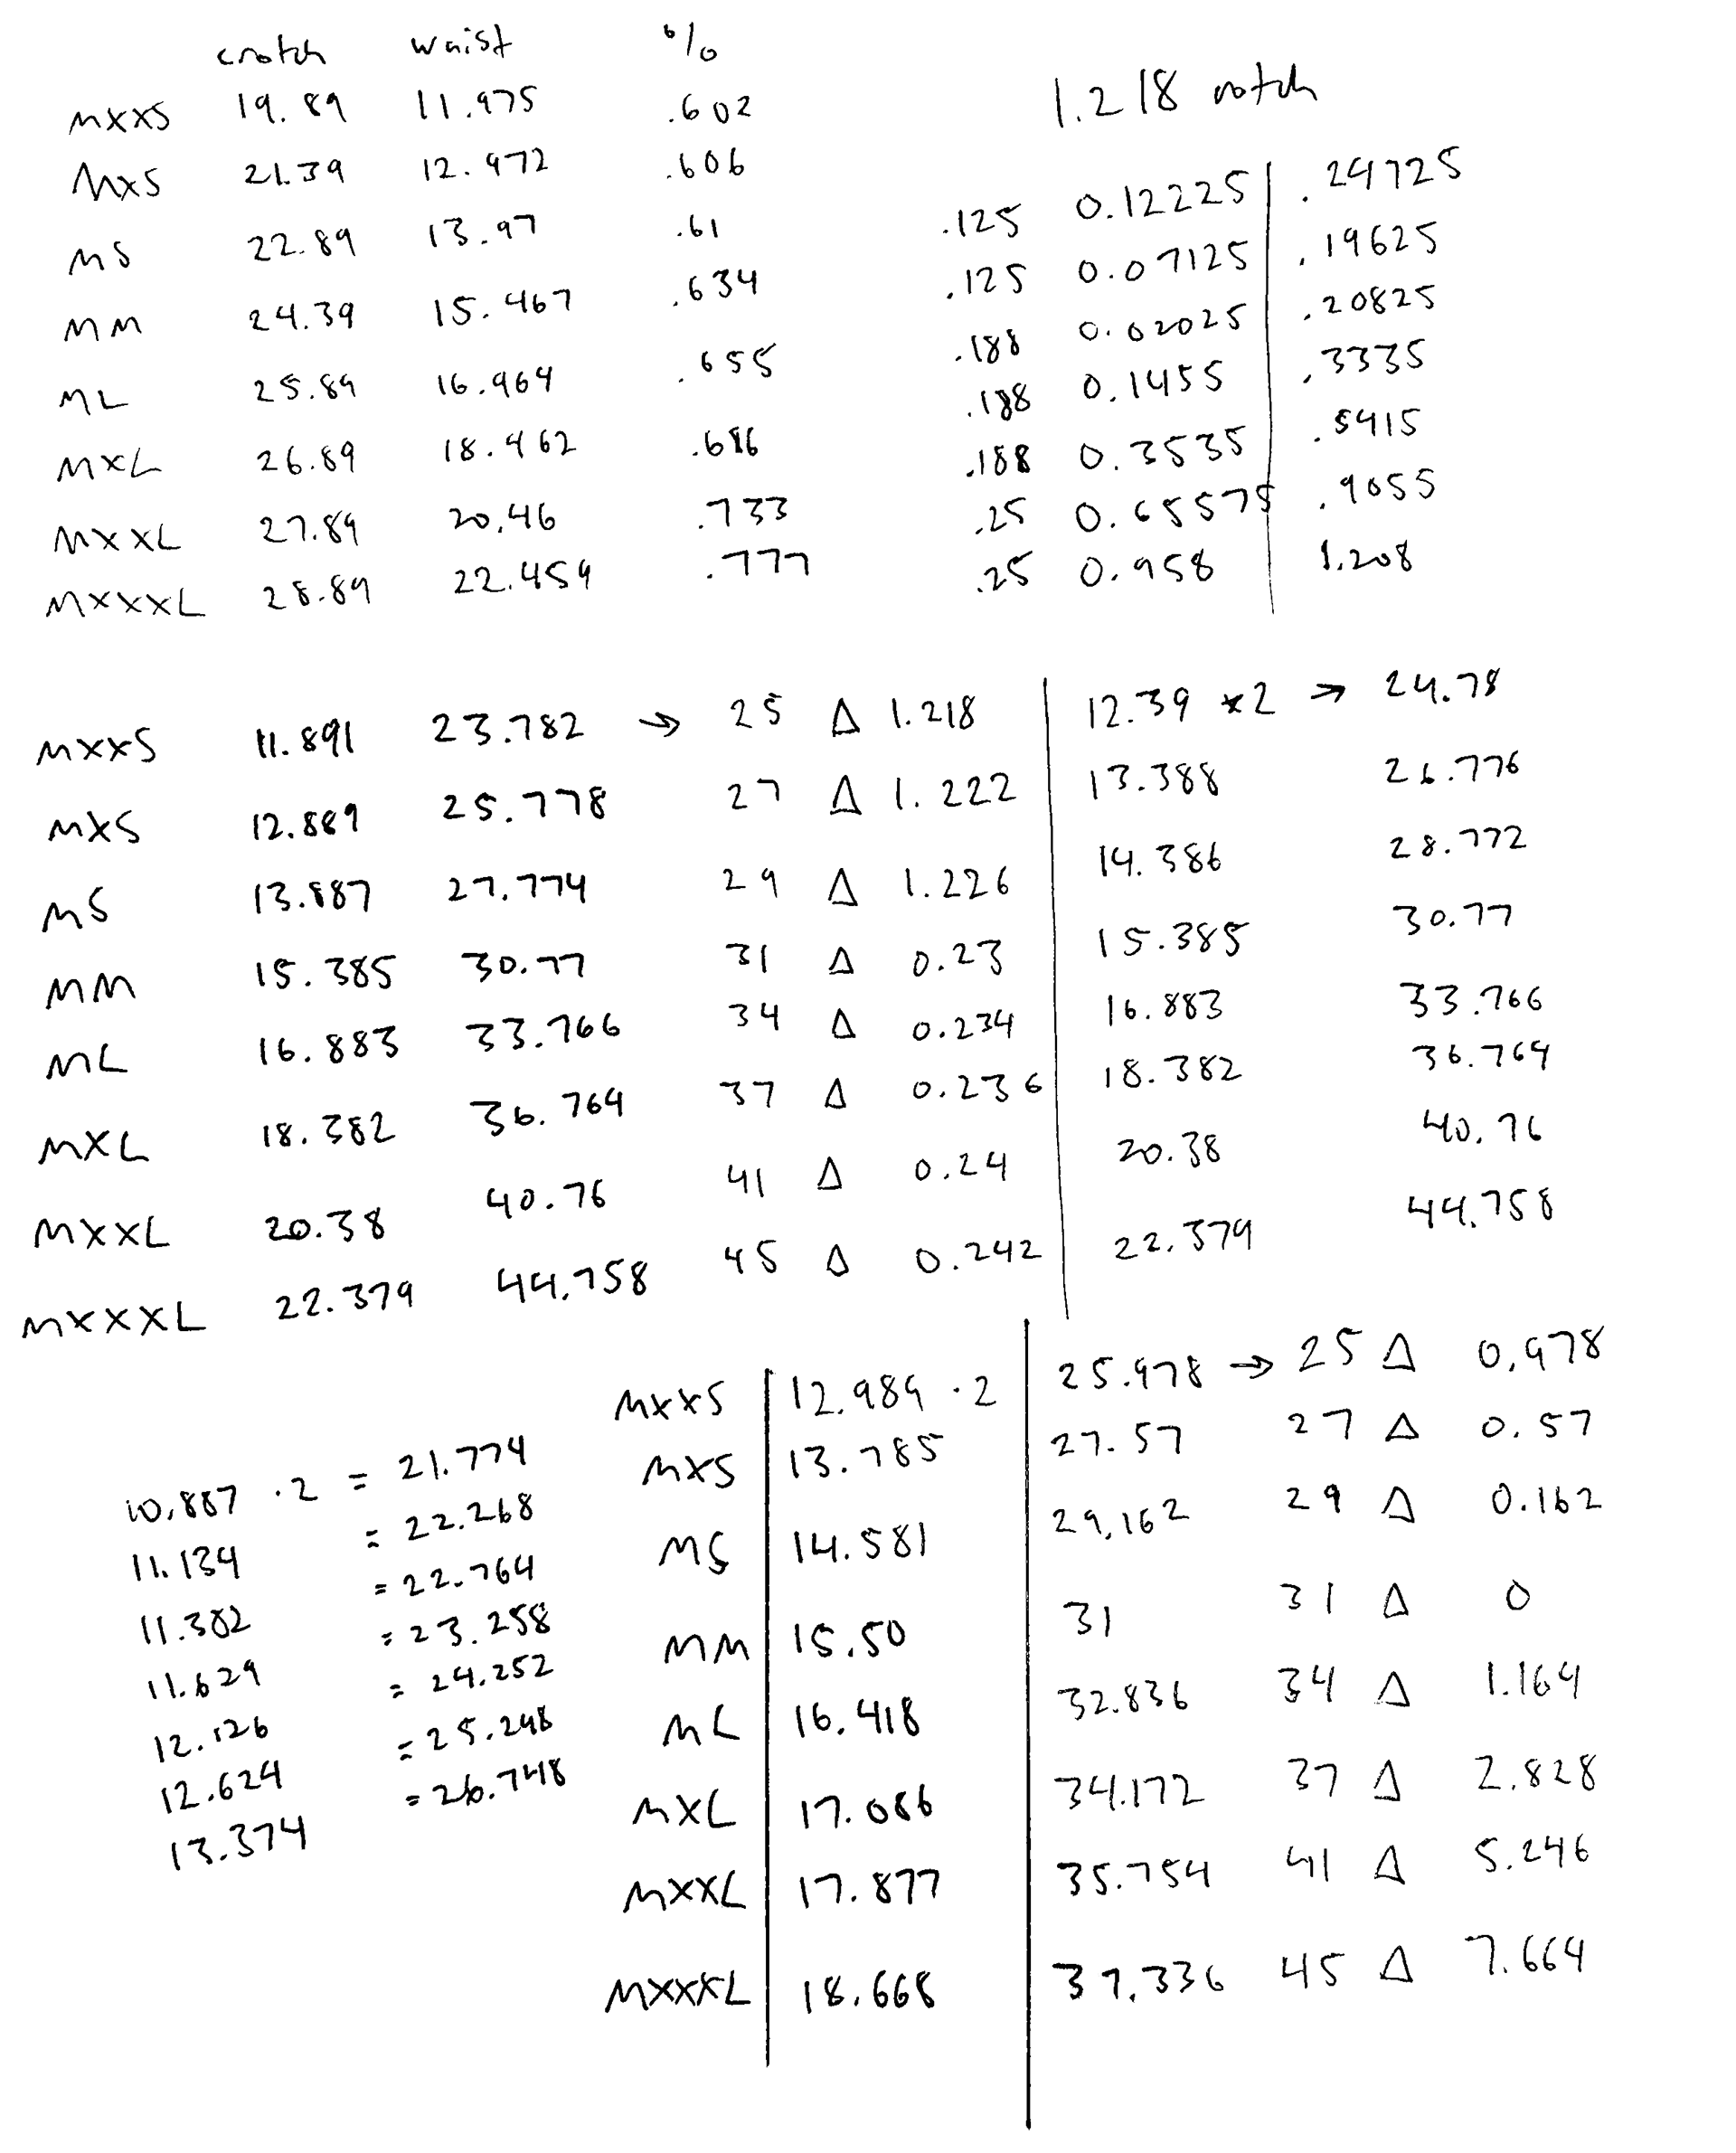
Scratch paper grouping
In total, we had measurements from 43 individual male dancers, ranging in age from 7 to 19. Many of these dancers were missing random POMs, leaving me with plenty of gaps in my data that needed to be filled. I sifted through their measurements and assigned each dancer a top and bottom size based on our internal guys size charts. After assigning them a size, I grouped all of each dancer based on their POM data into individual sizes. In these size charts, I then listed their measurements in order from smallest to largest to create a rough measurement range for each POM.

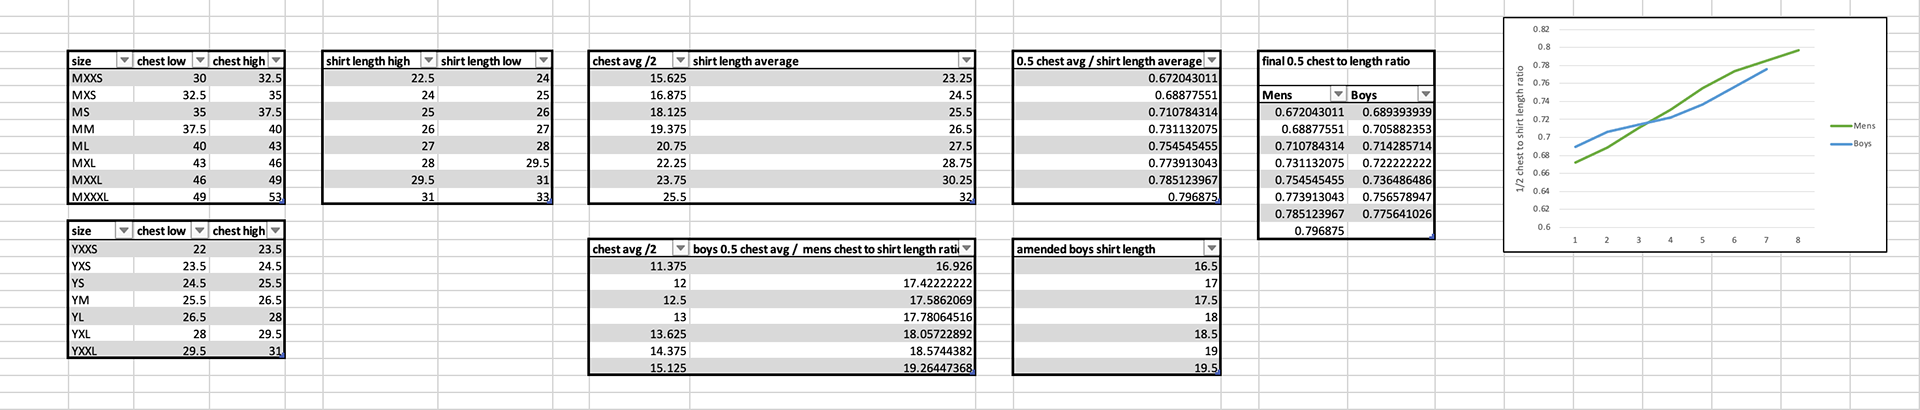
Using these rough ranges extrapolated from our data, I began to assemble the initial size charts. To give myself even more data to pull from, I cross referenced with the size charts of popular mens athletic and dancewear companies such as Nike and Adidas. One of the major issues with our old boys patterns was the awkward proportions; everything was too long and visually ill-fitting. I felt our mens patterns were better proportioned and looked much more balanced on the body. I wanted to ensure the way the mens and boys garments scaled between sizes was proportional between both size charts. To do this, I calculated the ratio between the men's max chest POM and the shirt length POM, then used these numbers to fill in some of the measurements that were missing from our boy's POM data. This resulted in boys garments that looked and felt much more refined, like some real time had been spent developing them even if historically they didn't constitute more than 2% of our total sales year to year. After a week or more of what felt like the hardest sudoku puzzle ever conceived, I arrived at my first draft of the youth and adult mens size charts.
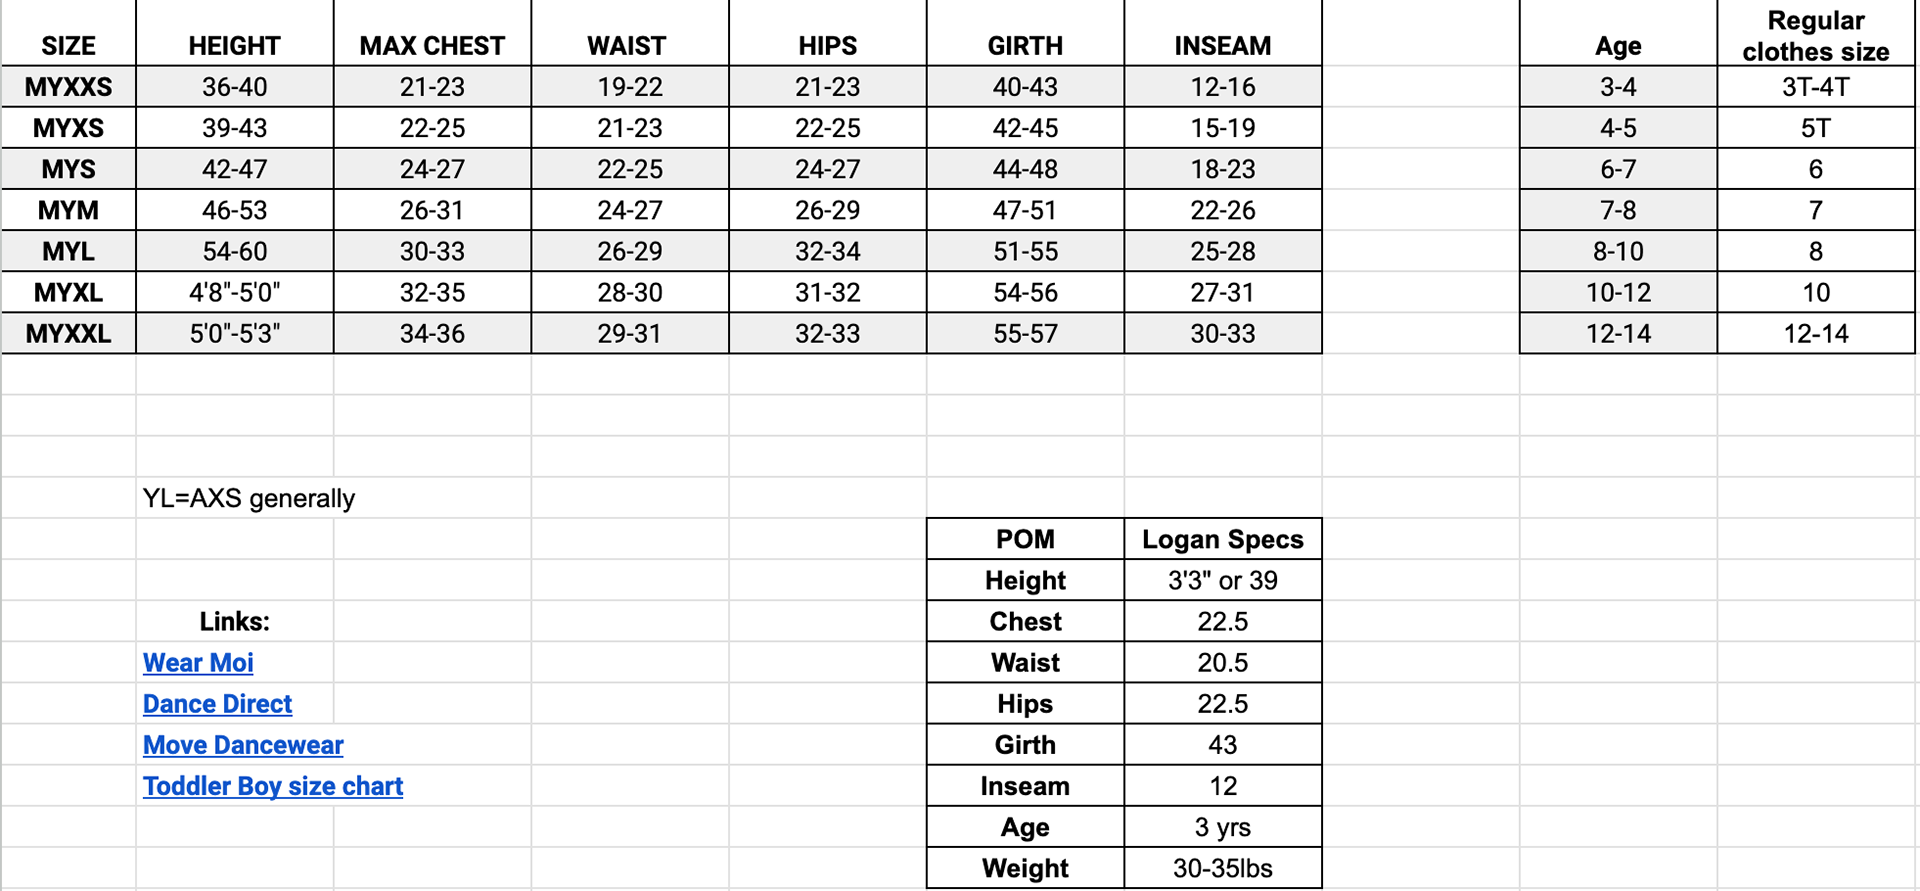
FINE-TUNING:
Final POM range chart
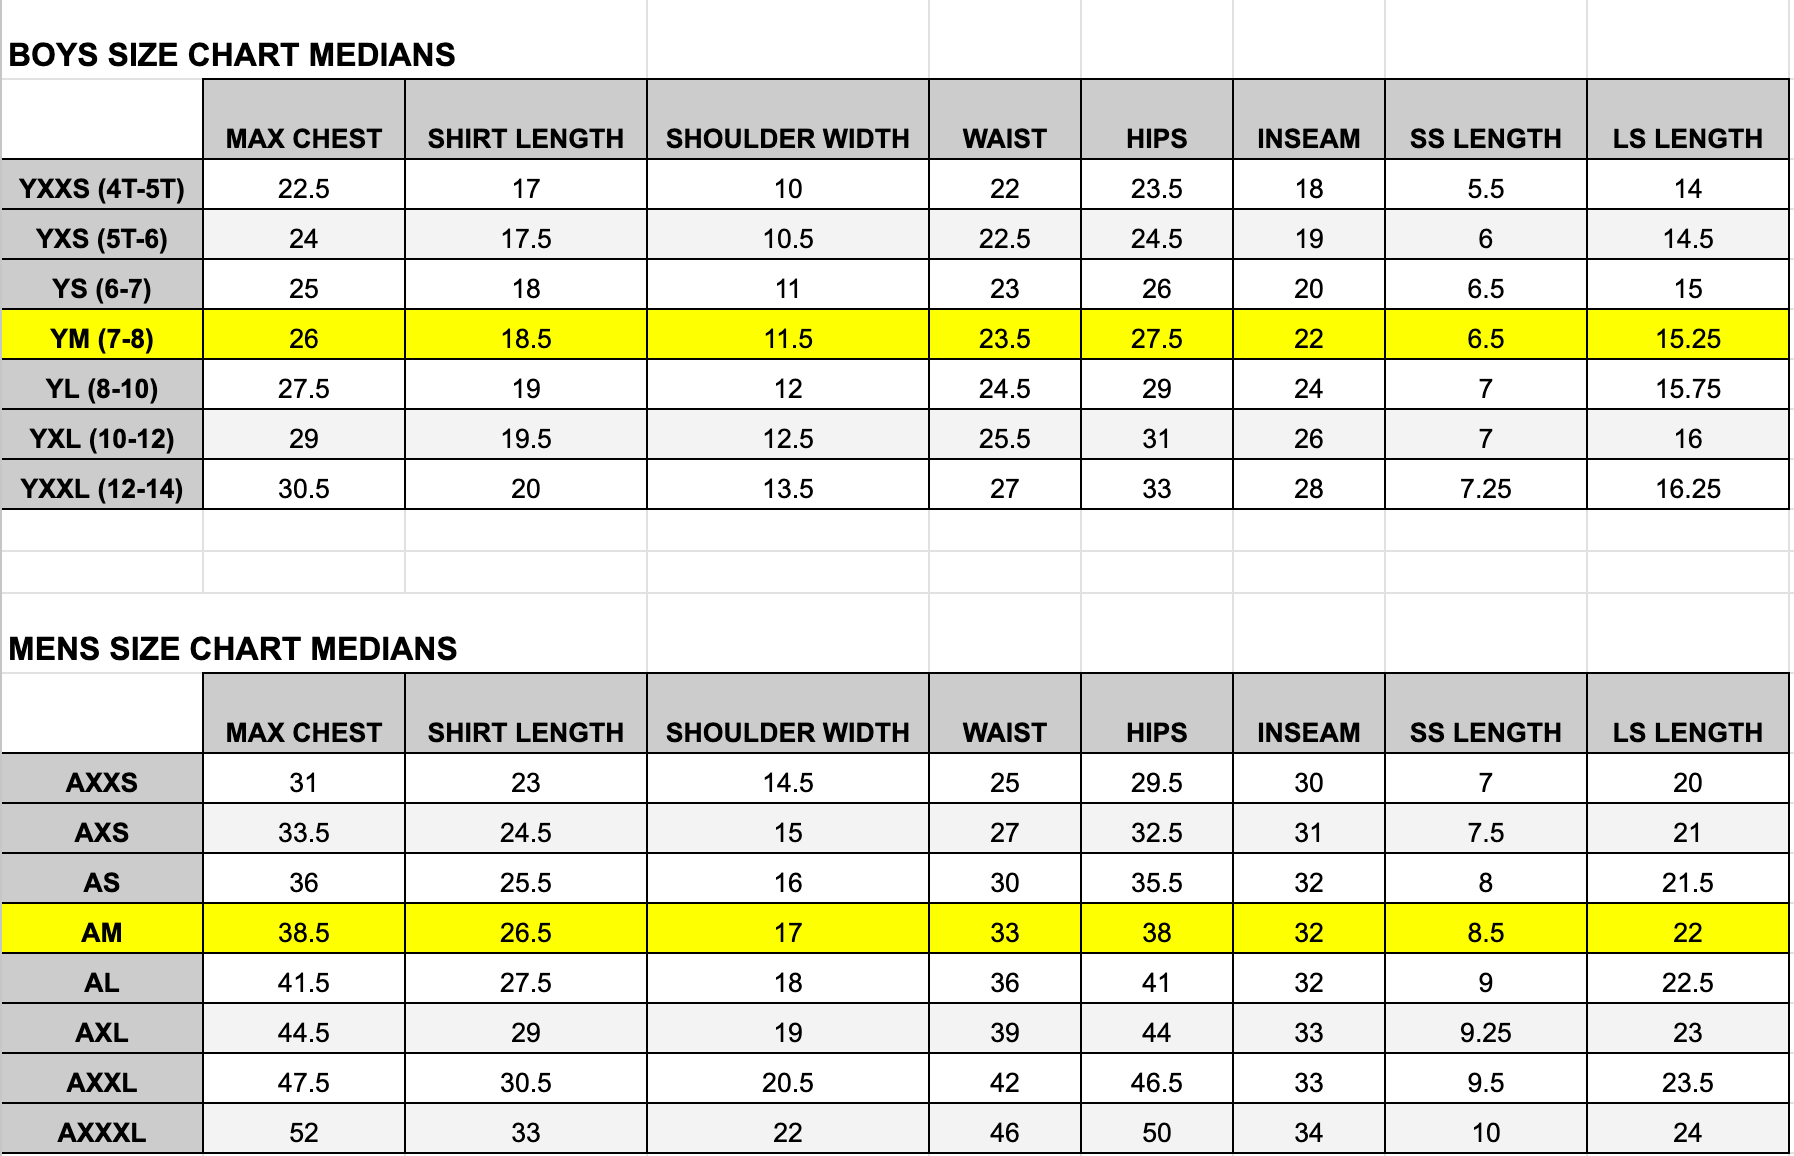
Final POM median chart
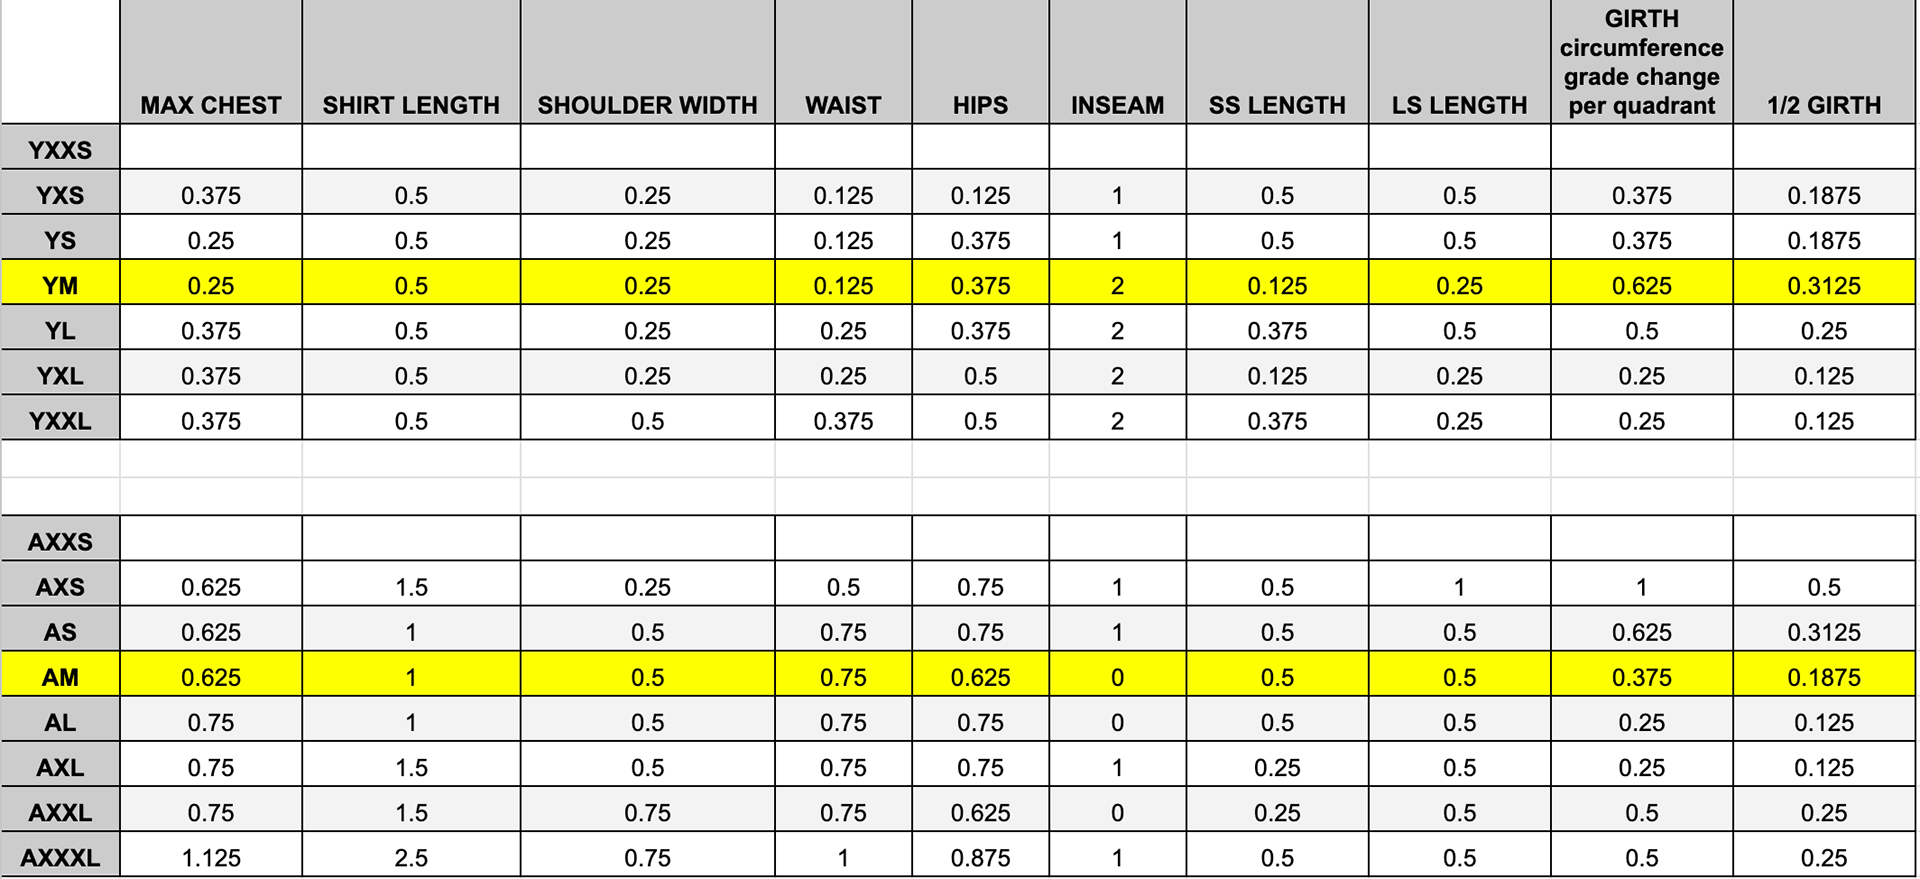
Final grading chart
I cleaned everything up and passed it along to the head patternmaker. She looked over the first draft charts and pointed out anything she thought could be improved upon based on her own knowledge working with these male dancers. After several revisions, she signed off on my charts and we began the arduous process of updating the base size patterns and grades of our entire men's catalogue to reflect the changes. To begin, I created a grading chart using the changes between POM medians from size to size; This helped to speed up the whole process considerably. We had a very limited selection for guys, only about 20 styles in total, but I had to alter the base-size patterns according to the new charts, then apply and fine-tune the grade for each individual size. Each guy's style had between 1-5 pattern pieces each, times 7 youth sizes and 8 adult sizes. All told, the total number of patterns I updated across all sizes is around 750.
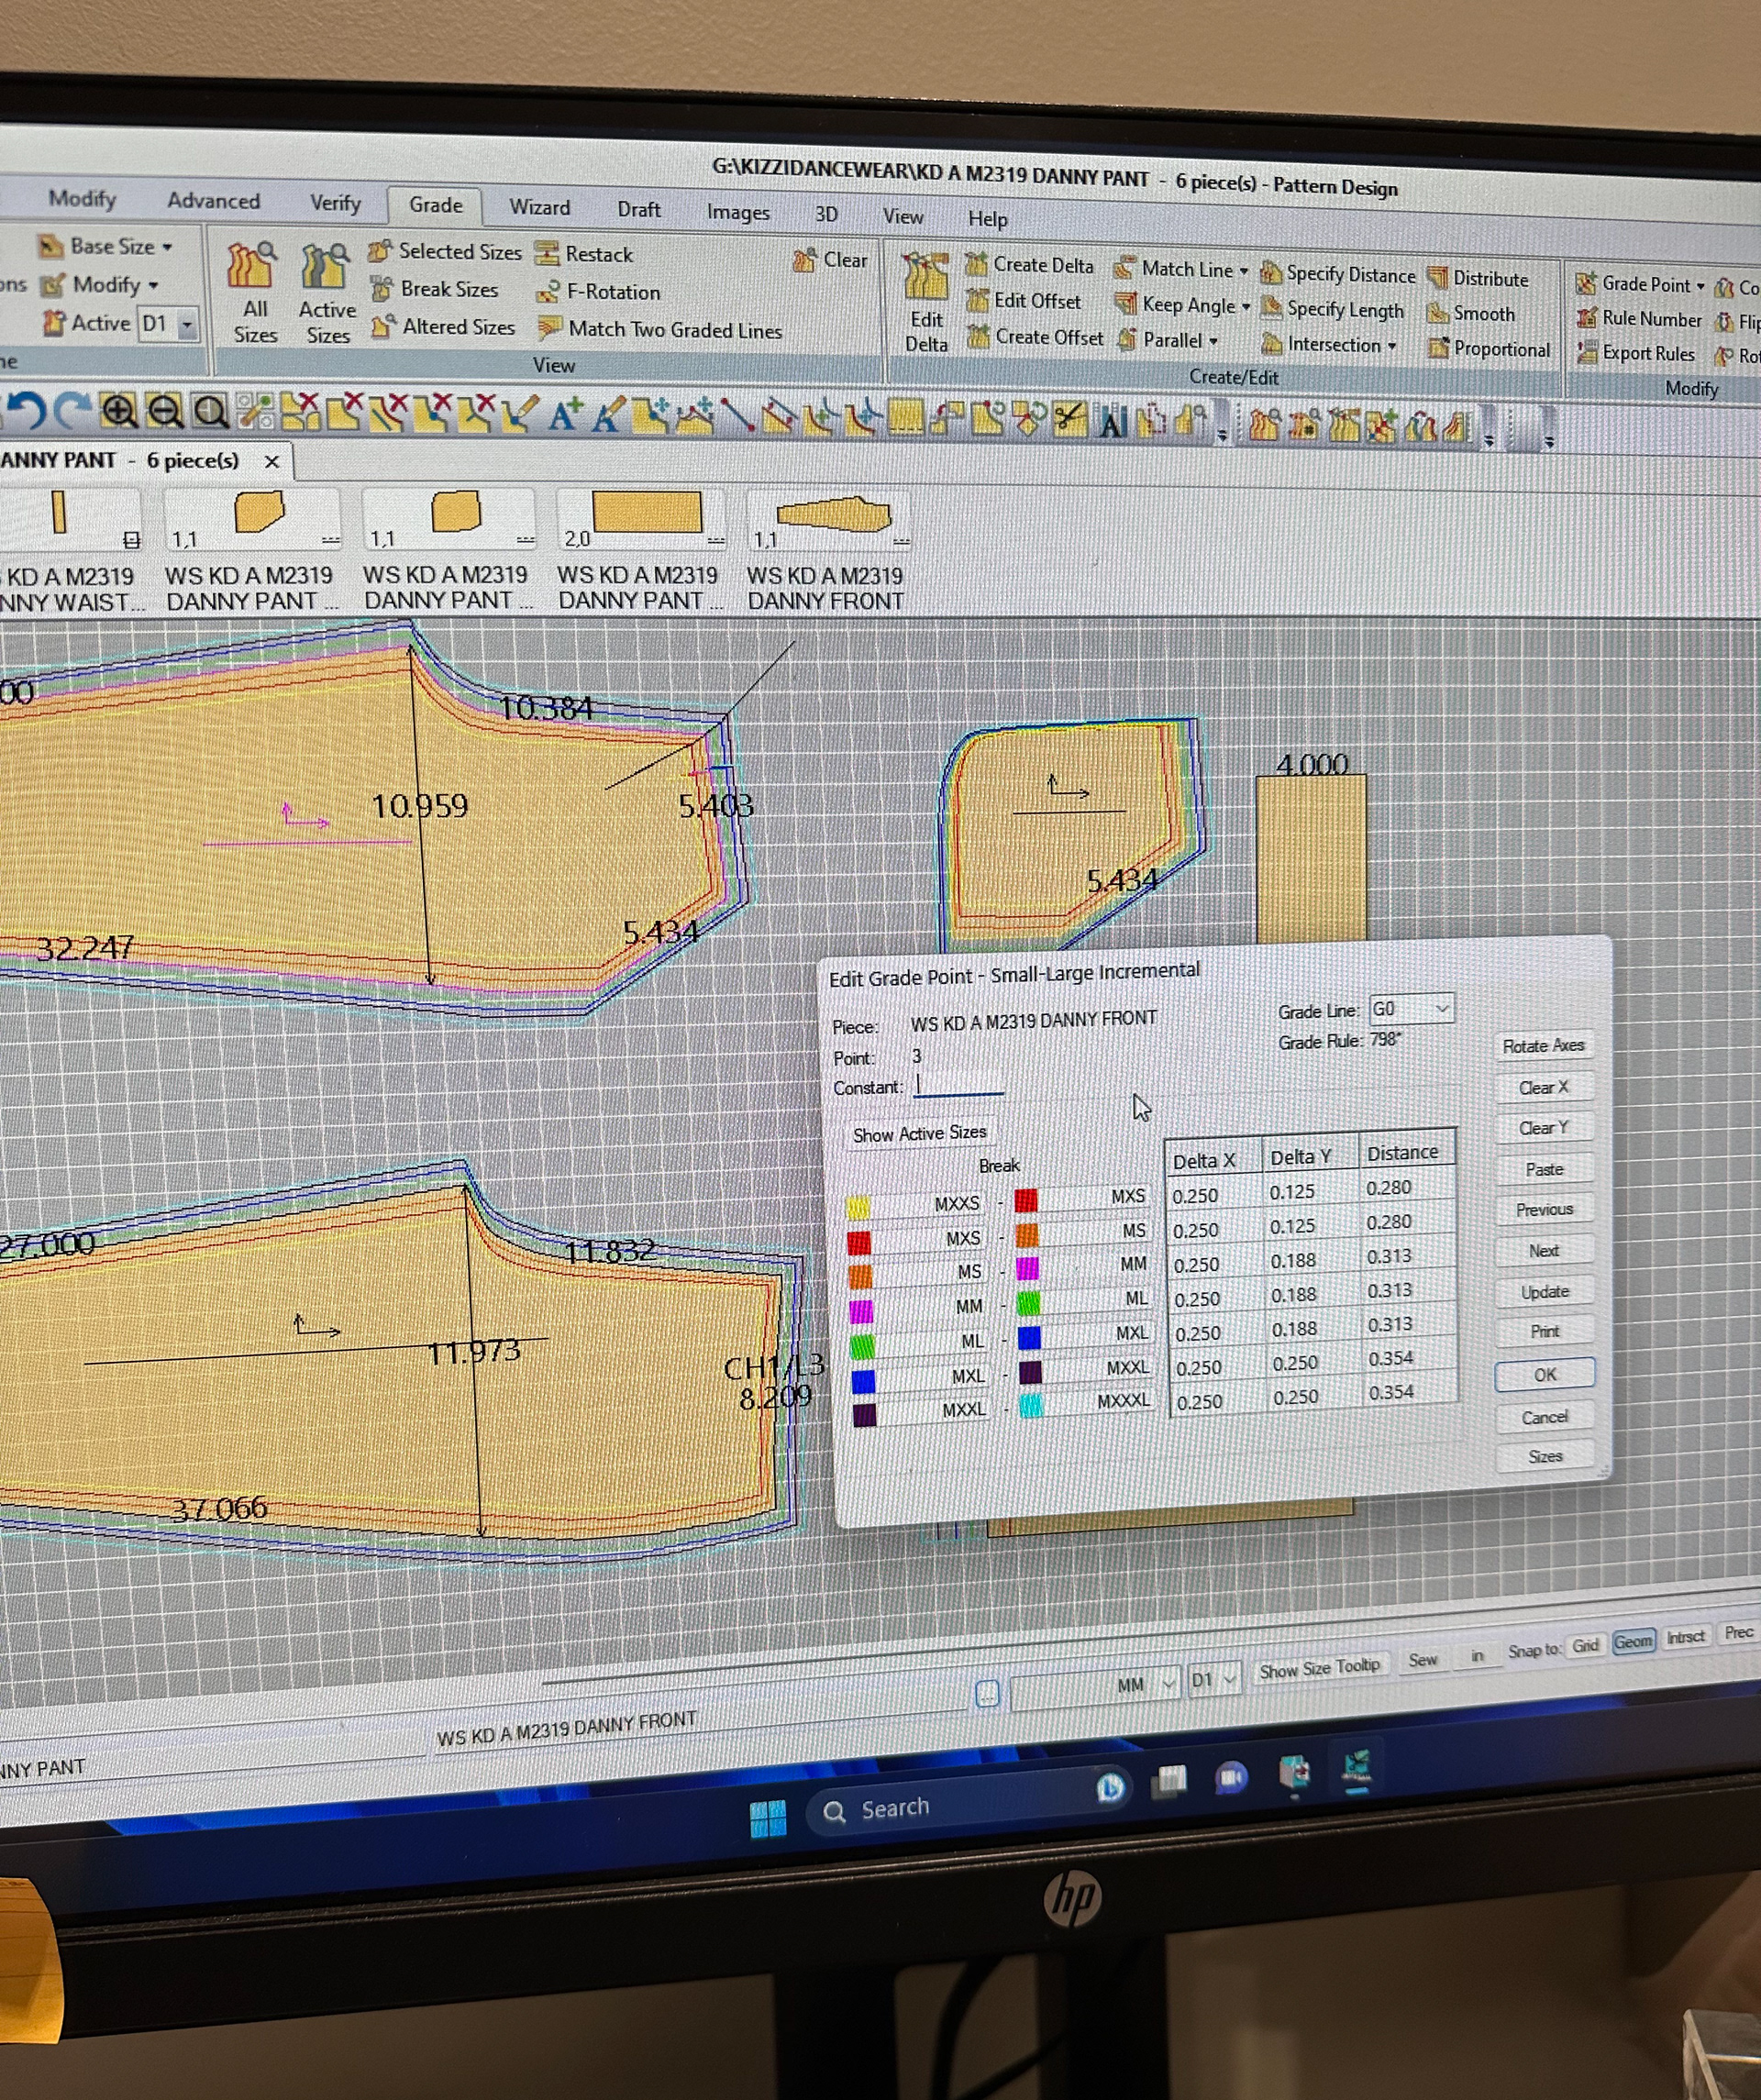
Quick snap updating base-size pattern and grade
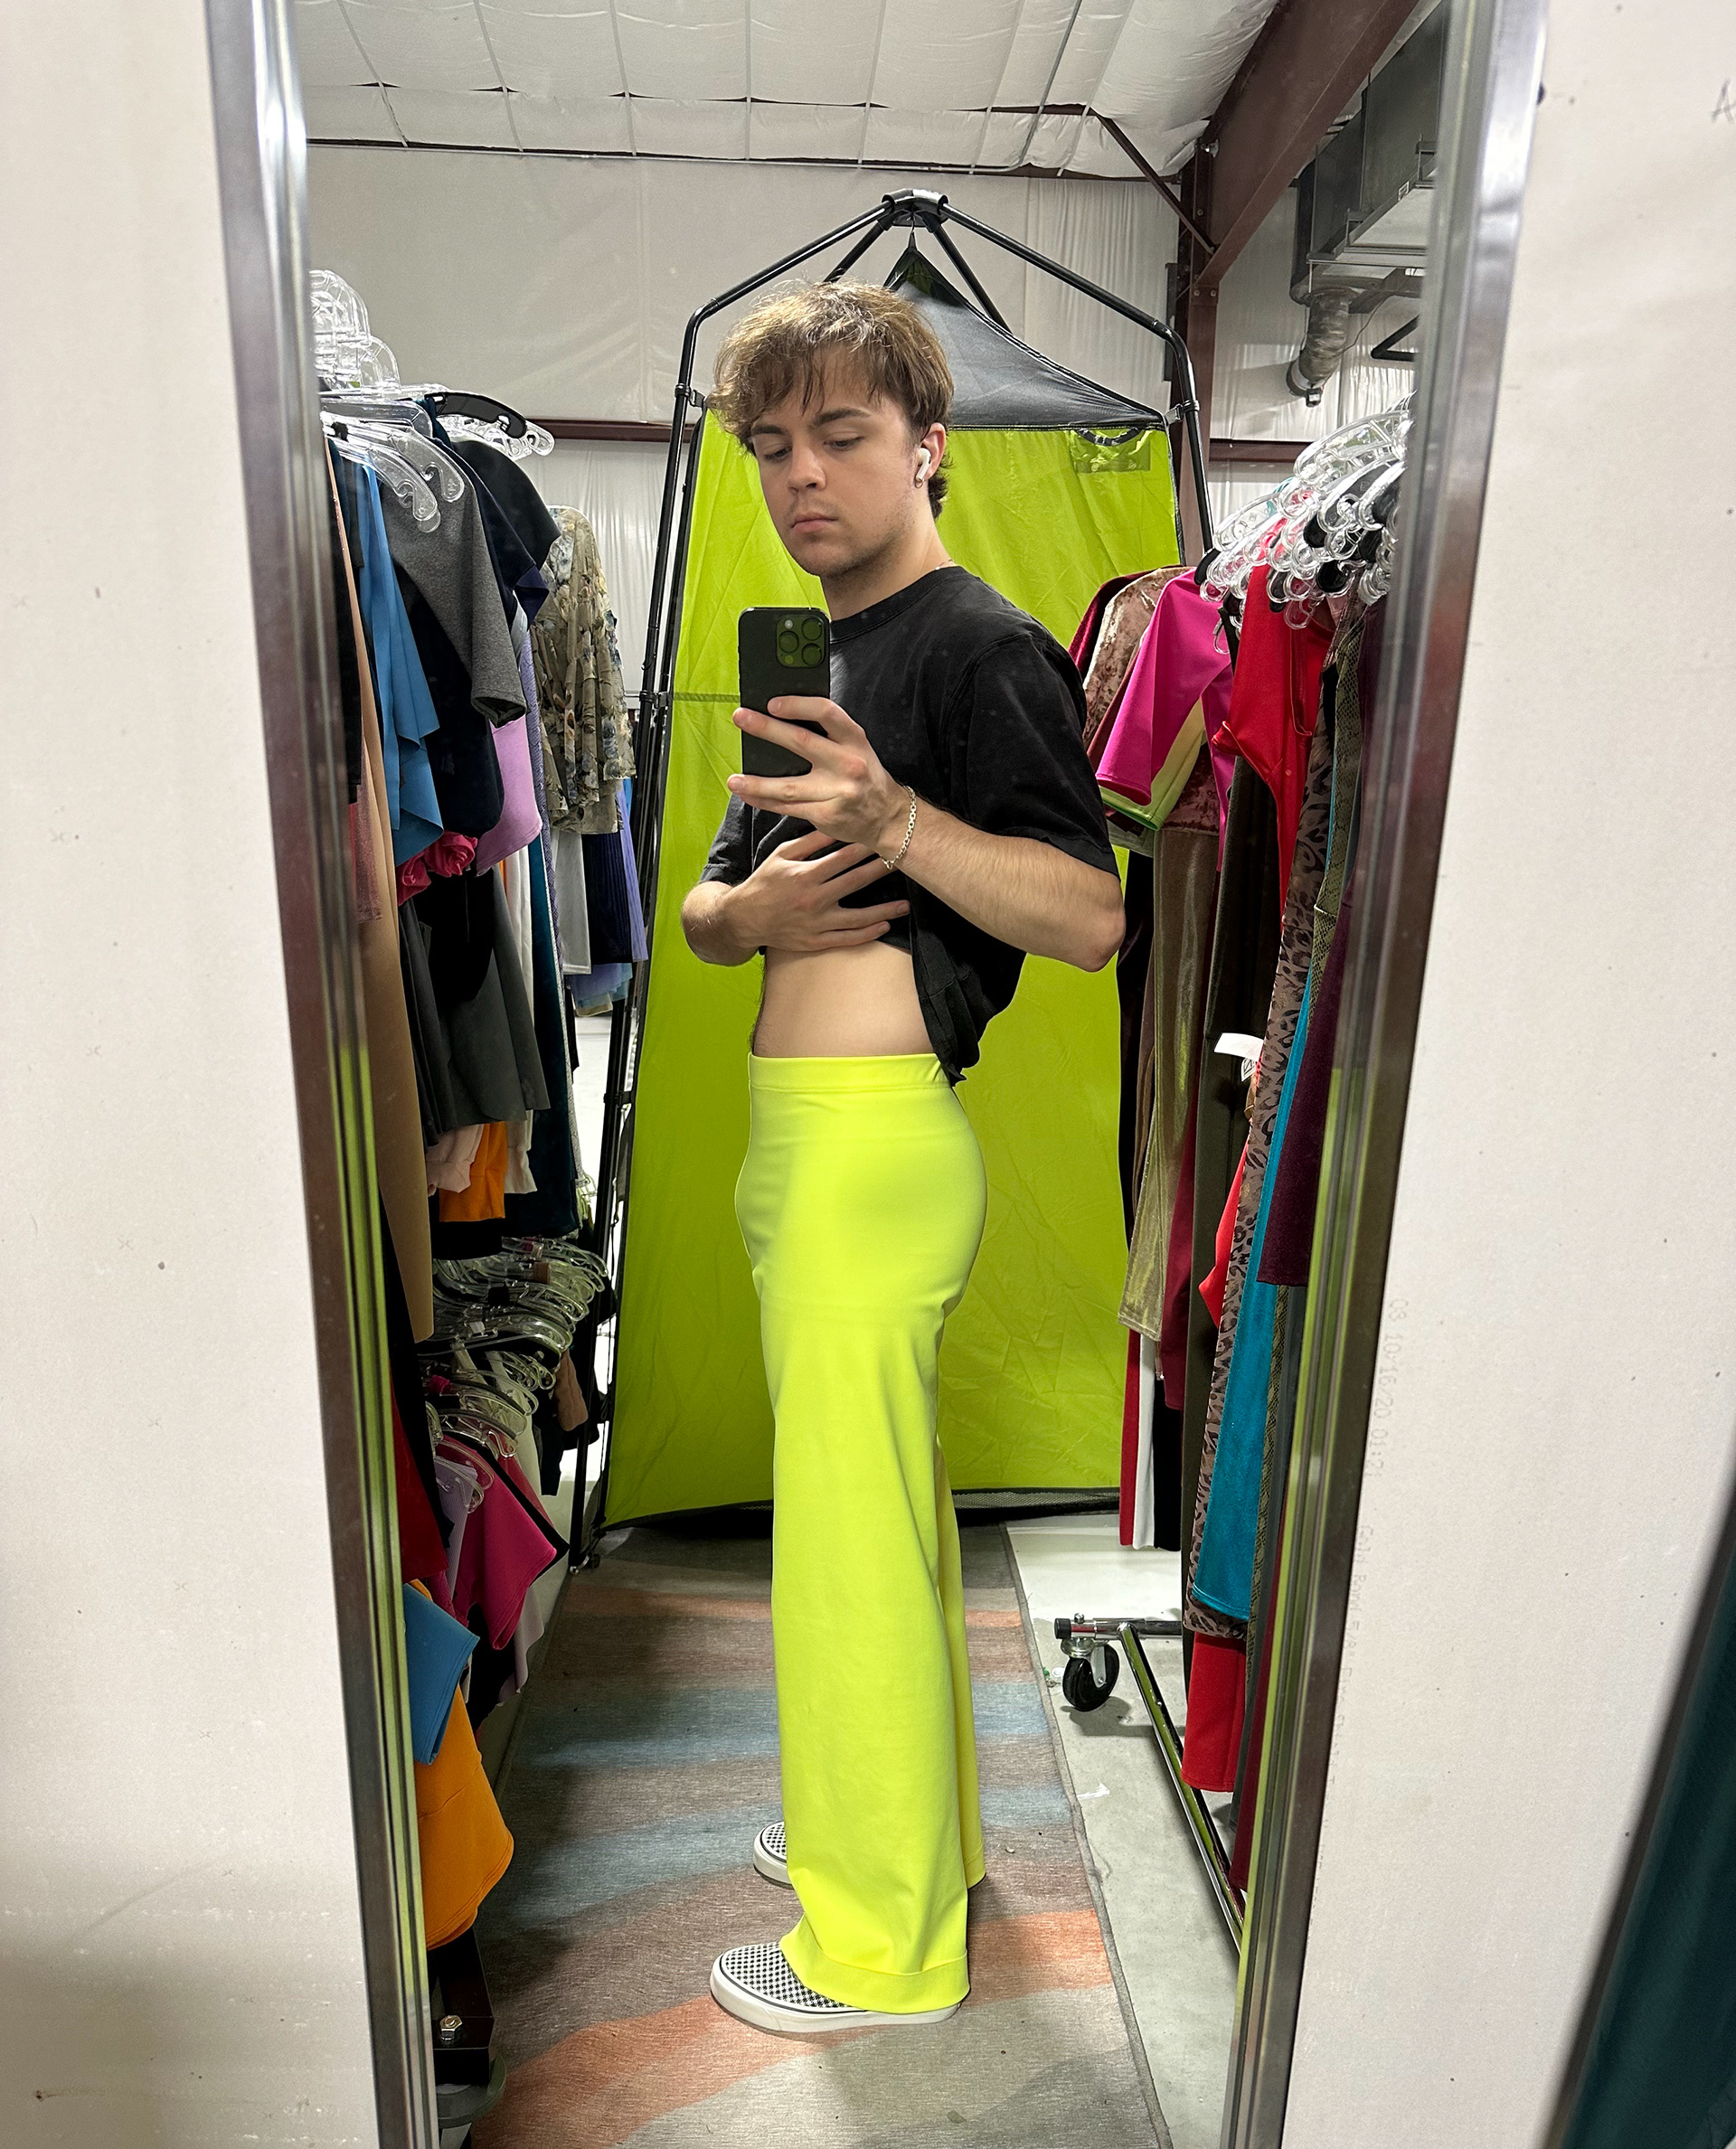
Test fitting of updated base-size on myself
This was obviously a huge undertaking for me. I was honored to be entrusted with such an important project for the company despite how little time I had spent as the associate patternmaker. I didn't know it at the time, but this project was given to me to gauge my readiness to take over as the new head patternmaker. The previous patternmaker who trained me was planning on leaving the company for several months, but didn't announce it until after this project was completed and presented to the CEO and CFO of KIZZI. This experience gave me, her, and our bosses confidence that I was a suitable replacement for the position.
RESULTS & CONCLUSION:
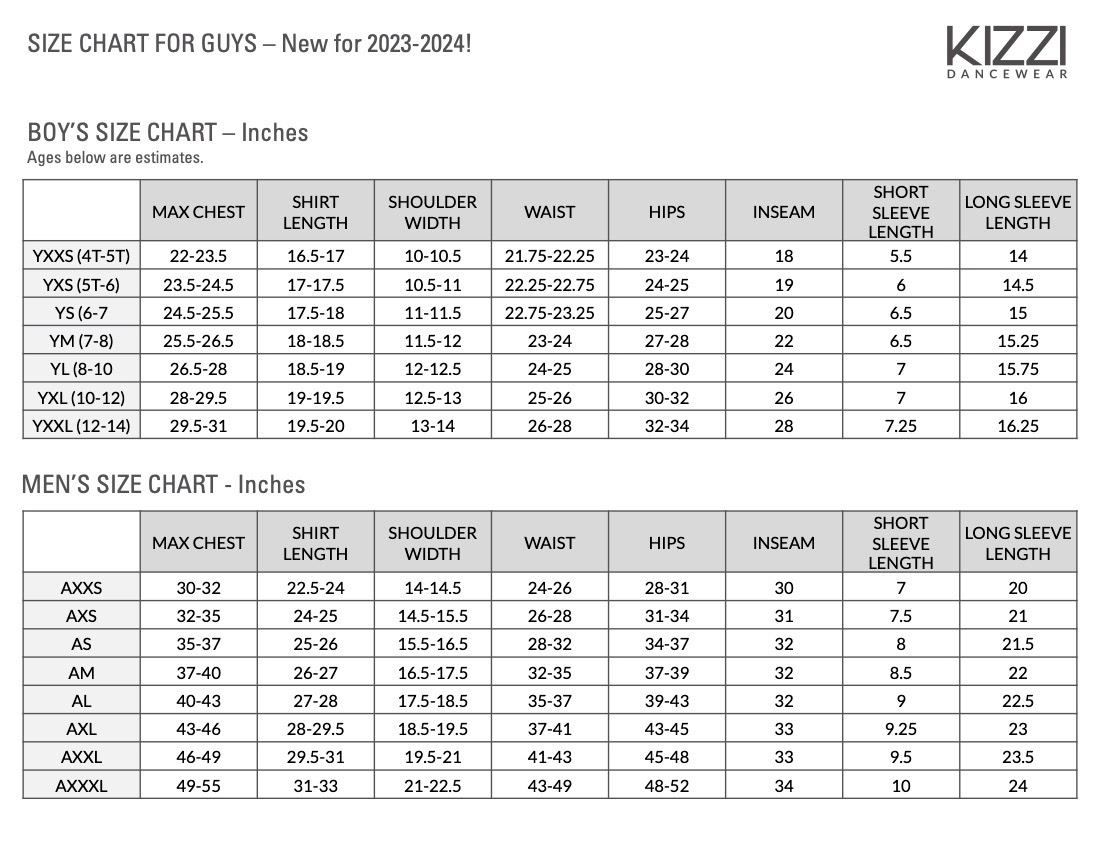
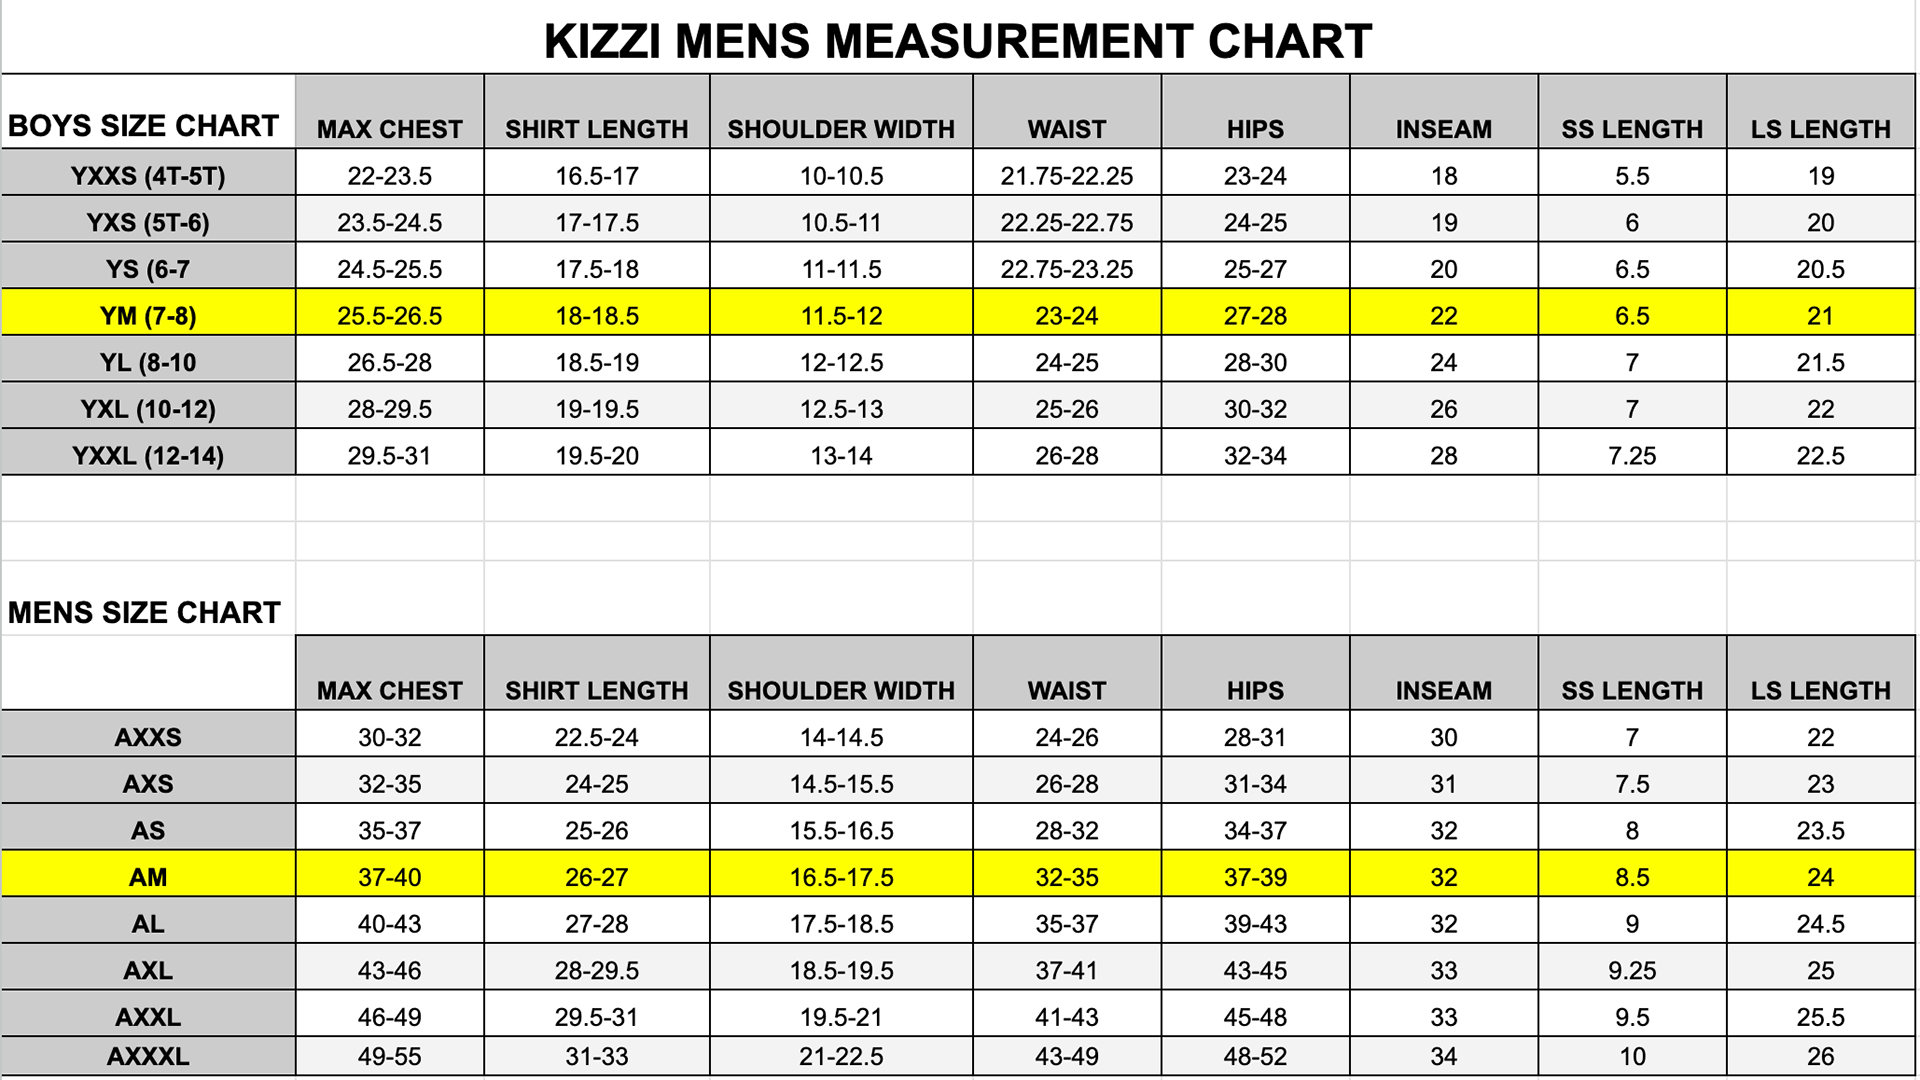
Official size charts offered to customers
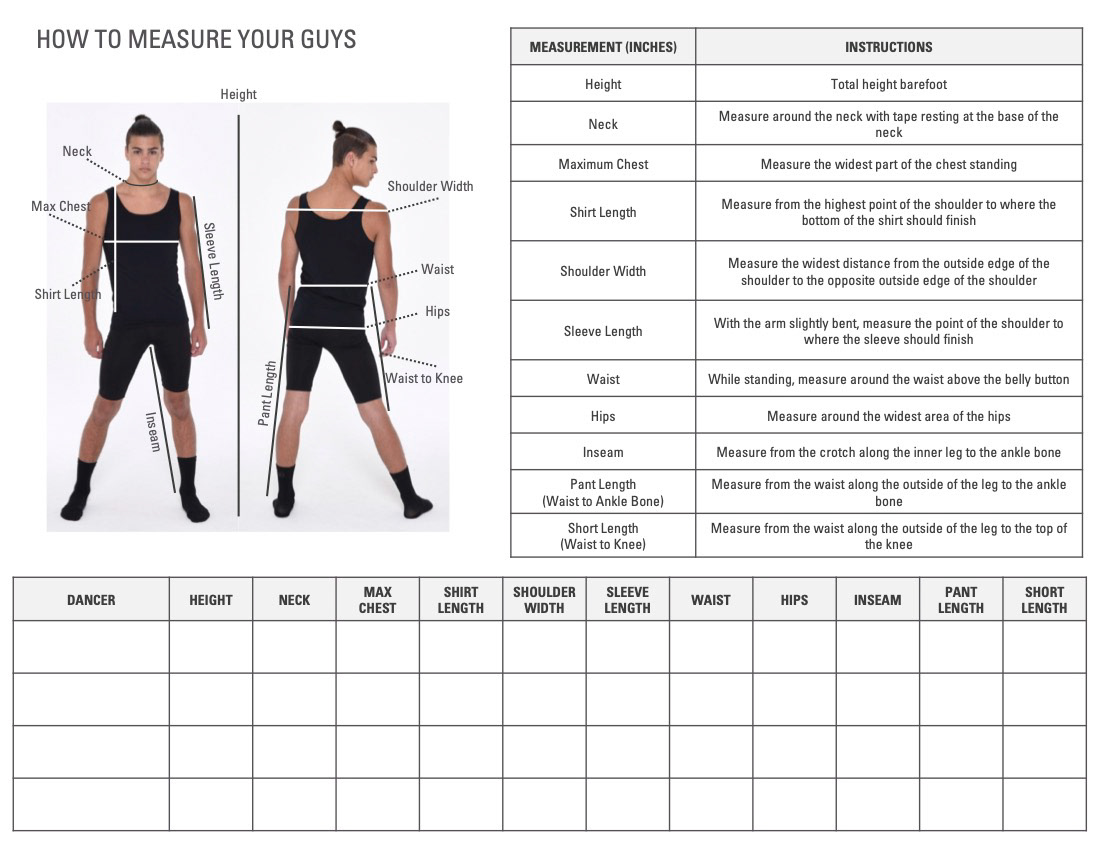
Improved POM sheet
My new standardized mens and boys size charts resulted in ZERO returns during the 2023/2024 season, totalling several thousand dollars saved in labor and shipping costs alone. The difference between this season's 4 custom-size orders and the previous season's 30+ custom-size orders is night and day. To date this is the largest project I have ever led, and serves as a constant reminder of my skillset as a technical designer and patternmaker and my ability to translate these skills into real-life results for my employers.
TALIA LEO
This was one of the more difficult styles to pattern and grade due to the twisting panels on the front of the body which had to be both supportive and visually balanced. The twists required me to think in 3D, each revision to front needed to be flipped and mirrored. Getting all these pieces to do what I needed them to do on a body was only half the challenge, as I then needed to grade them after the final sample was approved in the fitting. Initially I applied our basic grade to the most important POMs like the chest, hips, waist, and girth. Just by looking I could tell that this was not going to work, and the largest of the three twisting panels was the most crucial piece of the puzzle as we wanted to avoid any wardrobe malfunctions. Through a long process of picking and choosing from the grades of similar styles and applying a proportional grading technique, everything was finally fitting together. Of the over 60 regular and 3 custom-sized Talia Leos sold, we didn't have a single return. This was by far our most successful new style for the 2023/2024 season.
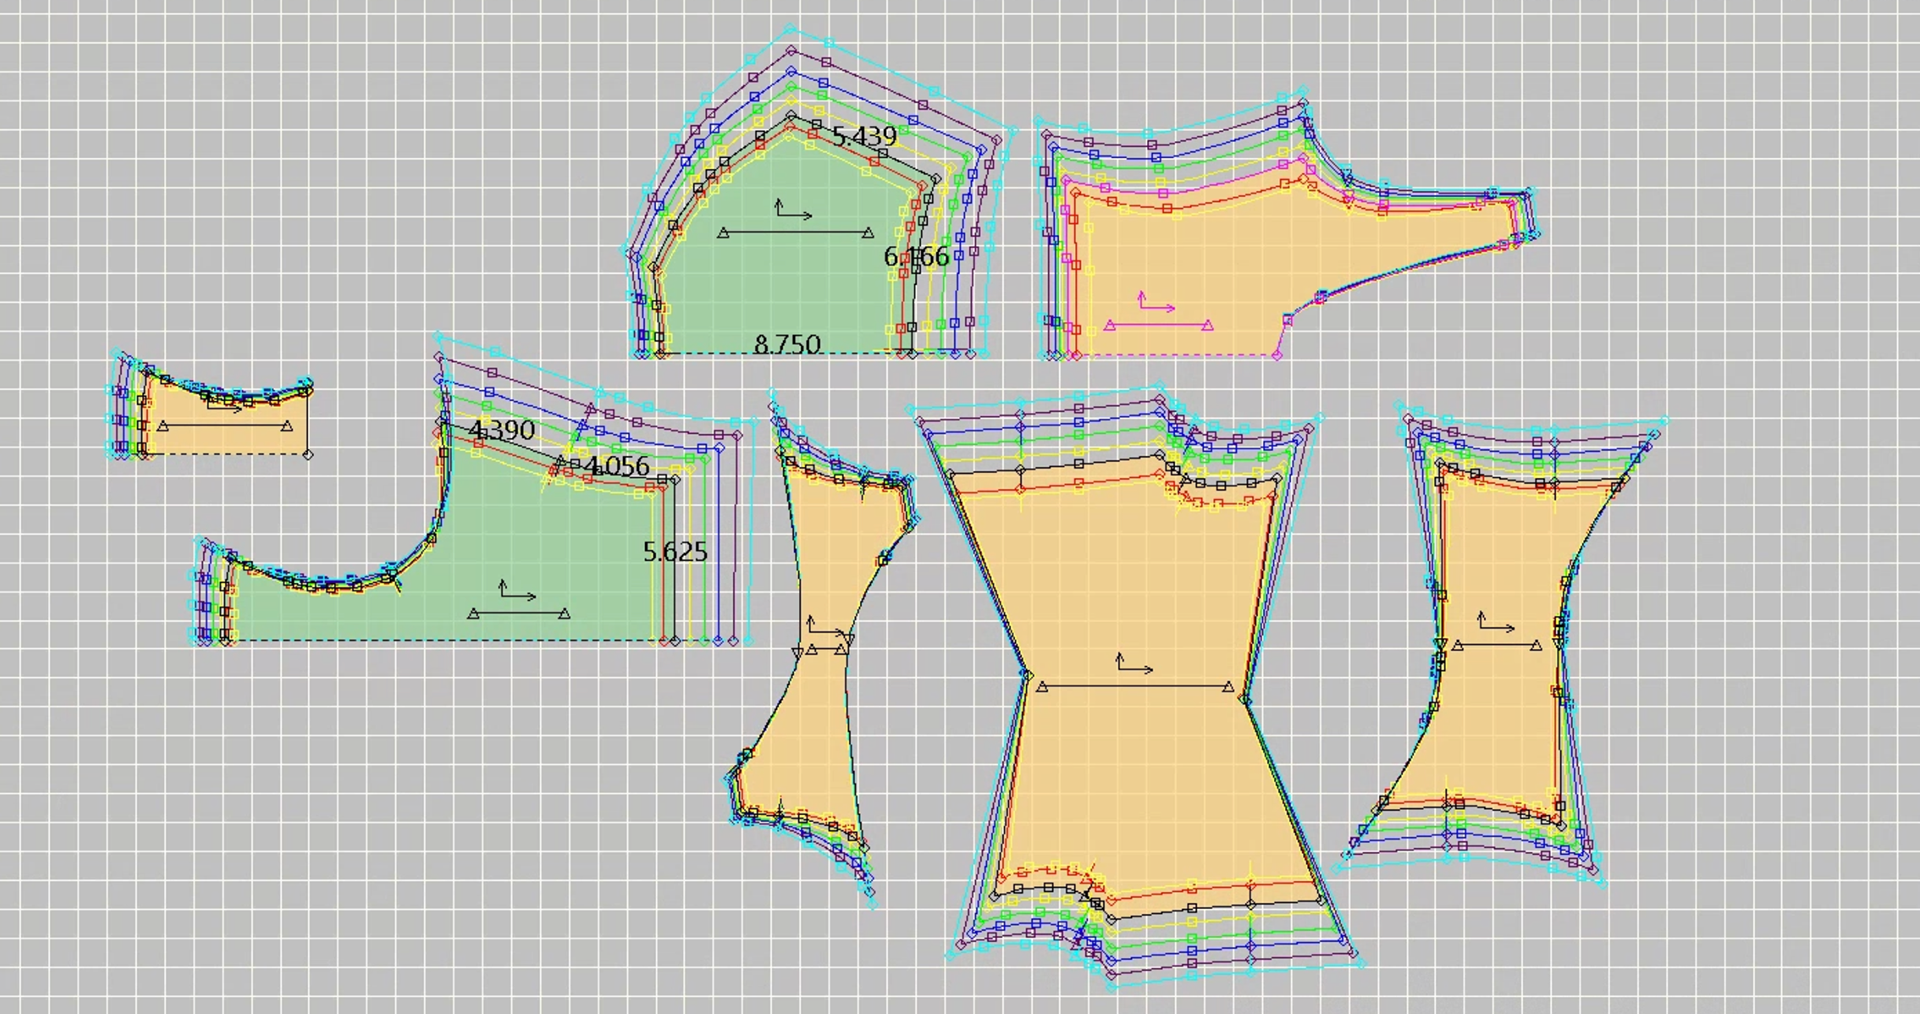
Final pattern with grade in AccuMark
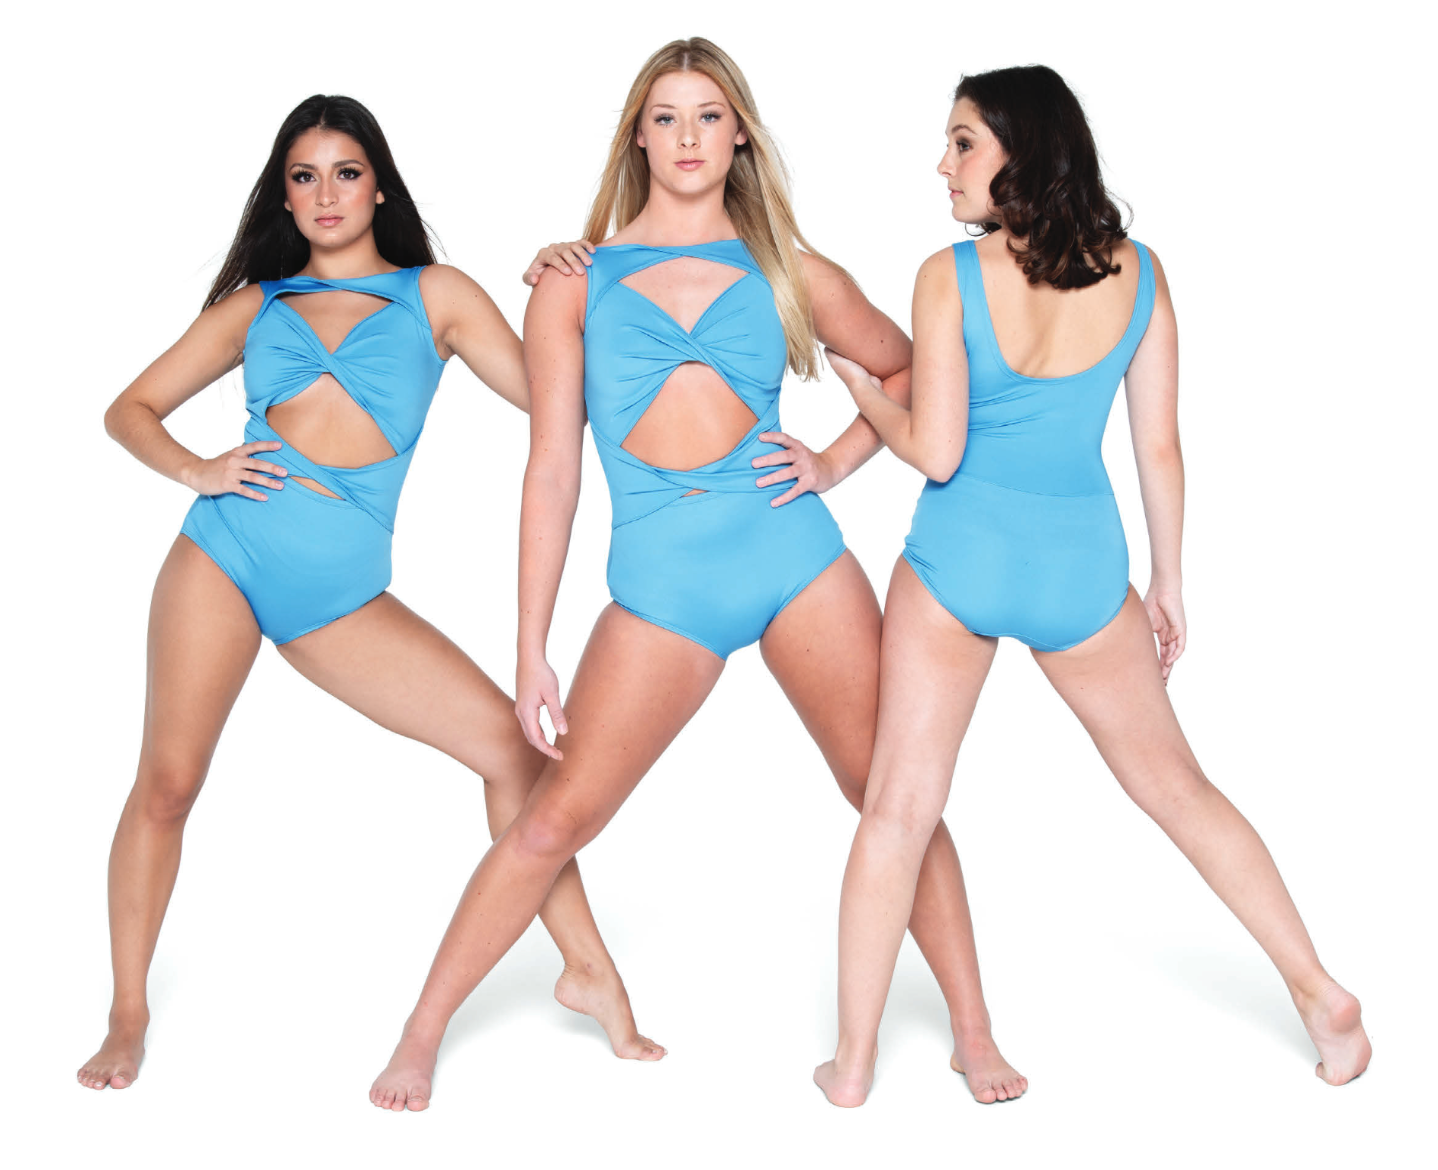
Final catalogue image
TEXANA CUSTOM BODYSUIT
A local high school drill team came to us with a very eccentric design for a custom bodysuit, featuring bits and pieces of pre-existing styles in our catalogue all combined into one new look. Reproducing their design accurately required considerable knowledge of our extensive pattern library and a very carefully constructed model sheet. I highlighted this custom out of the hundreds of others I worked on because this specific style was the most "custom" of all, as in it truly didn't look like anything else we had ever offered before. The whole team loved it, and this is one of my favorite styles I've created at KIZZI.
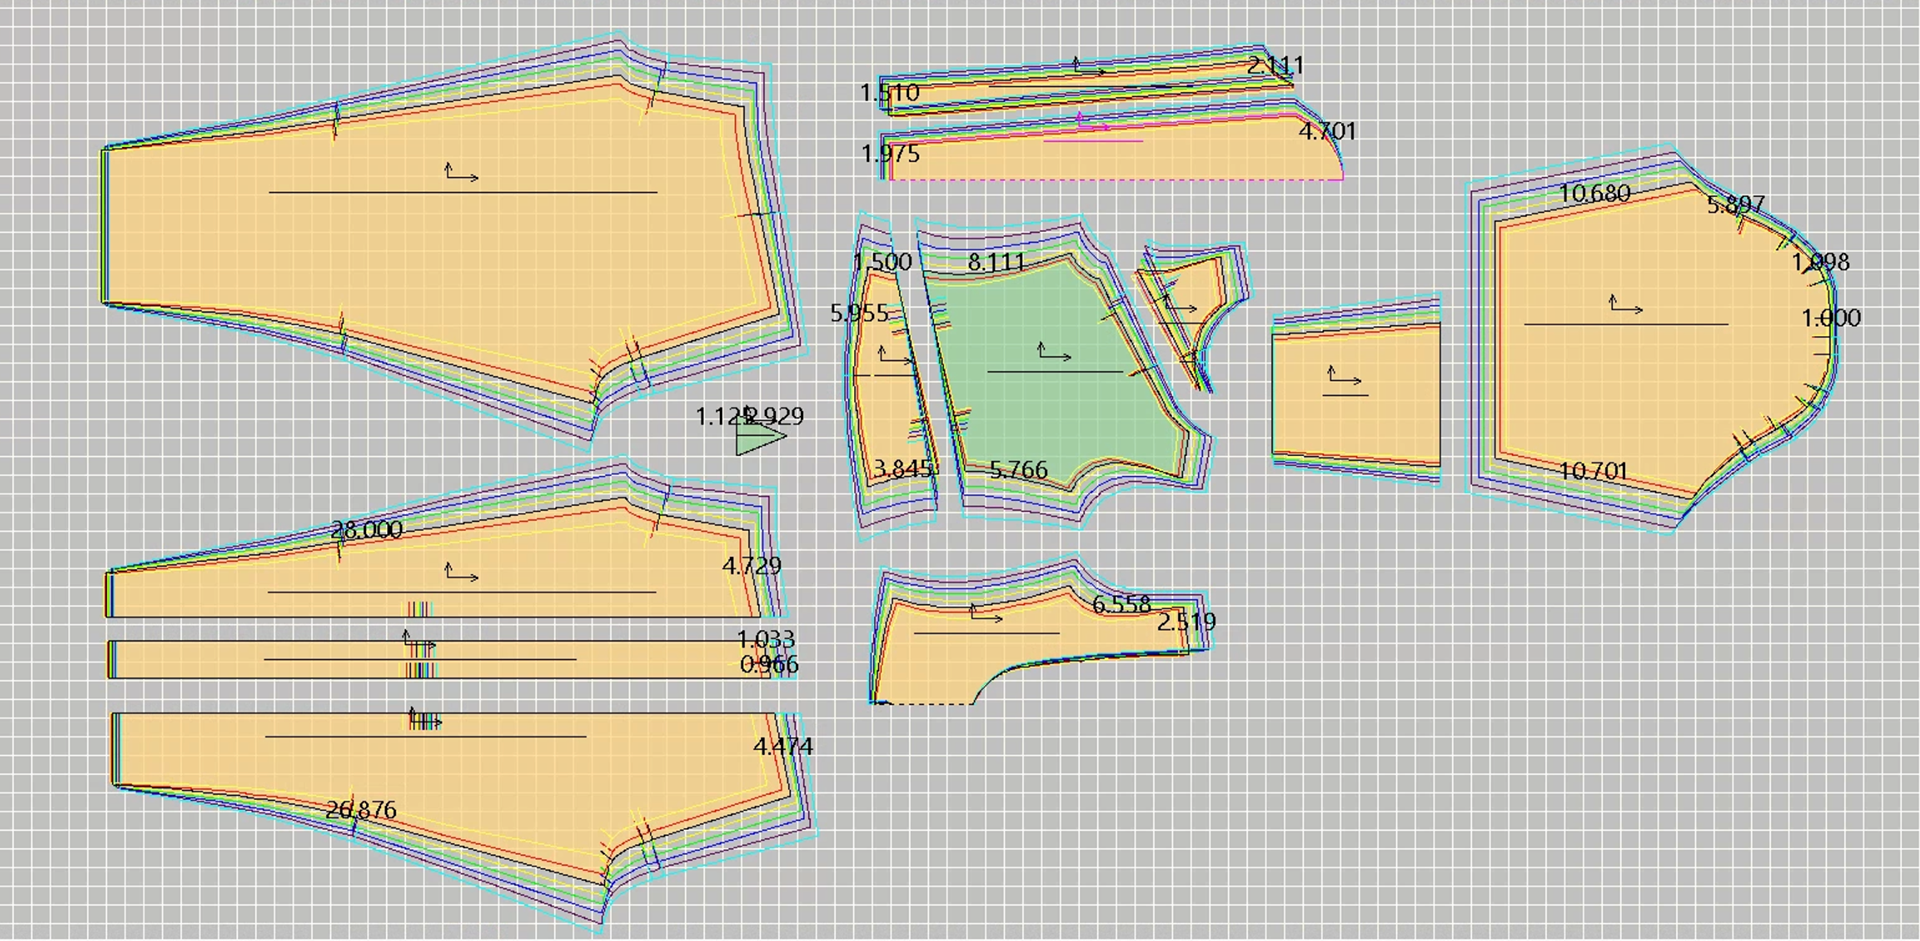
Final pattern with grade in AccuMark
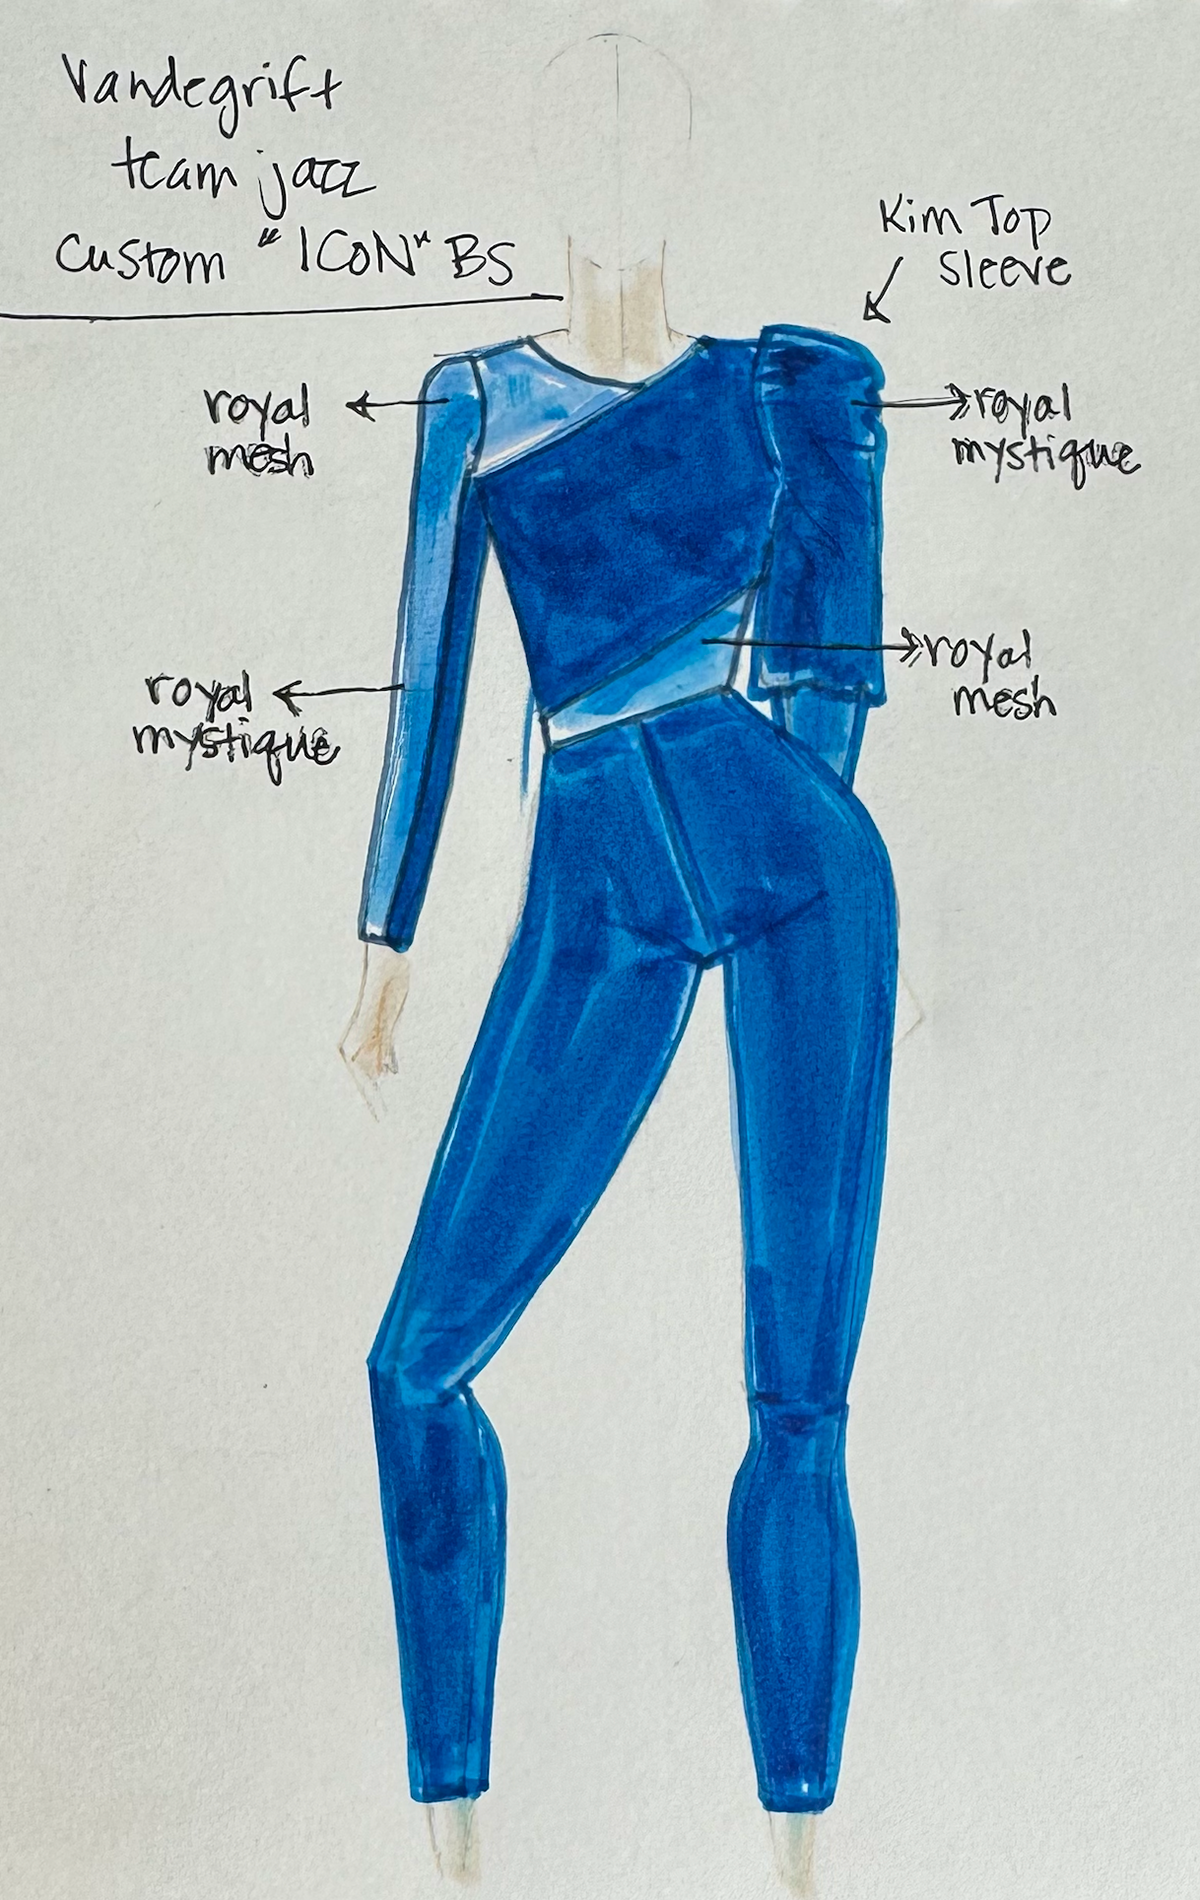
Initial design sketch
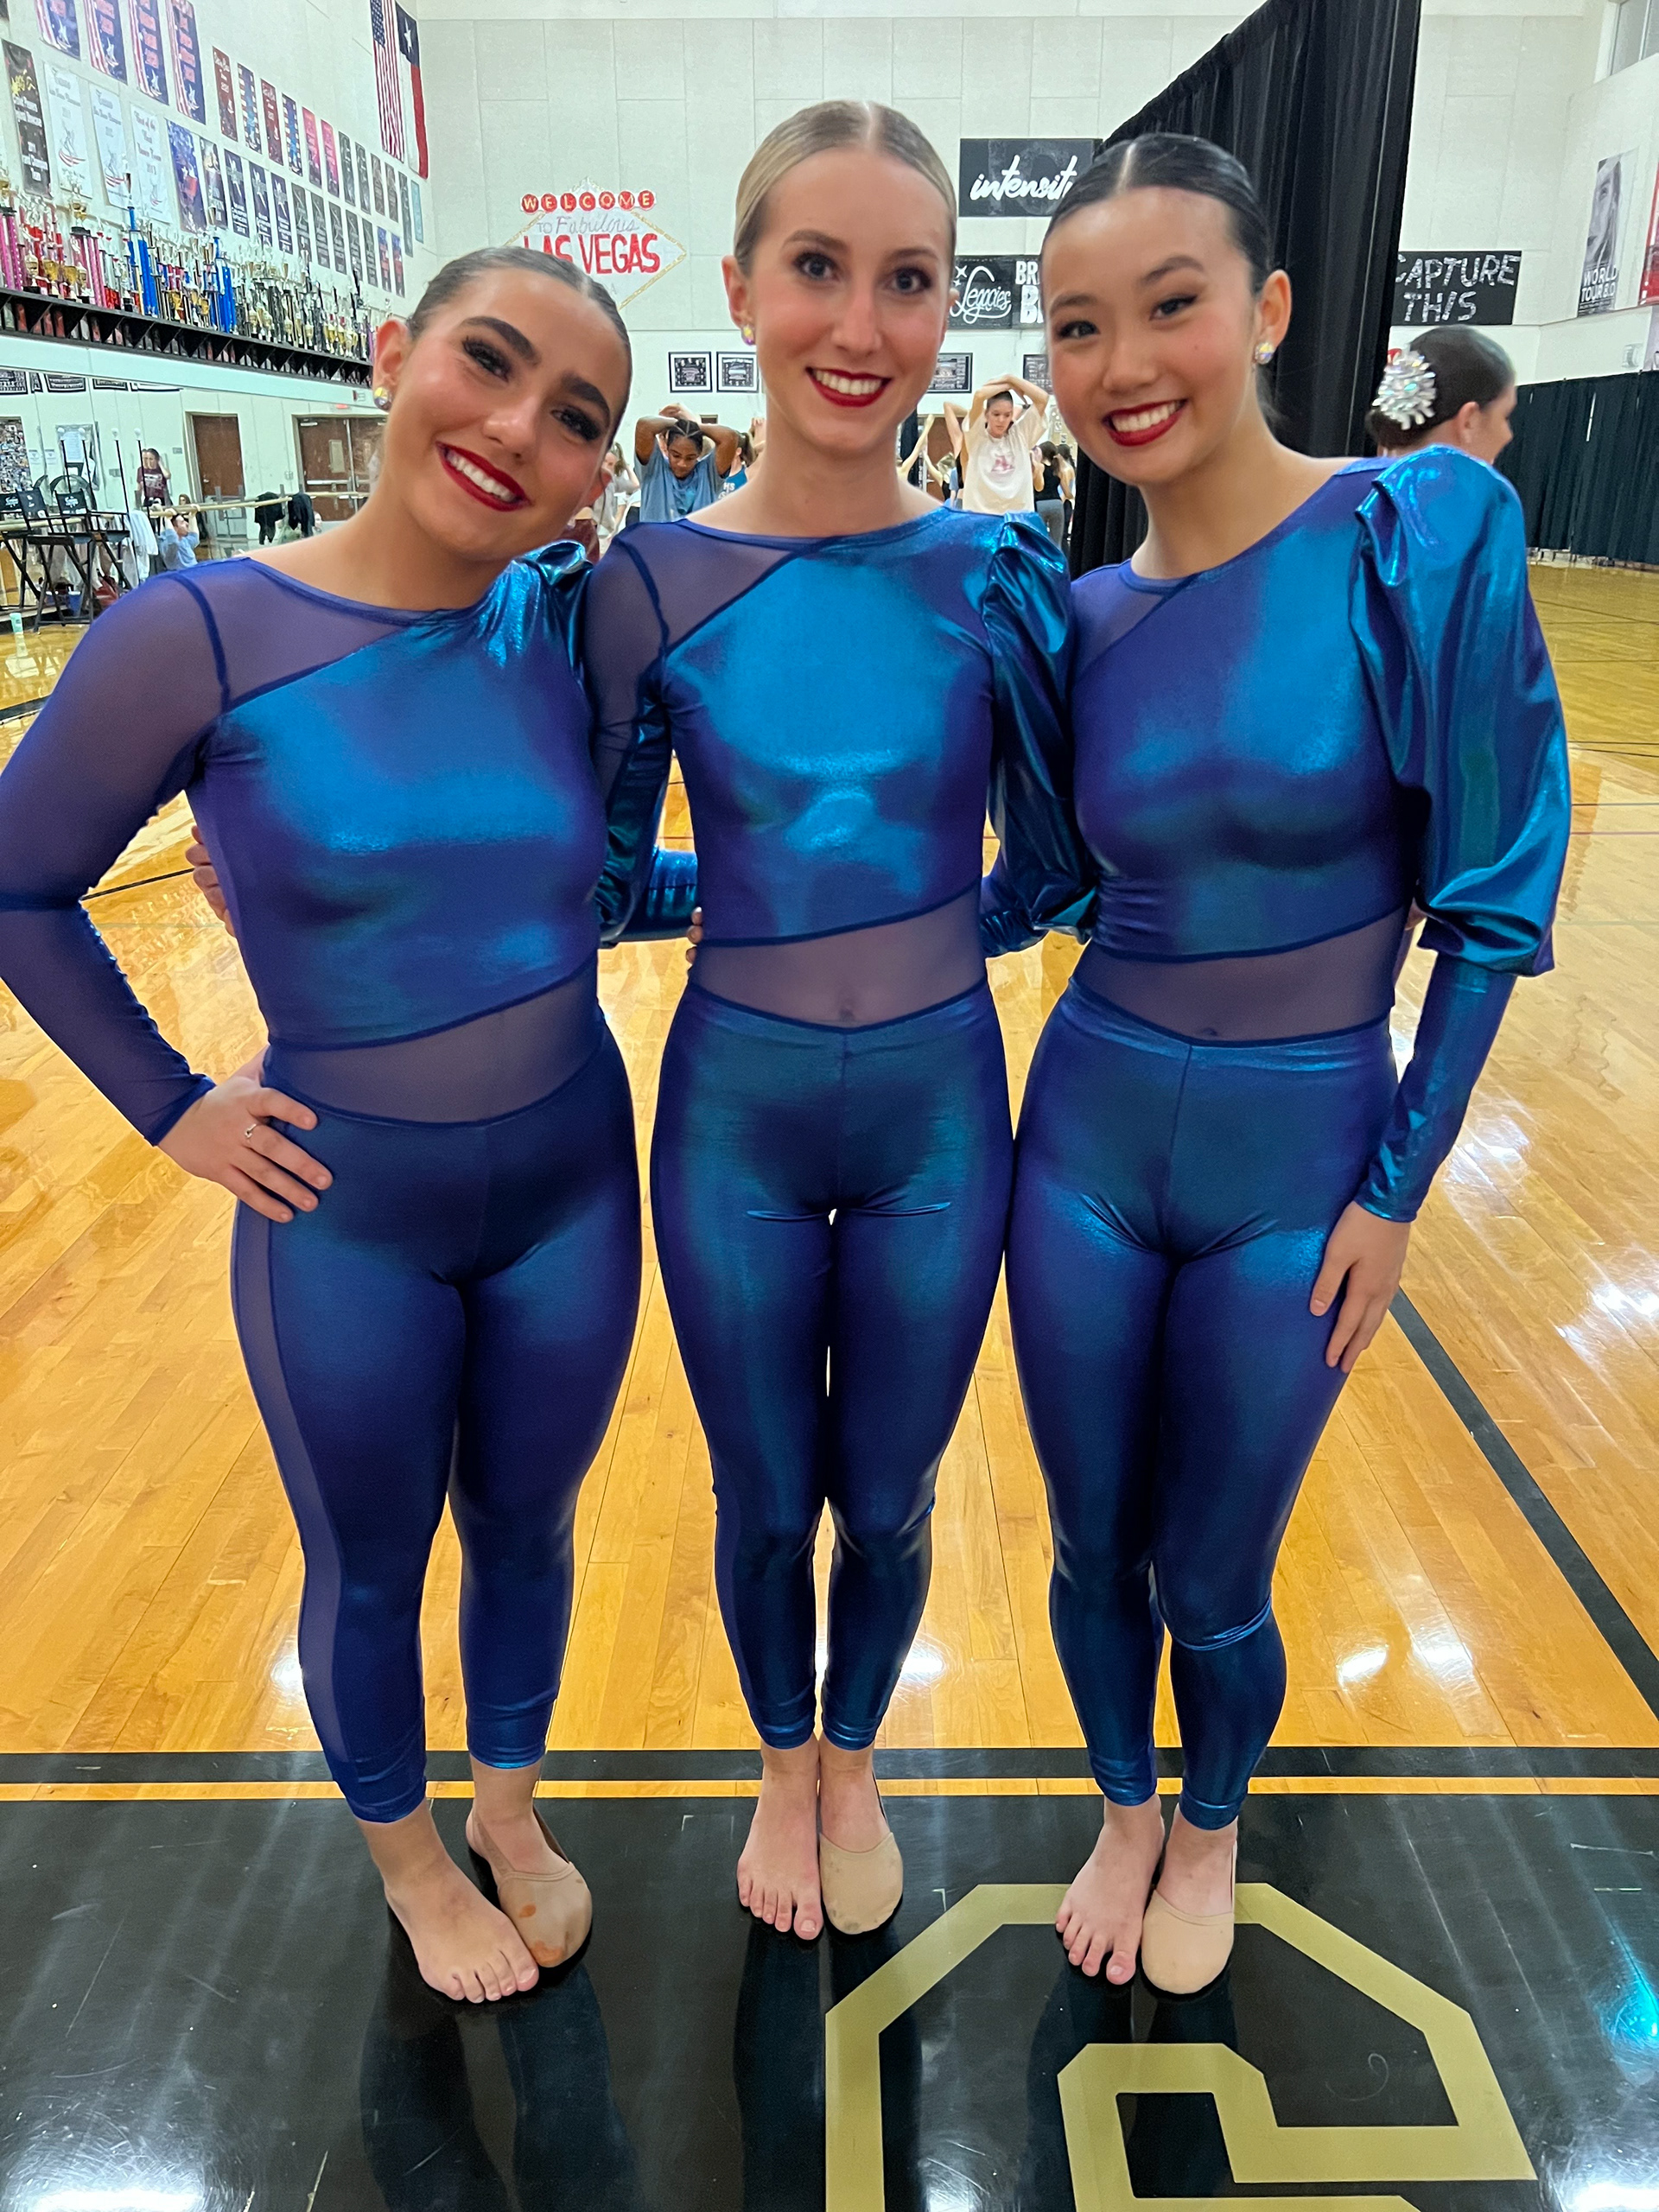
Final garments on dancers
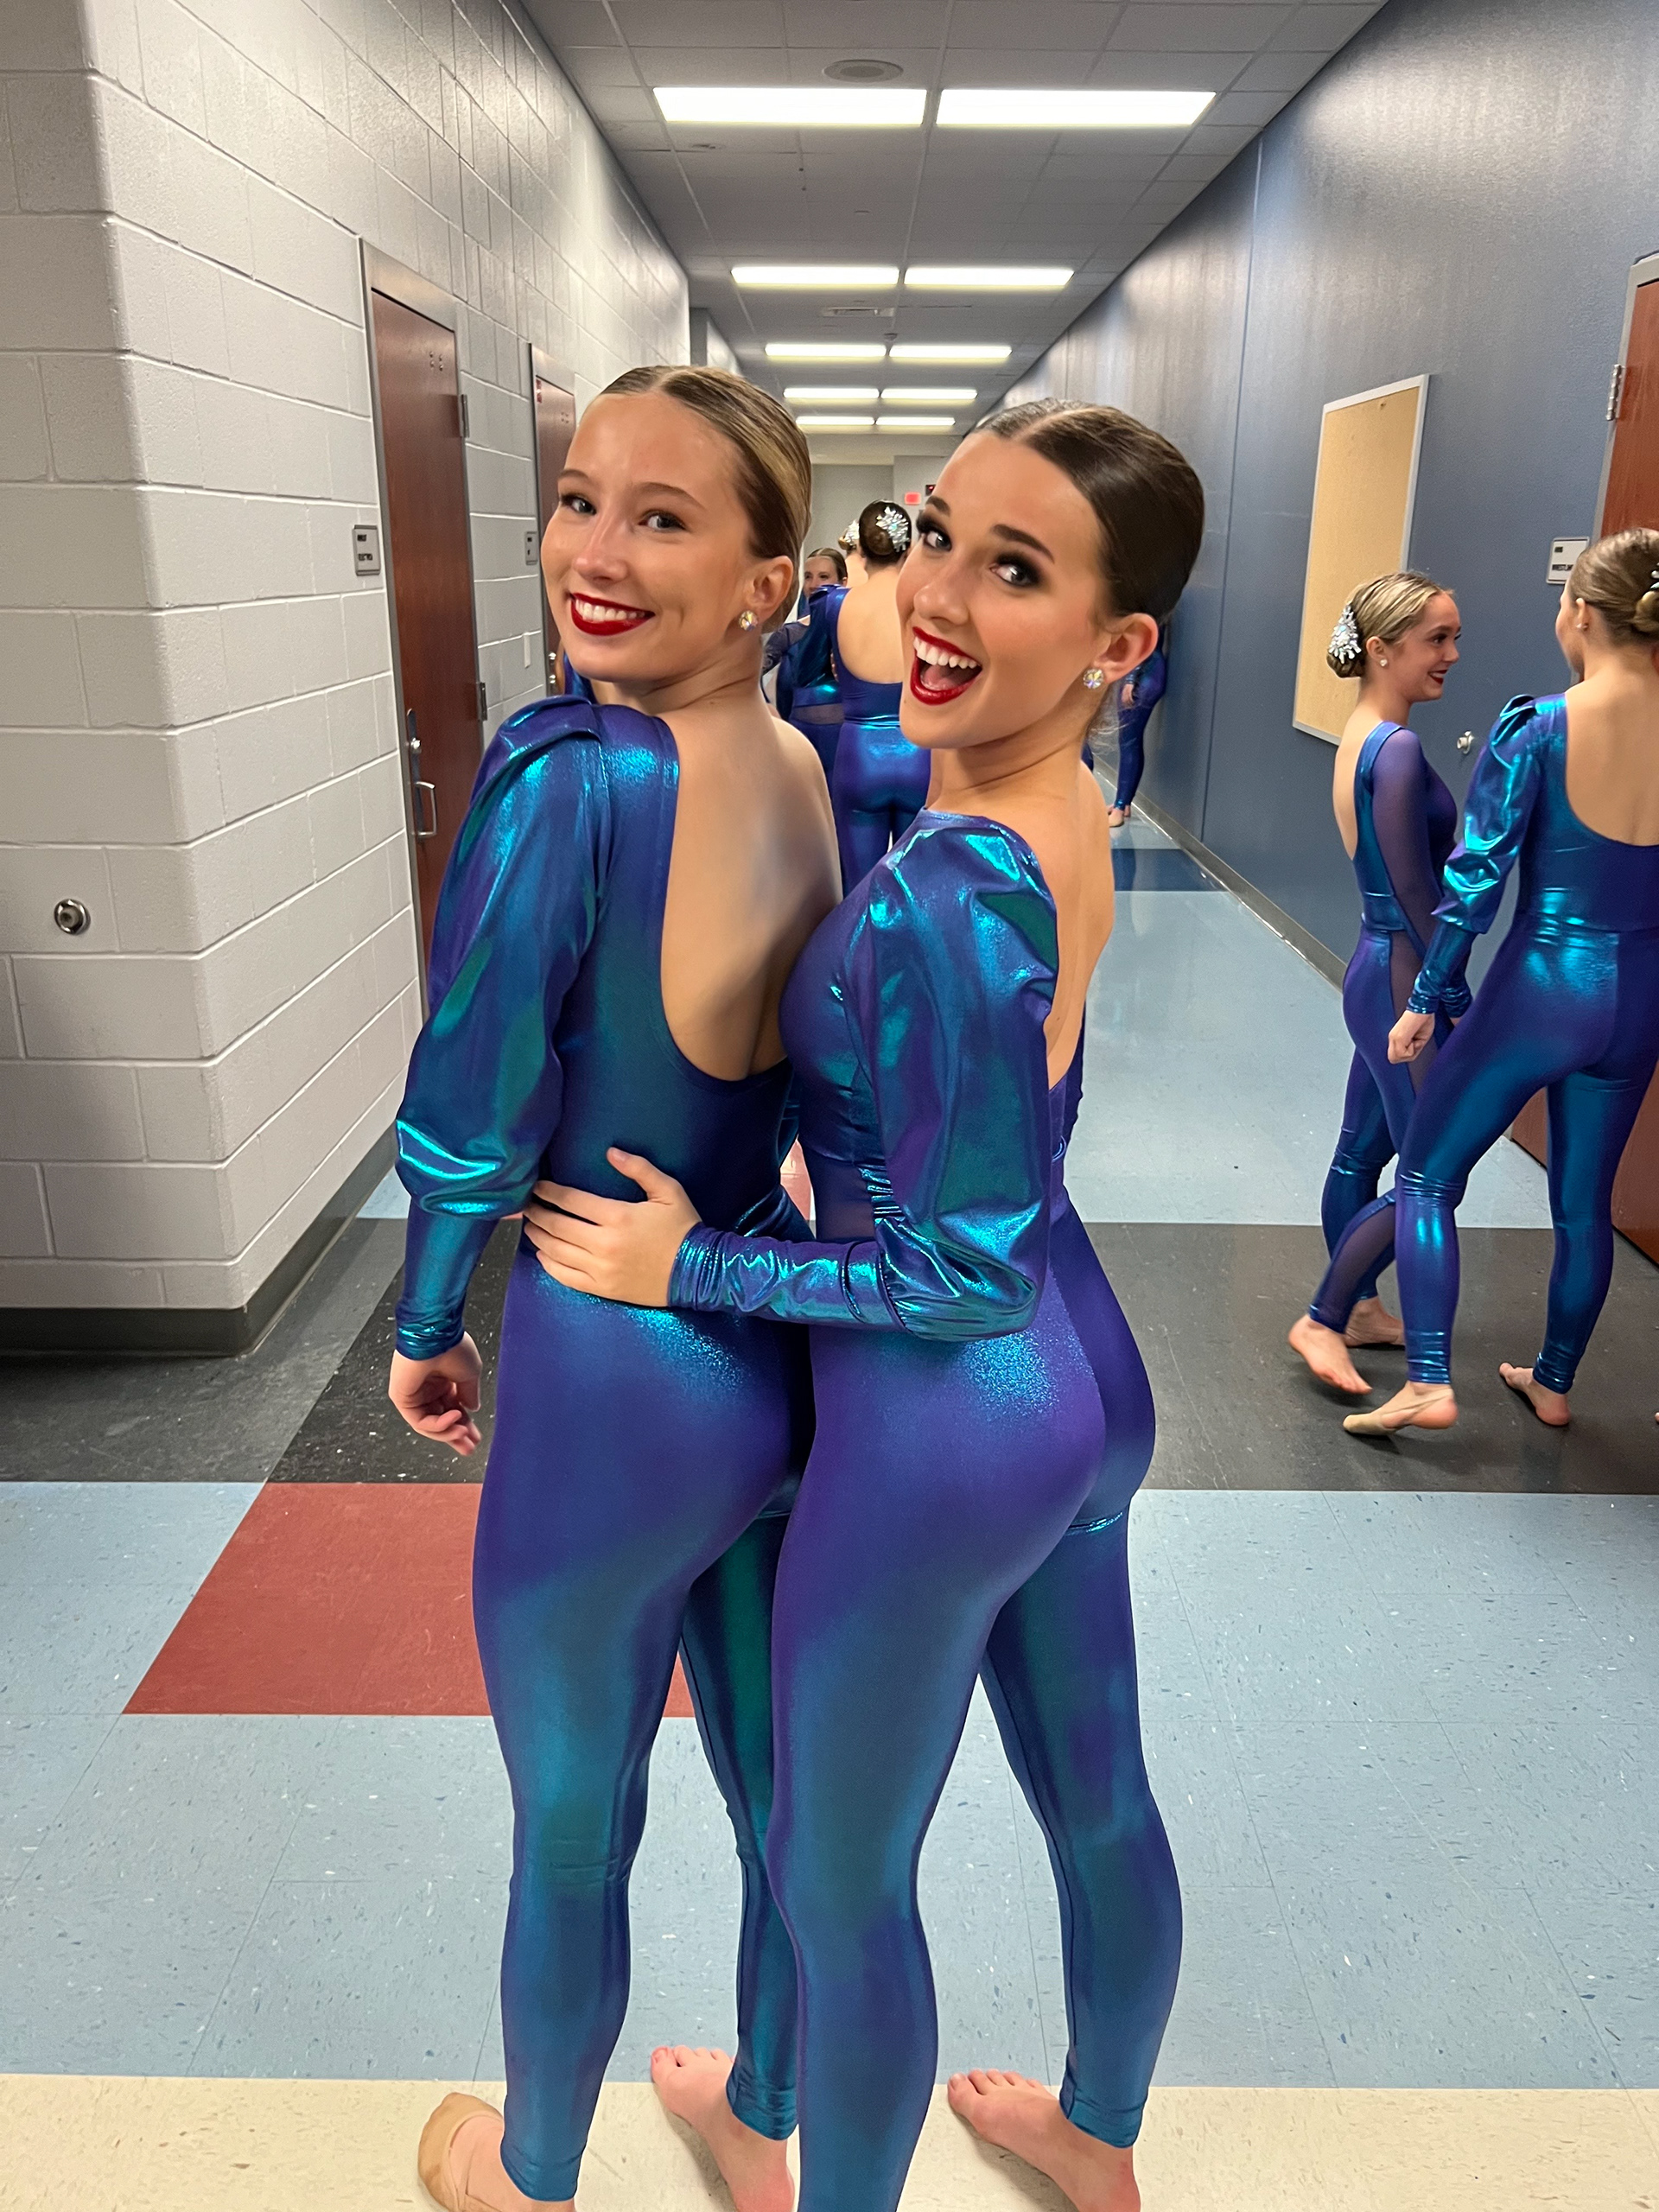
Drop back view
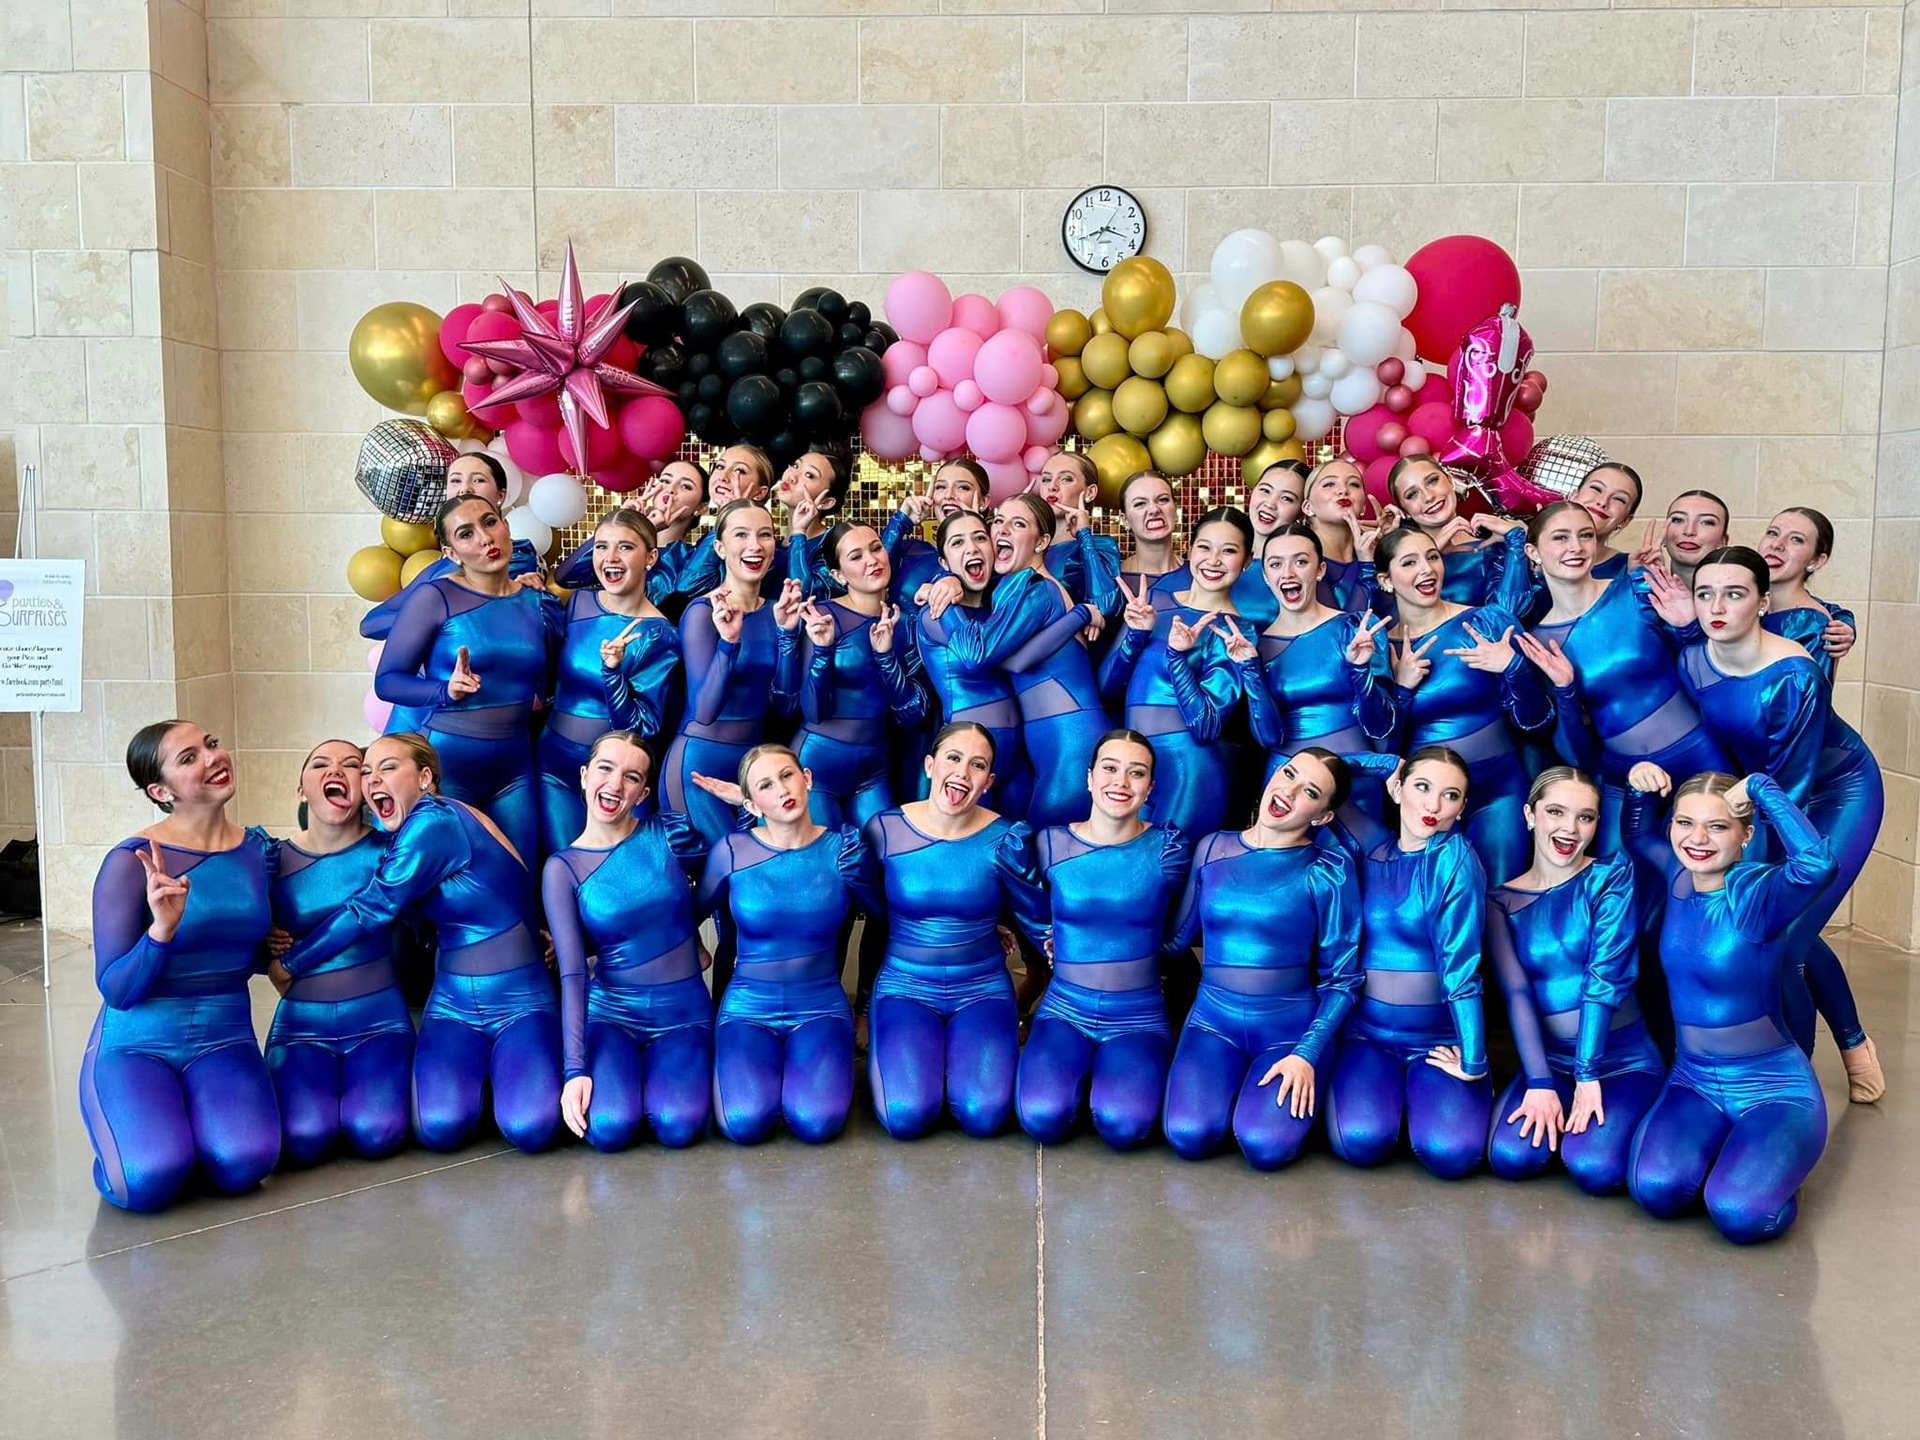
Full team pic
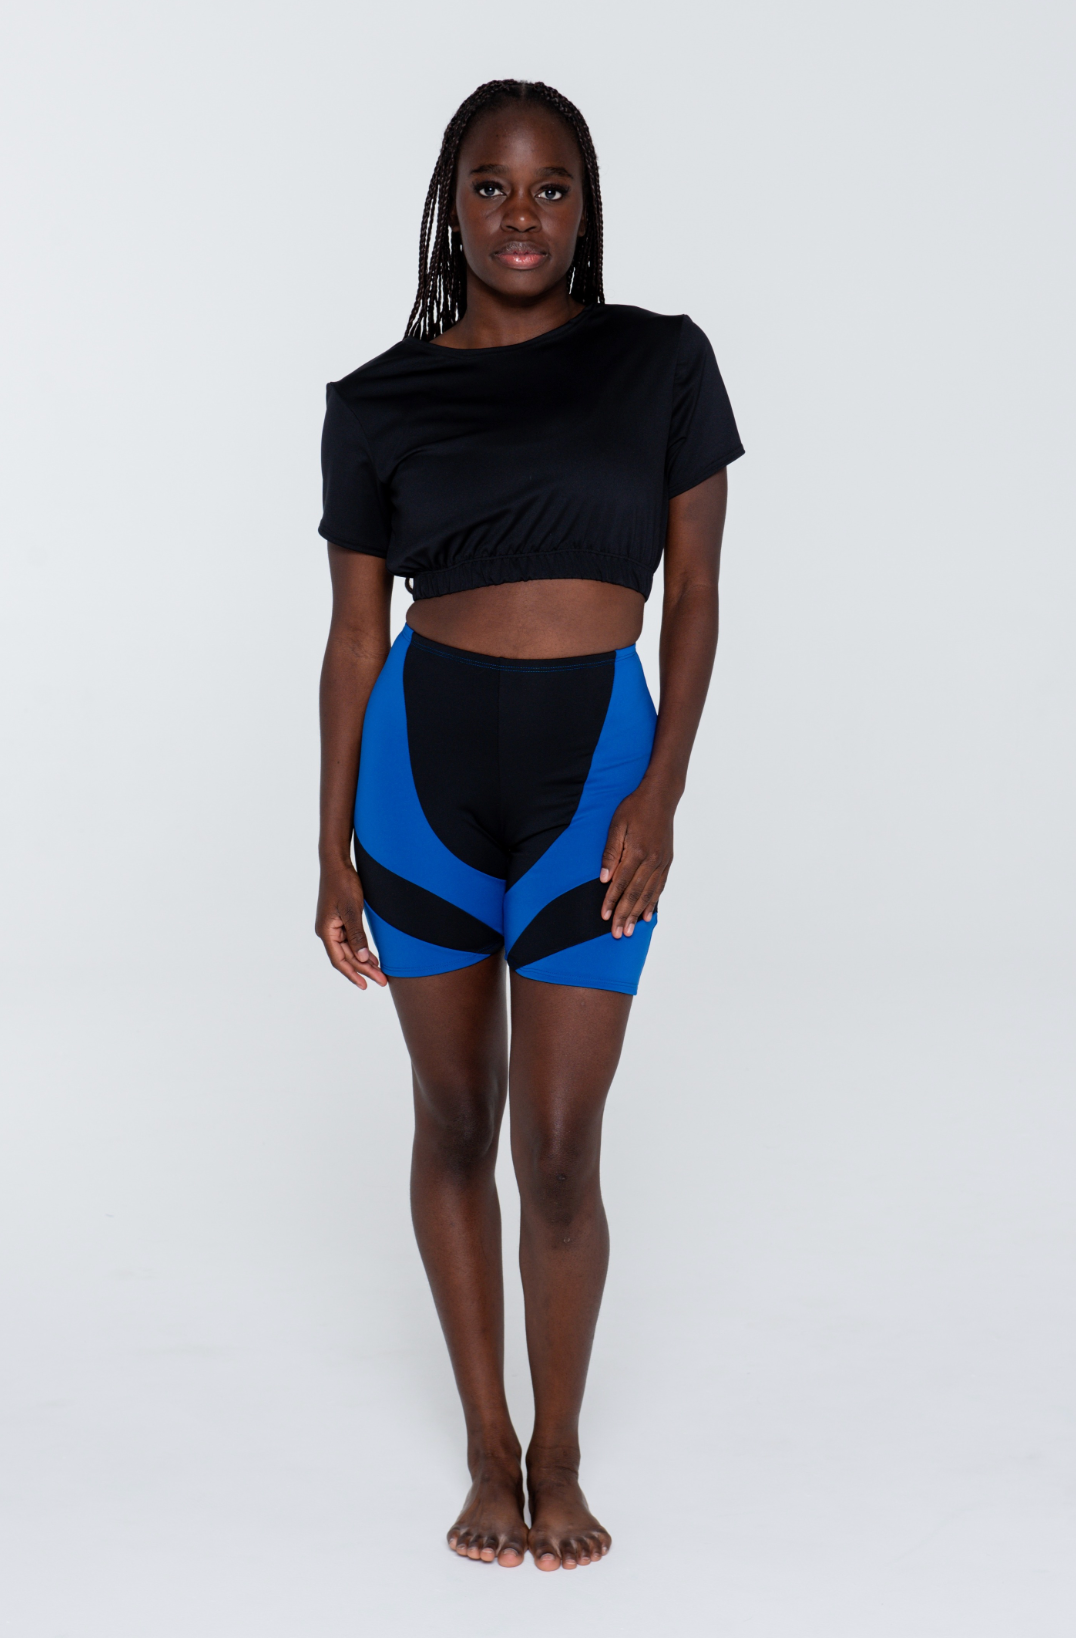
NASH BIKER SHORT
These shorts were originally designed and paper patterned by a coworker, based off one of our biker short styles. She made a sample to show to the design team, who decided they were good enough to move forward with. I digitized her patterns and cleaned them up considerably, balancing out the waist and hip fit. The grade was difficult as I had to maintain the alignments and proportions of the curved panels across all sizes, which necessitated the use of a proportional grading technique I developed with the previous patternmaker at the company. After feedback from our sewing team in Juarez, I numbered the pieces in order of sewing and added more notches to cut down on time spent trying to figure out what goes where. This made me realize how little contact I had with our production team in Mexico and how many things could be lost in translation. Because this was the first year that we had any manufacturing done outside of our Austin facility, our product development team hadn't yet fleshed out a tech pack system. To catch errors in the meantime, I spoke with our department heads in Juarez and told them I wanted them to ask their cutting and sewing teams to be more vocal about things like this and pass that information back to me.
Final catalogue image
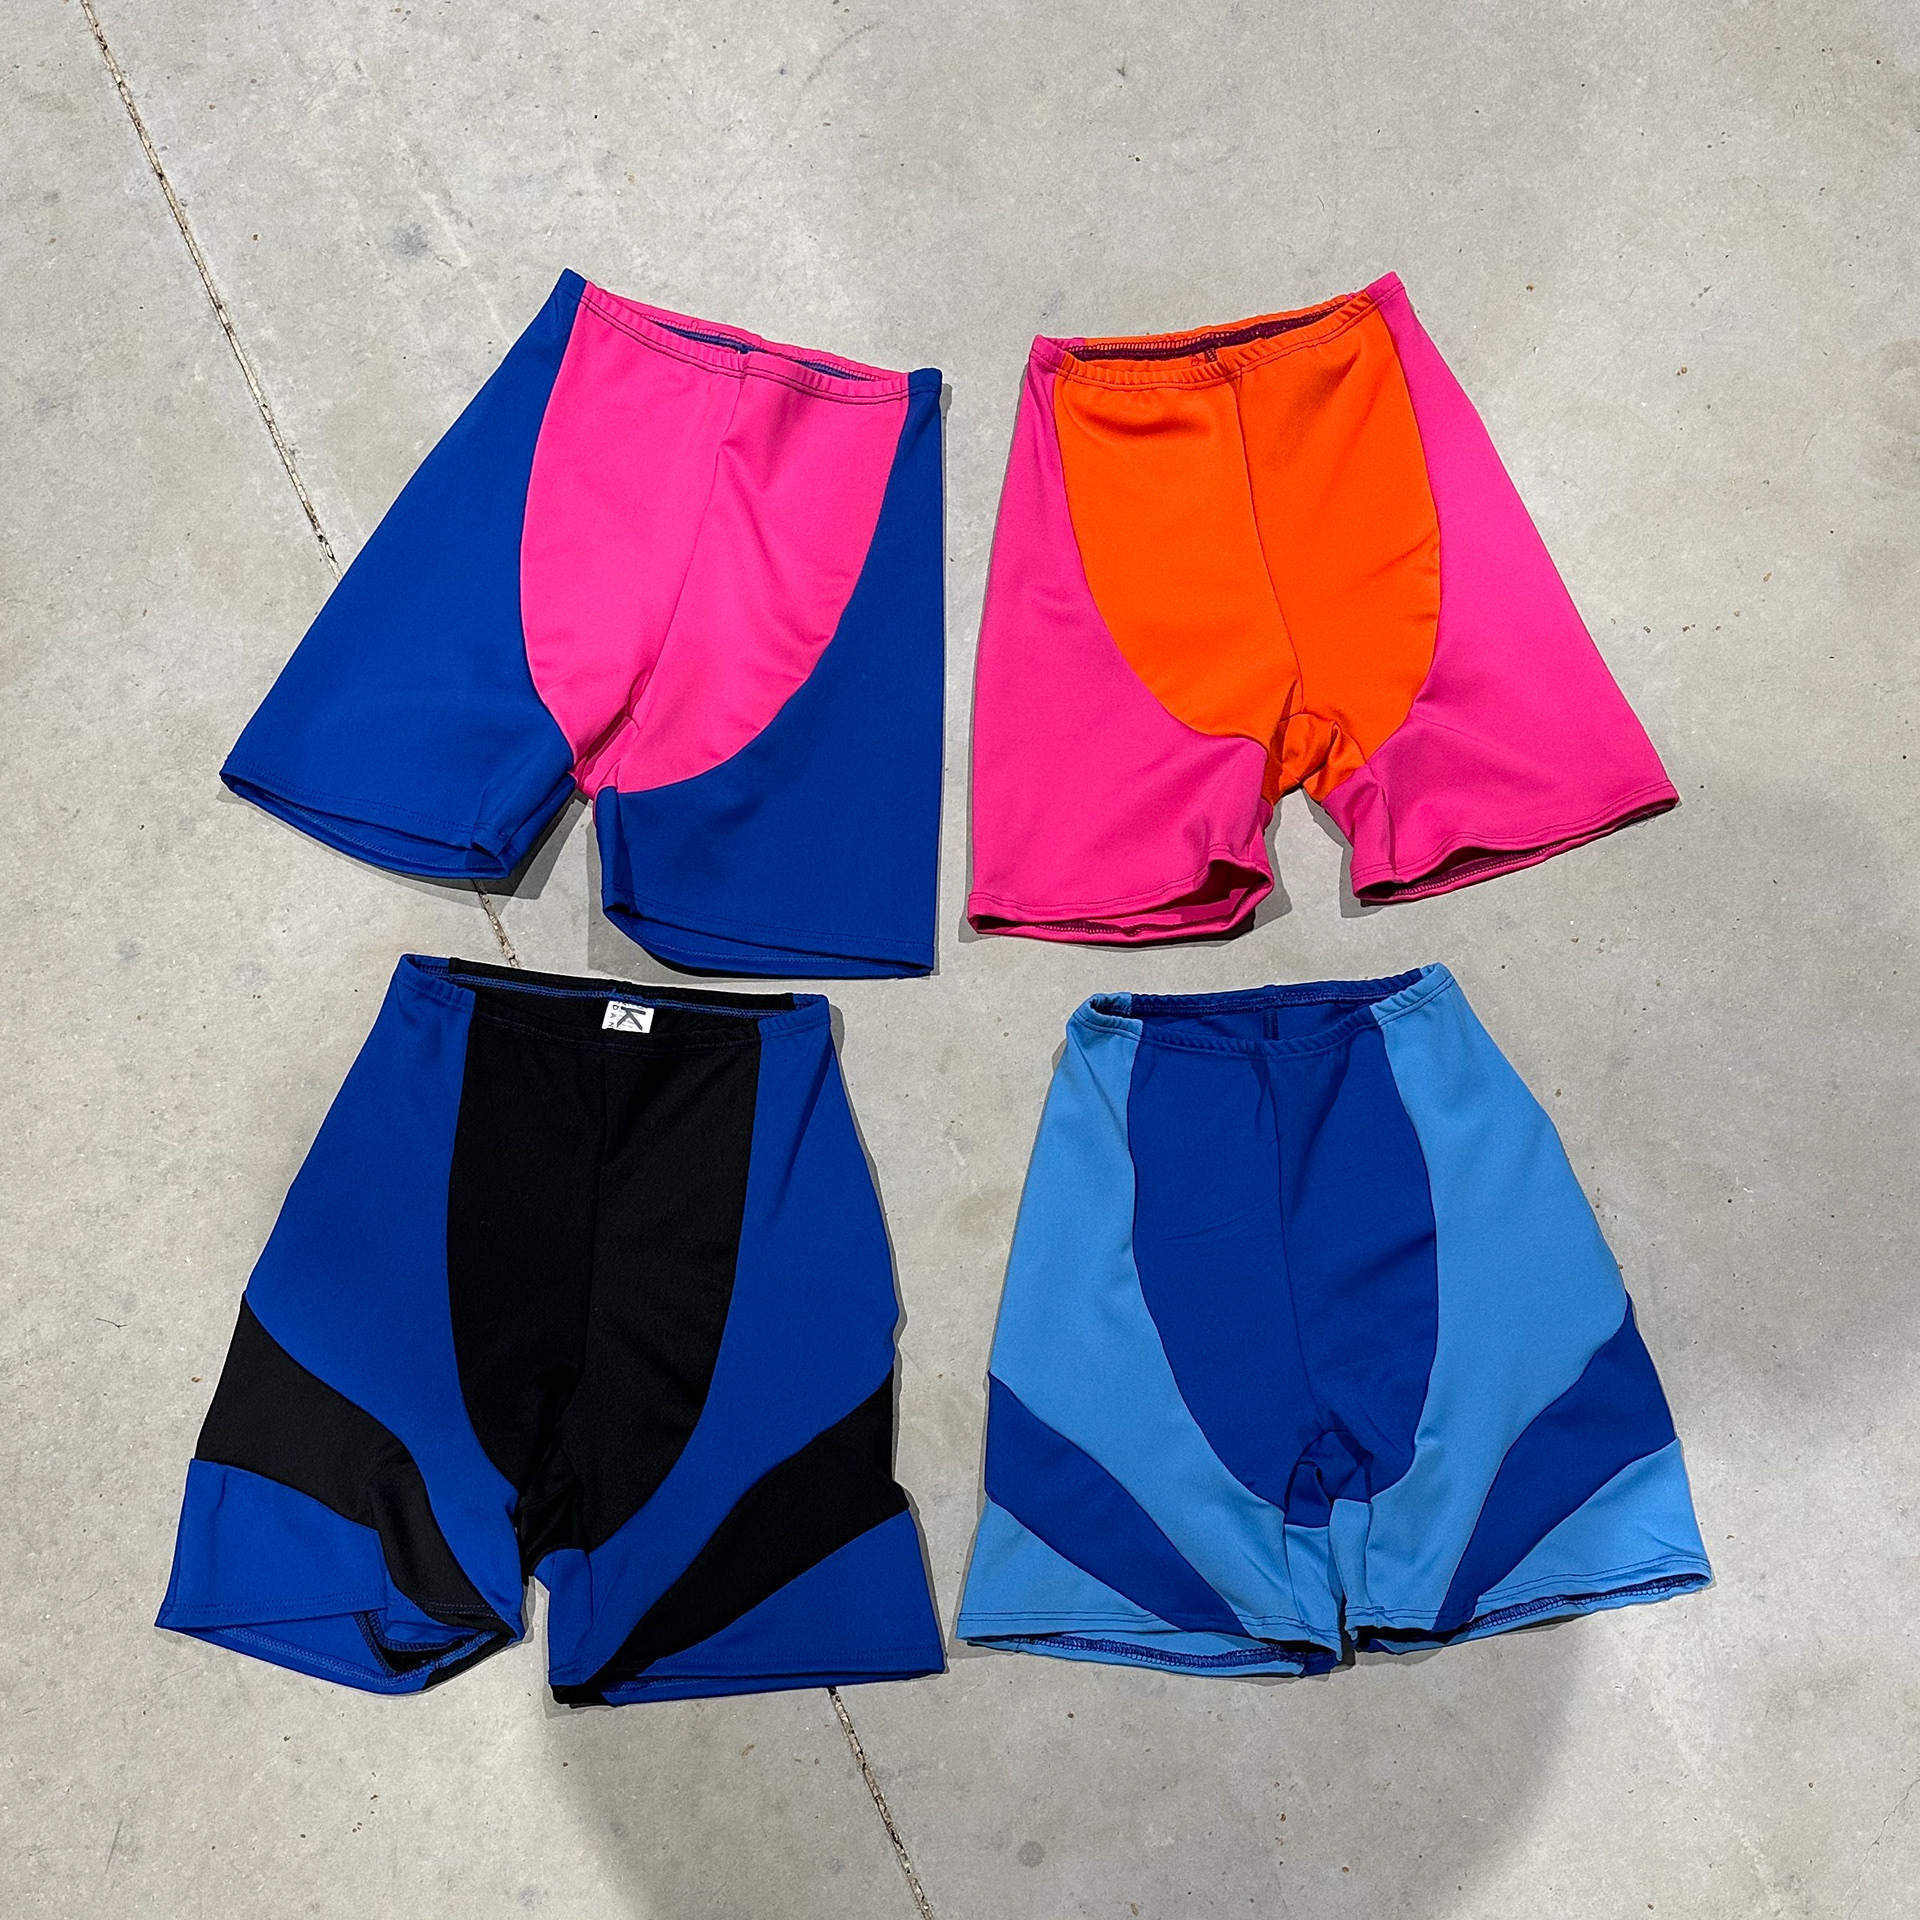
Nash and Nova colorway samples
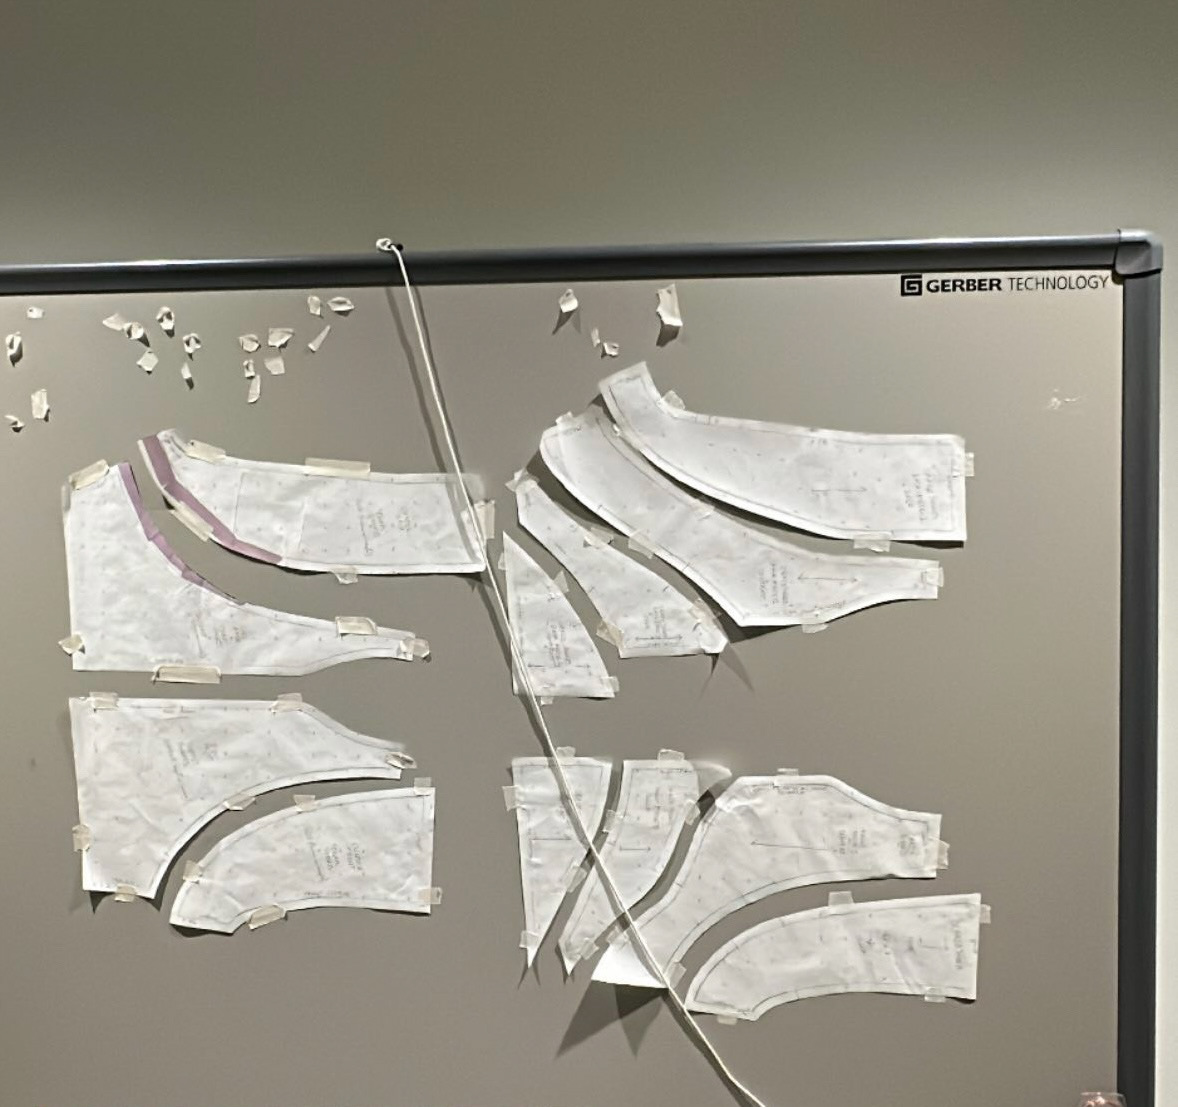
Digitizing paper patterns
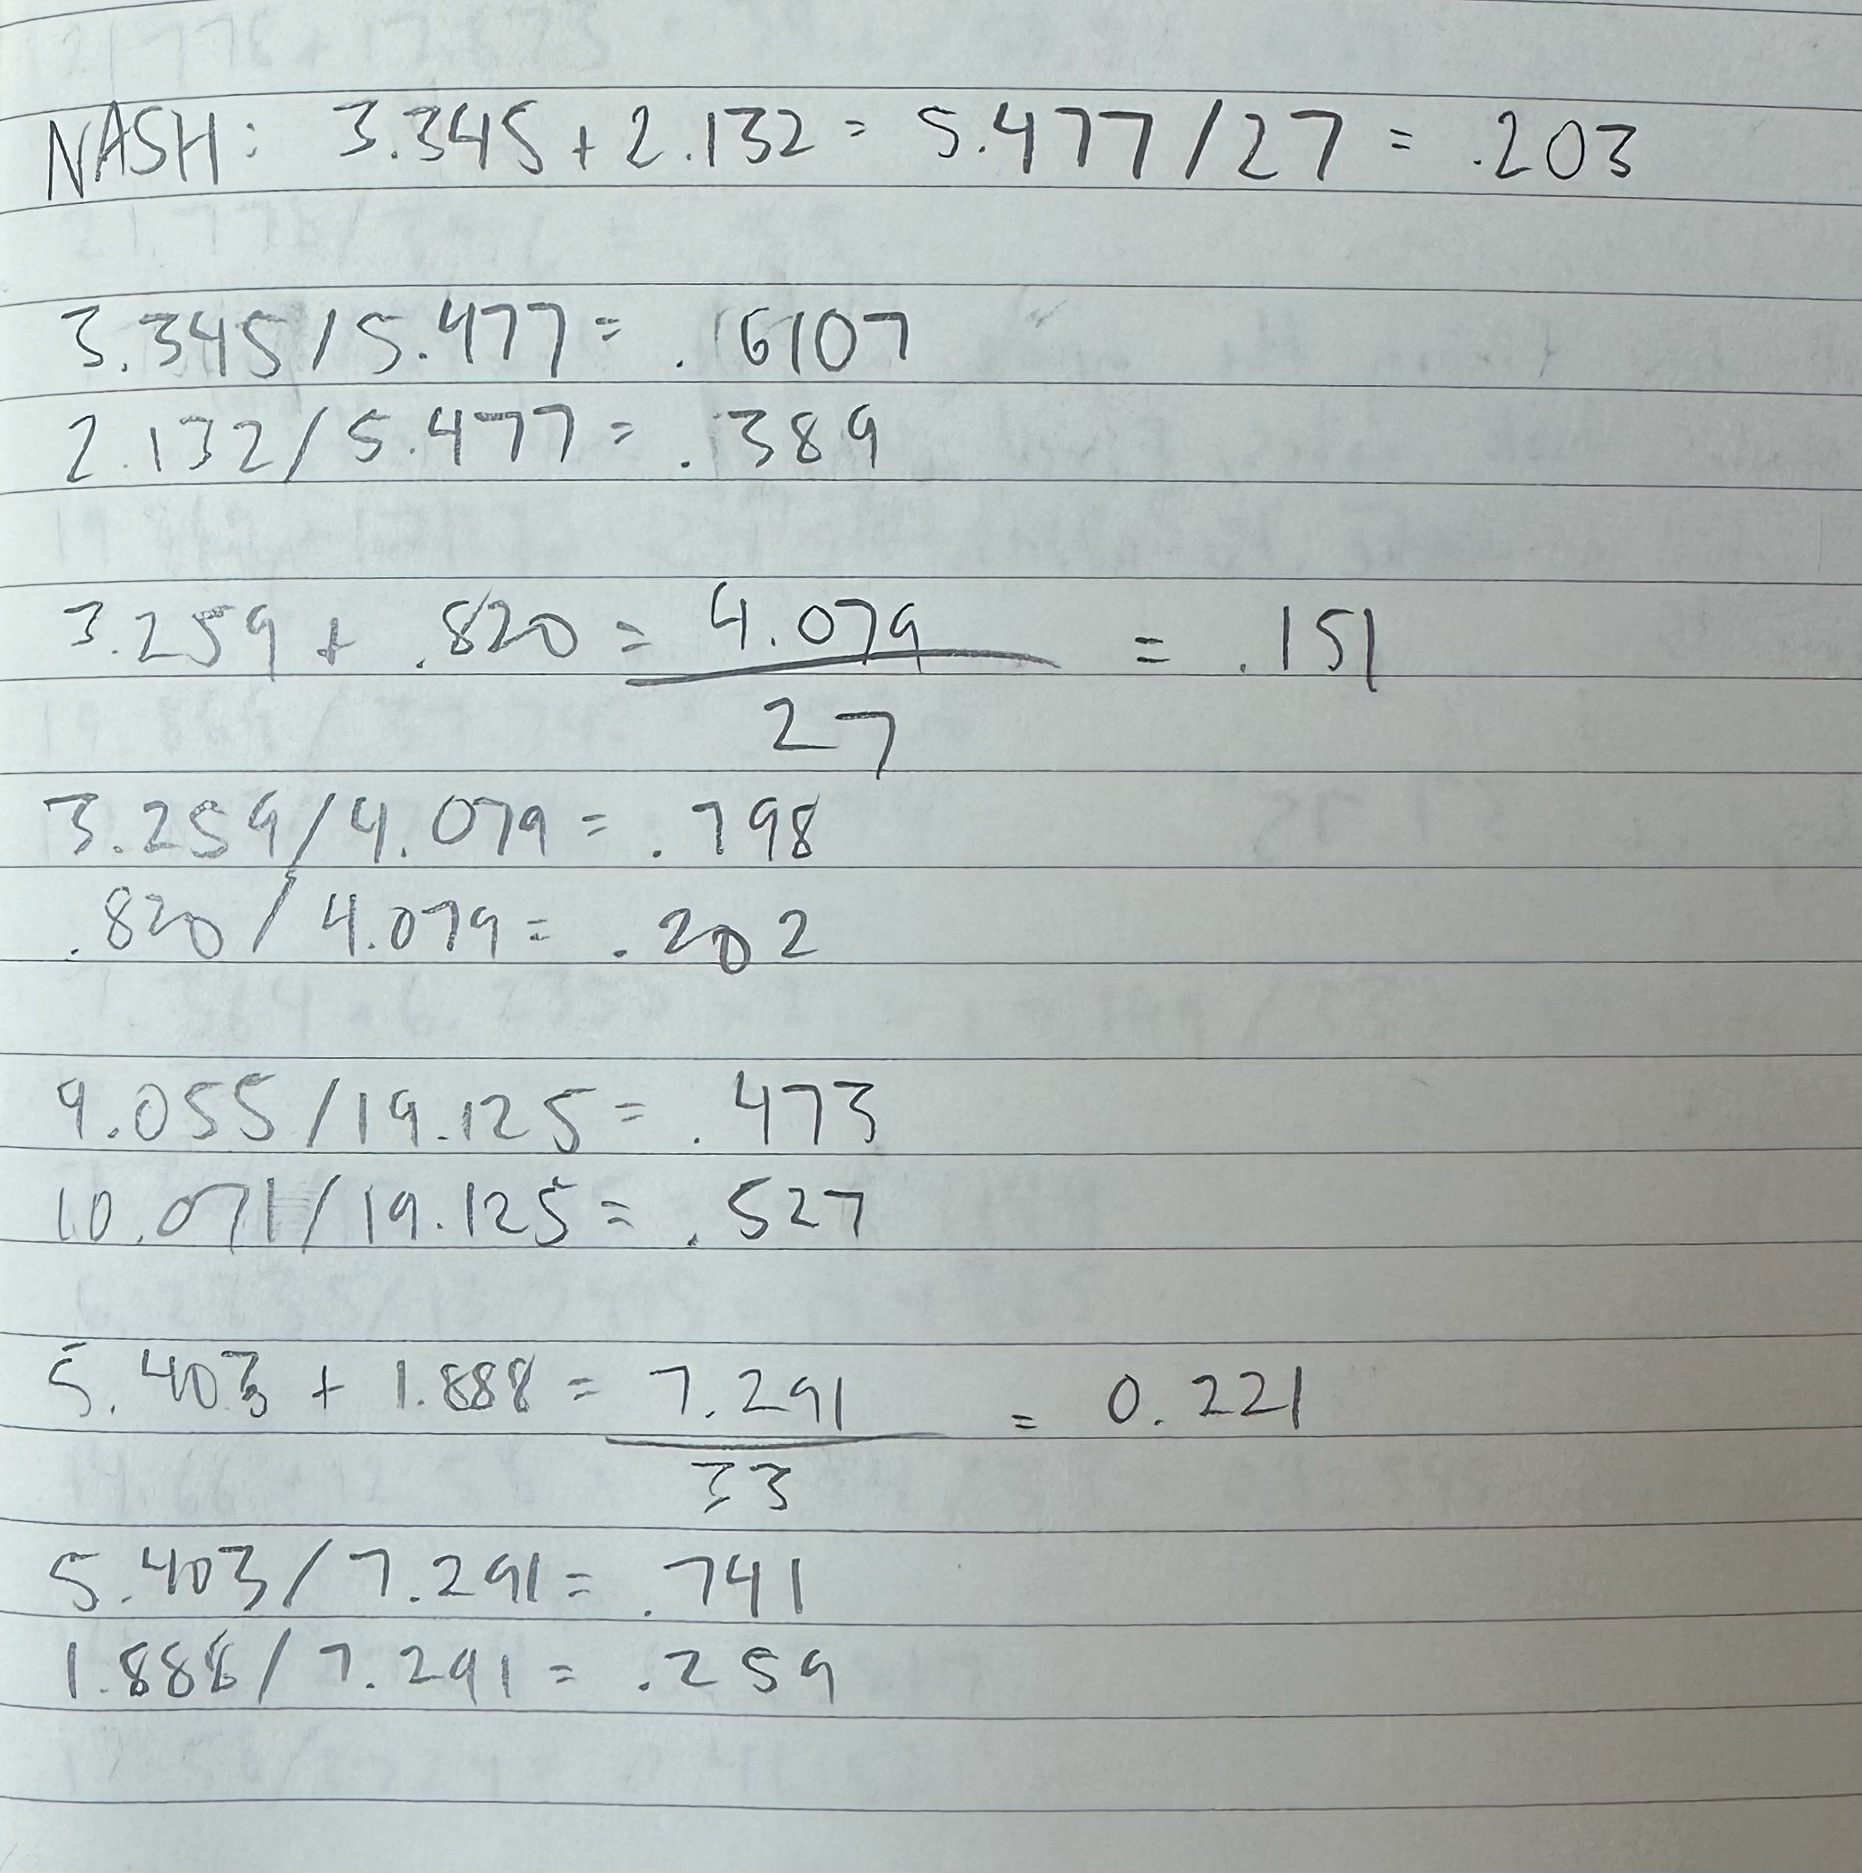
Proportional grading method, quick scratch math
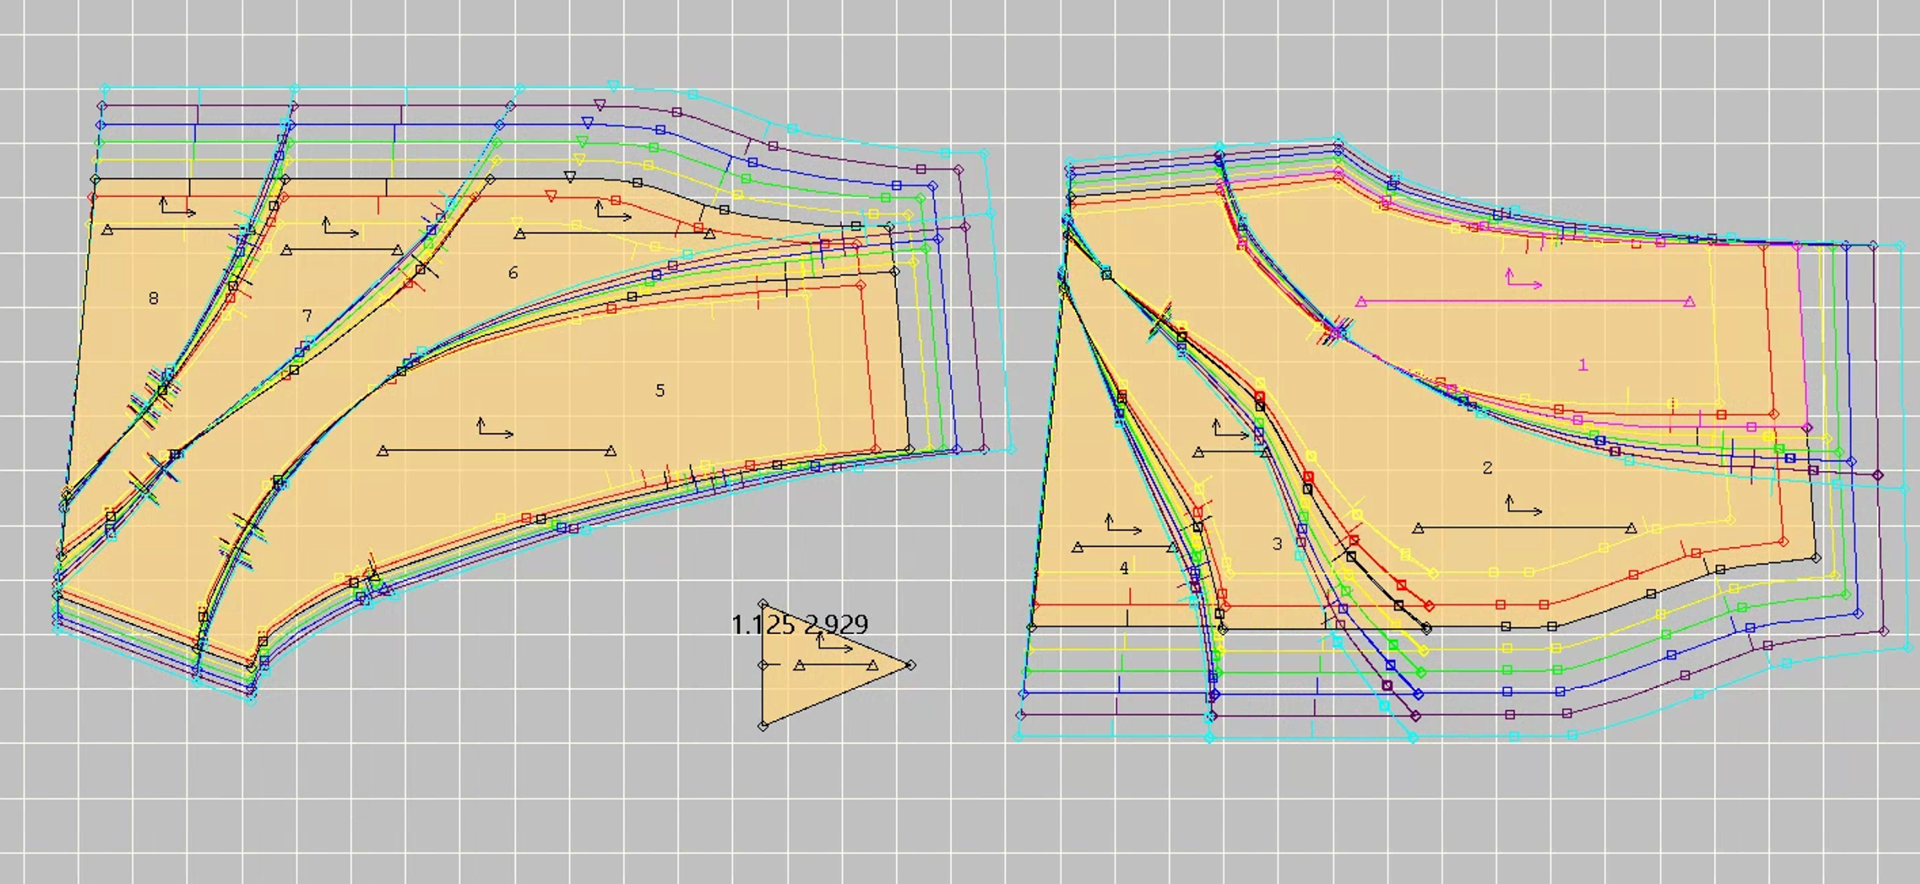
Final pattern with grade and annotated pieces
VINTAGE T-SHIRT RECREATION
This was a personal project of mine that I worked on intermittently. Like everyone else, I have one "perfect" t-shirt in my wardrobe, the one that fits just right and looks good with everything. Now of course, this means that I compare all my other t-shirts to it, and none of them come even close. This is why I made a paper rub-off pattern and digitized it. While I tracked down the right jersey fabric for it, I rendered it in Gerber AccuMark 3D to check the fit on a model based on my measurements. In doing this I was able to fine-tune the fit before even cutting my first sample, saving myself the money spent on fabric and time spent on redundant sampling. I now have two perfect t-shirts in my wardrobe with many more to come.
DEVELOPMENT

After digital patterning, I traced the patterns off my TV onto paper. At the time I didn't have access to the Gerber Plotter!
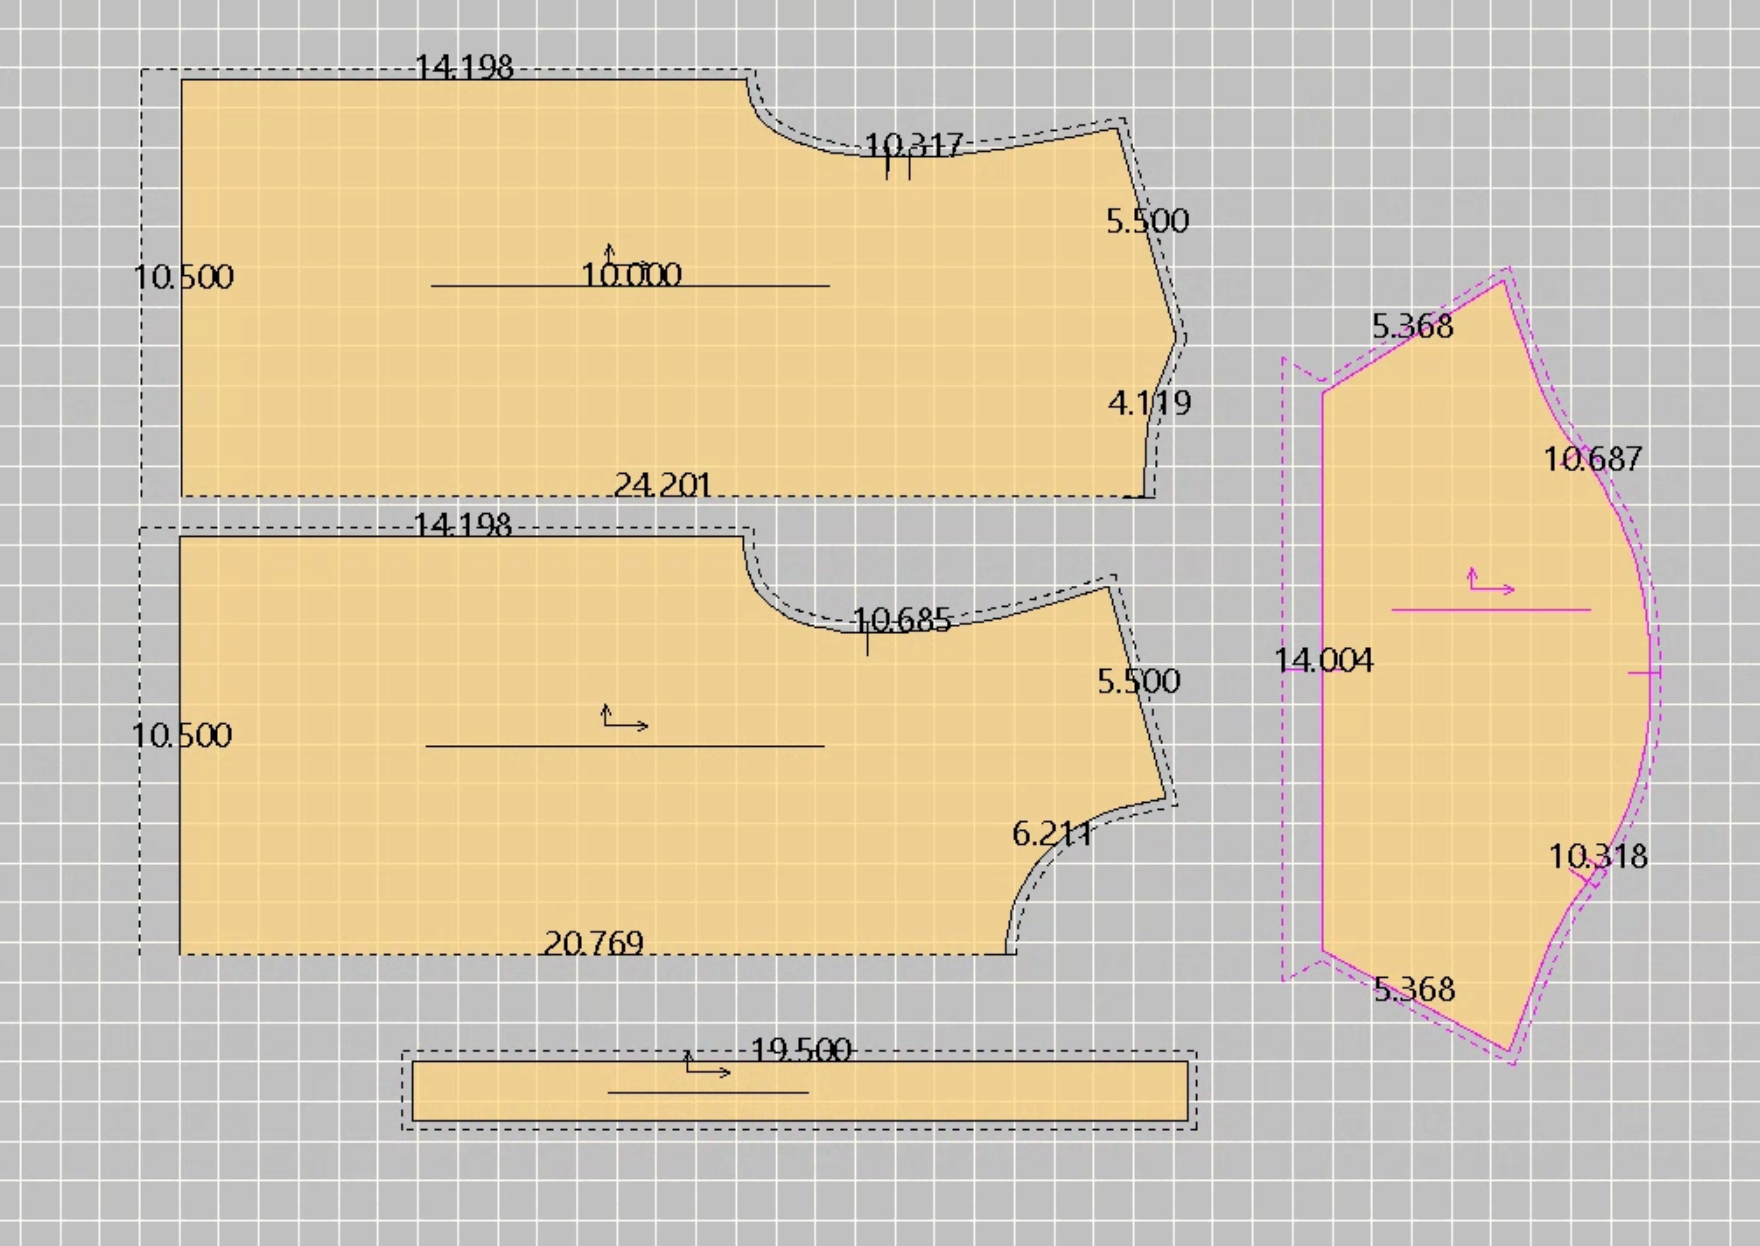
Final patterns in AccuMark
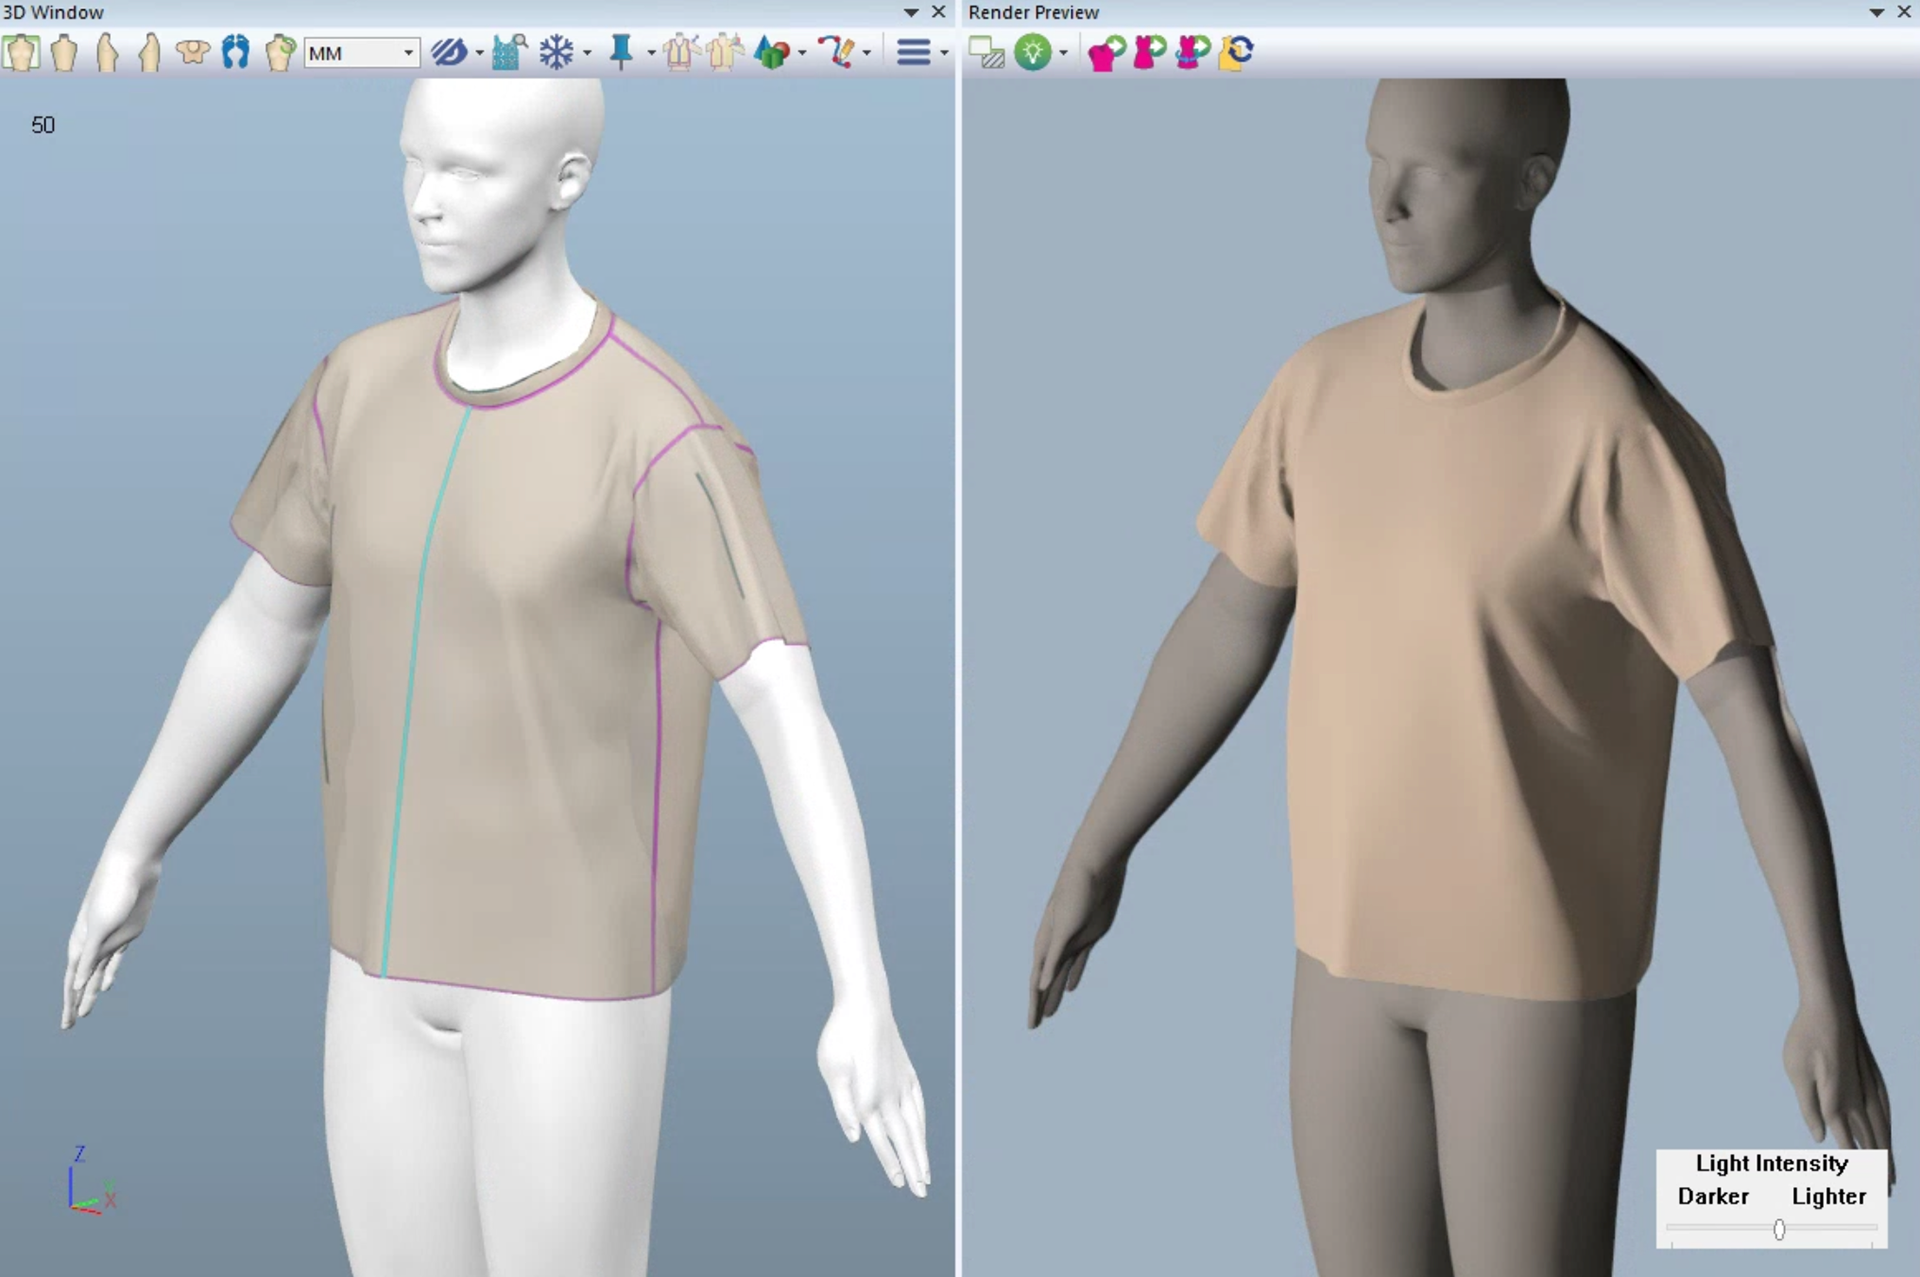
Test fitting renders in AccuMark 3D

Cutting final fabrics
SAMPLES


This was the first sample. The black jersey was far too heavy and had too much stretch. I suspect it was not 100% cotton as advertised. As I was sewing this sample I had to work out a few construction issues, mainly the sewing order and the seam finishes. I coverstitched the sleeve openings, neckline ribbing, and hem. The fit was right, but the fabric and finishes were not.
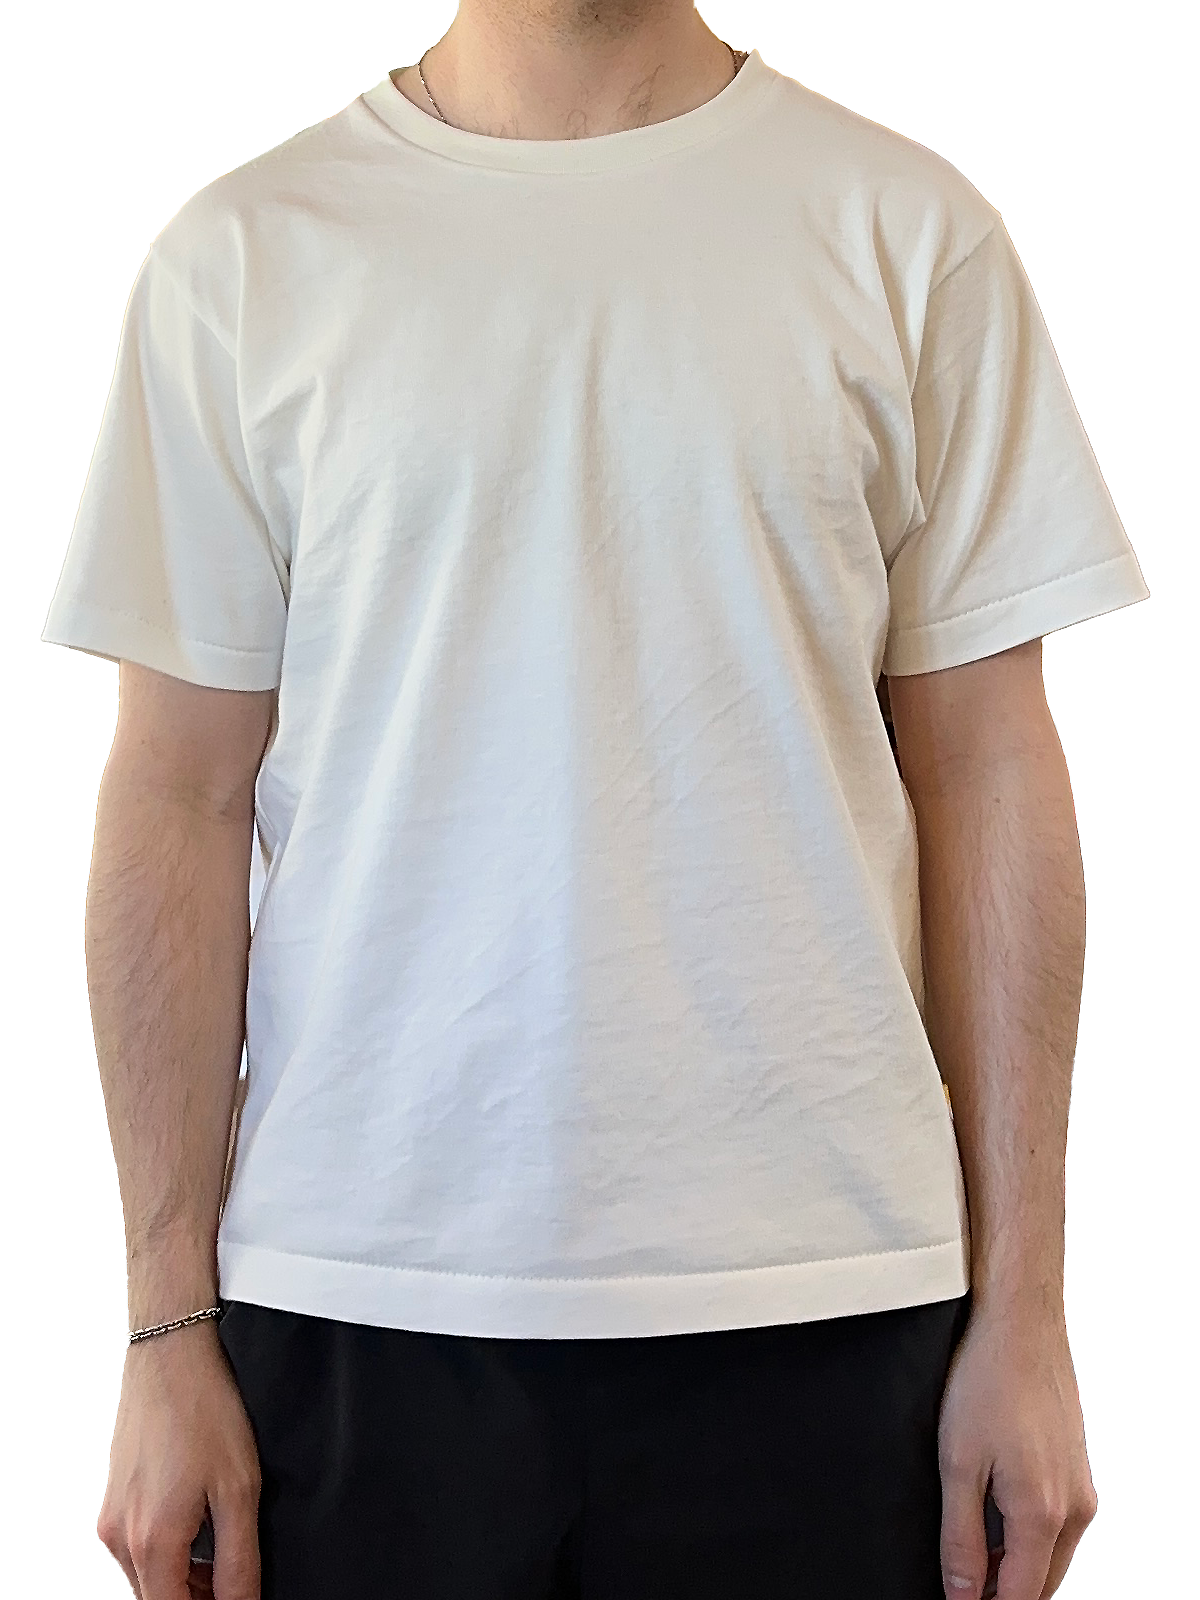
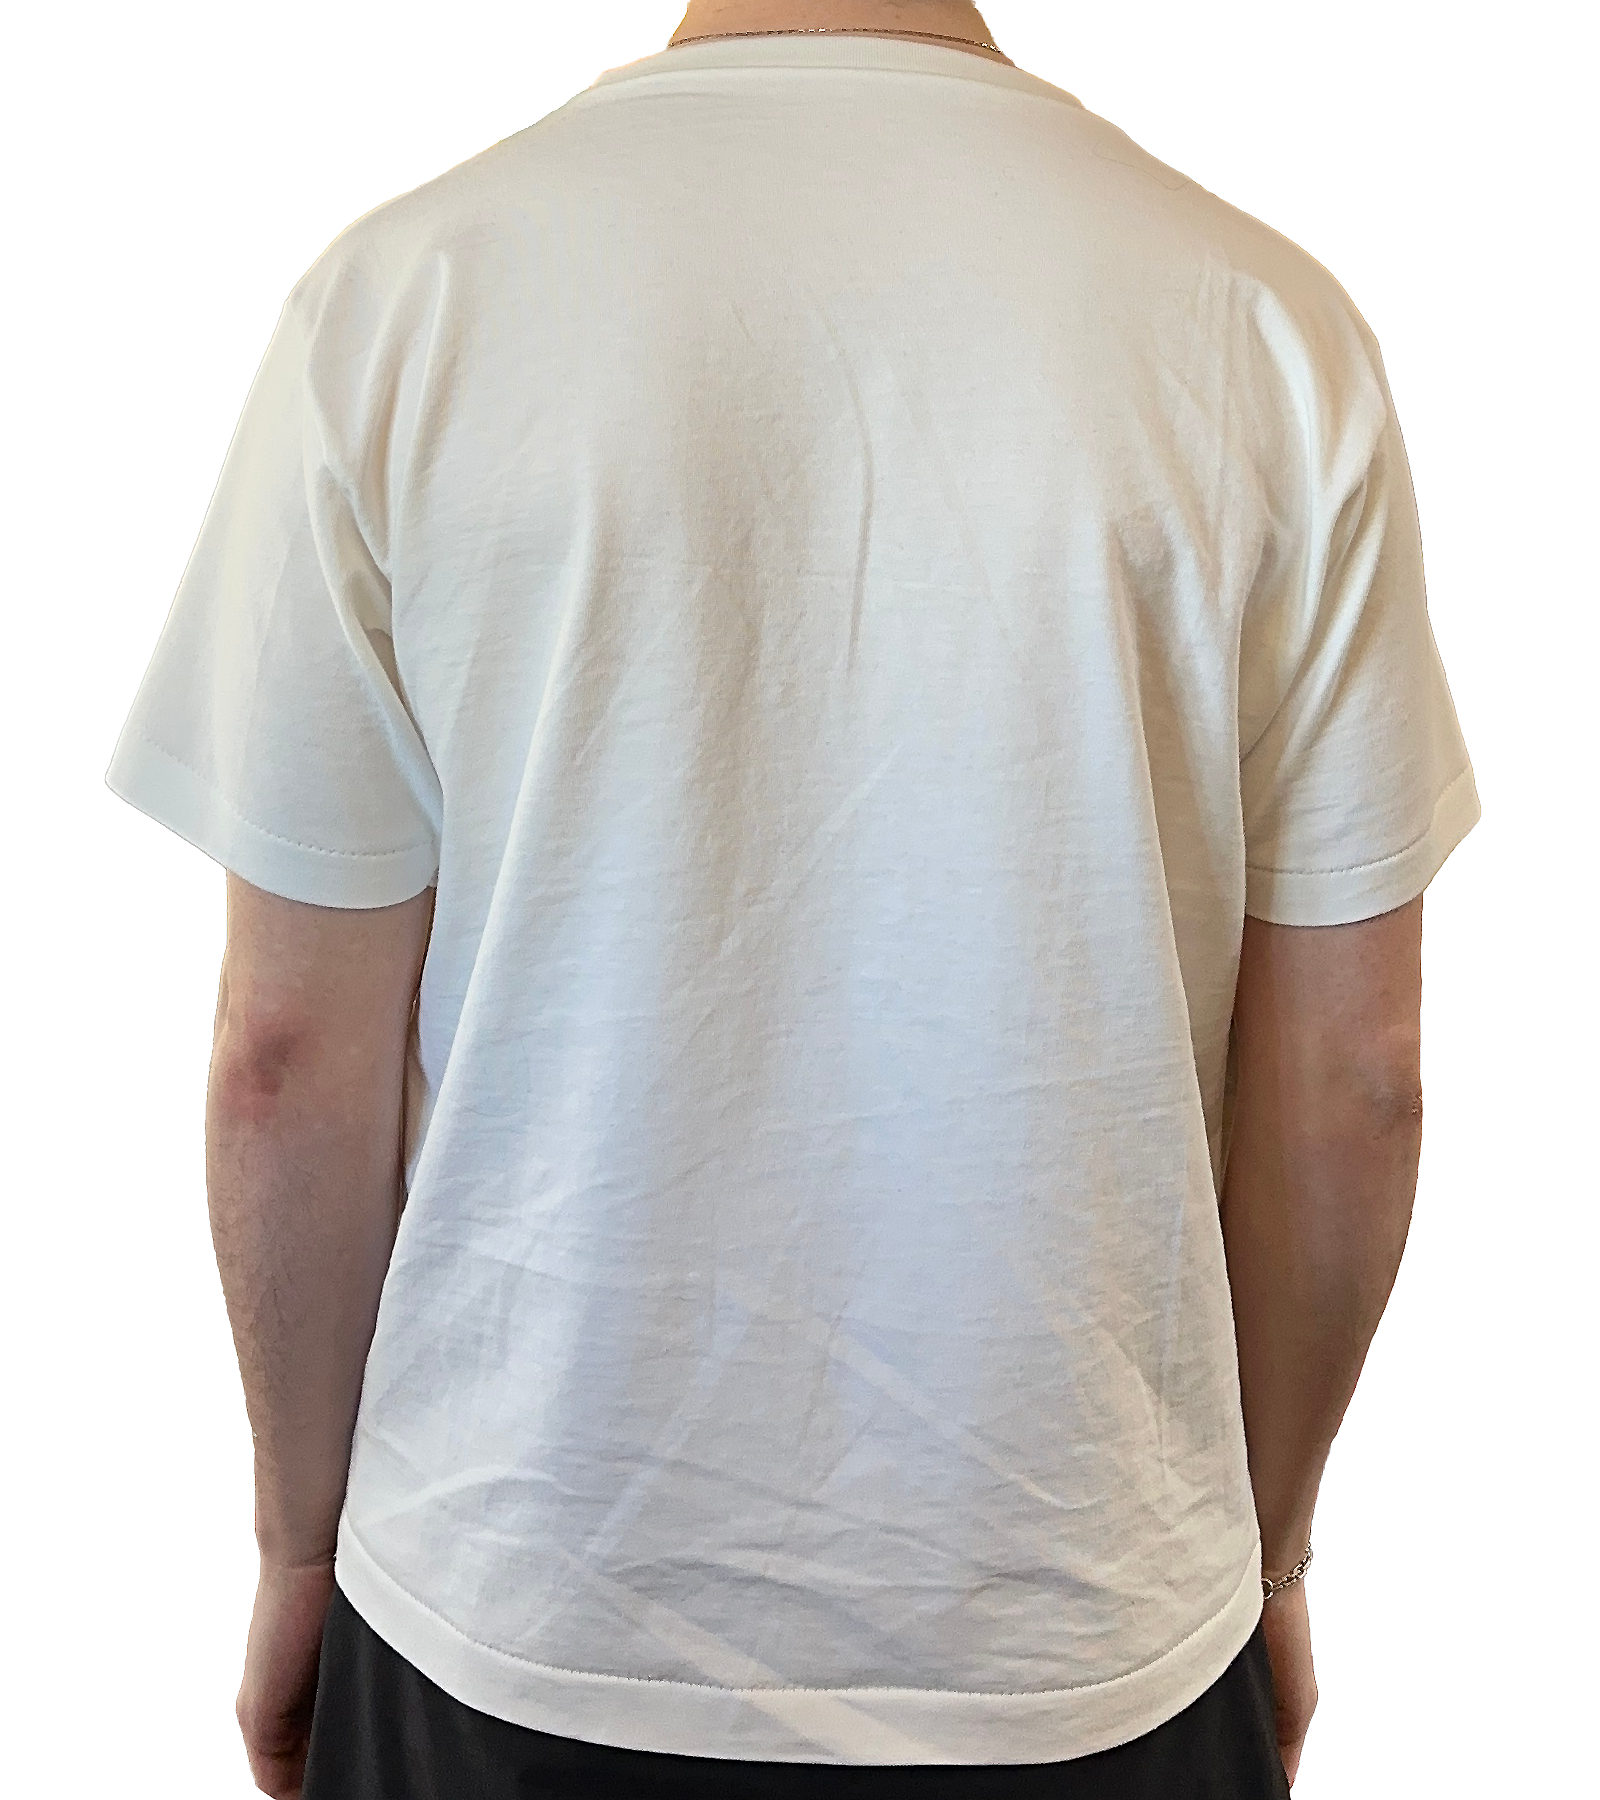

This is the final t-shirt. I found a lighter weight 100% cotton jersey that imitated the hand of my vintage single stitch tees. I copied the sewing order of vintage tees, as well as the use of the blind serge technique for the armhole openings and hem to accurately replicate the single stitch style. Maybe you can tell from the pictures, but this shirt really truly feels like a vintage blank. I could easily pass it off as a deadstock blank from the 80s with the tag ripped out on ebay! I have purchased more fabric and am continually fine-tuning the construction. Once I have every last detail worked out, I will grade the pattern and begin producing size runs for friends and *possibly* boutiques.
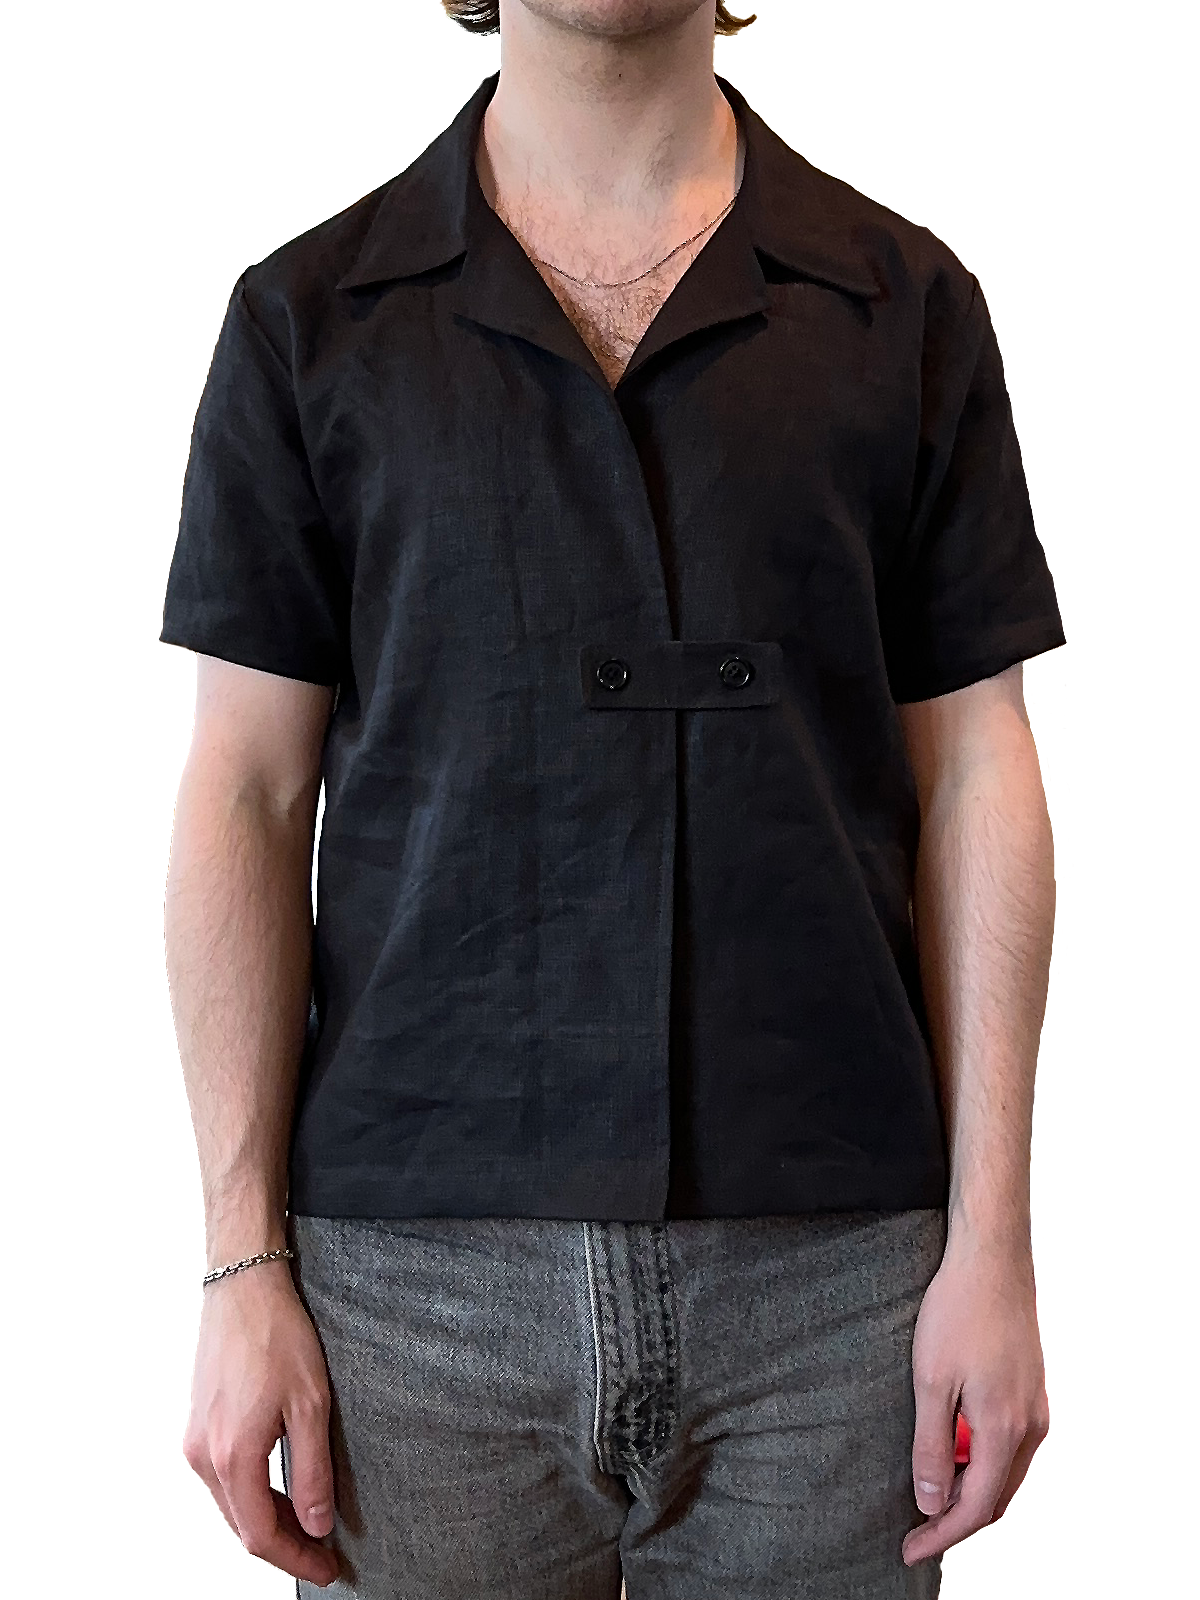
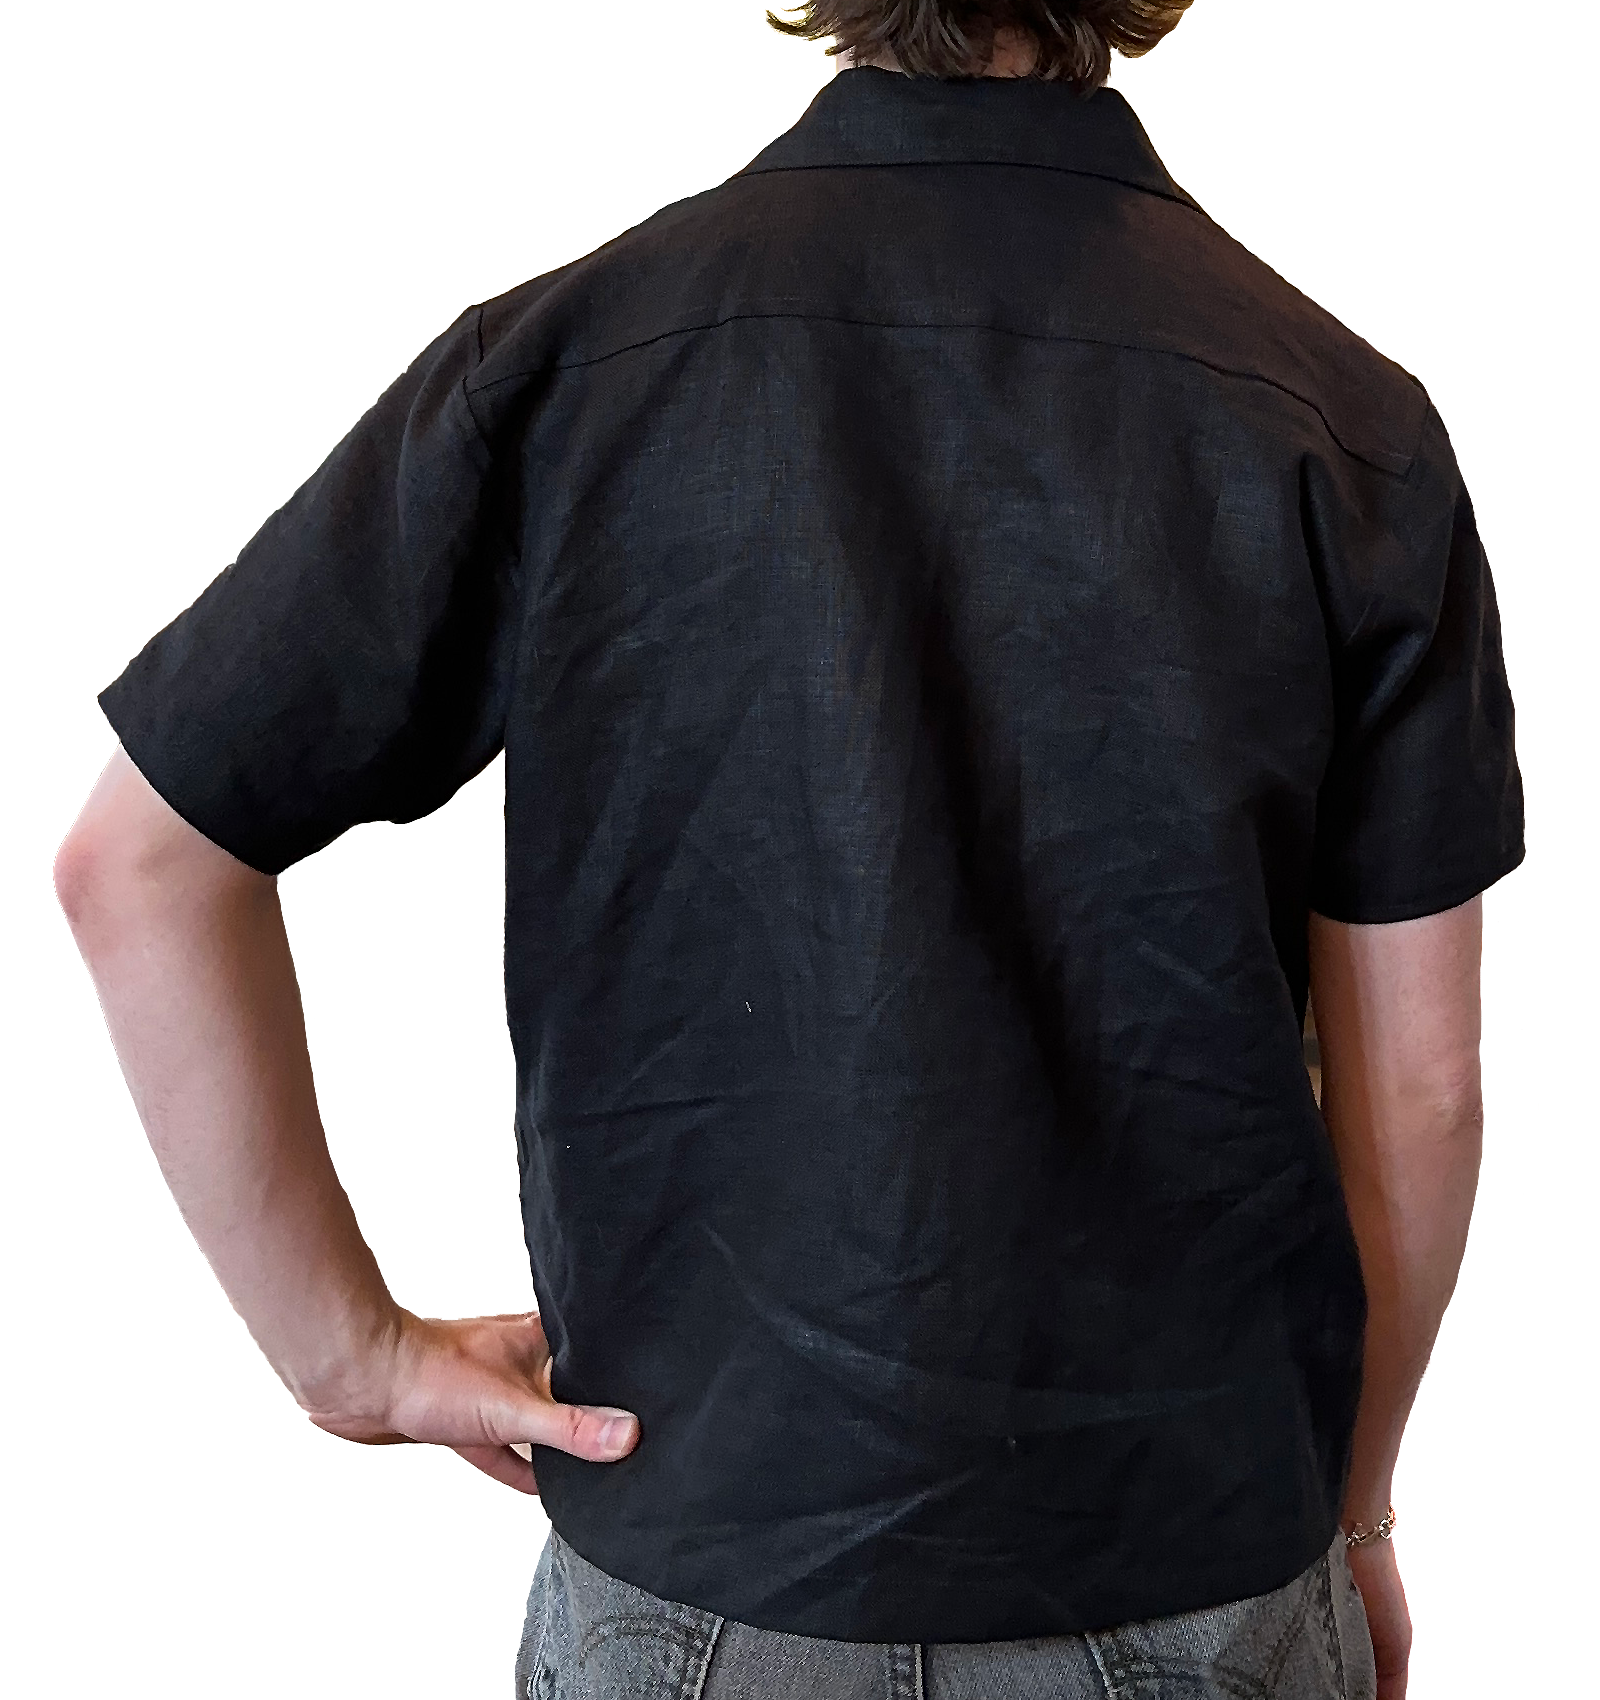
CAMP SHIRT
Similarly to my perfect t-shirt pursuit, I wanted to create a perfectly tailored button-up camp shirt for my wardrobe. I patterned the whole thing totally from scratch, just using my own measurements, no altering of previously existing blocks. I patterned several variations, one with the buttonholes built in to a seam running down the center placket, and one with contouring vertical and horizontal fisheye darts to accentuate my waist. During this project I taught myself to use the 3D side of Gerber AccuMark, which proved to be highly useful in weeding out the initial fit issues. The final shirt I created is the most flattering piece of clothing I own, I absolutely love how it looks on me.

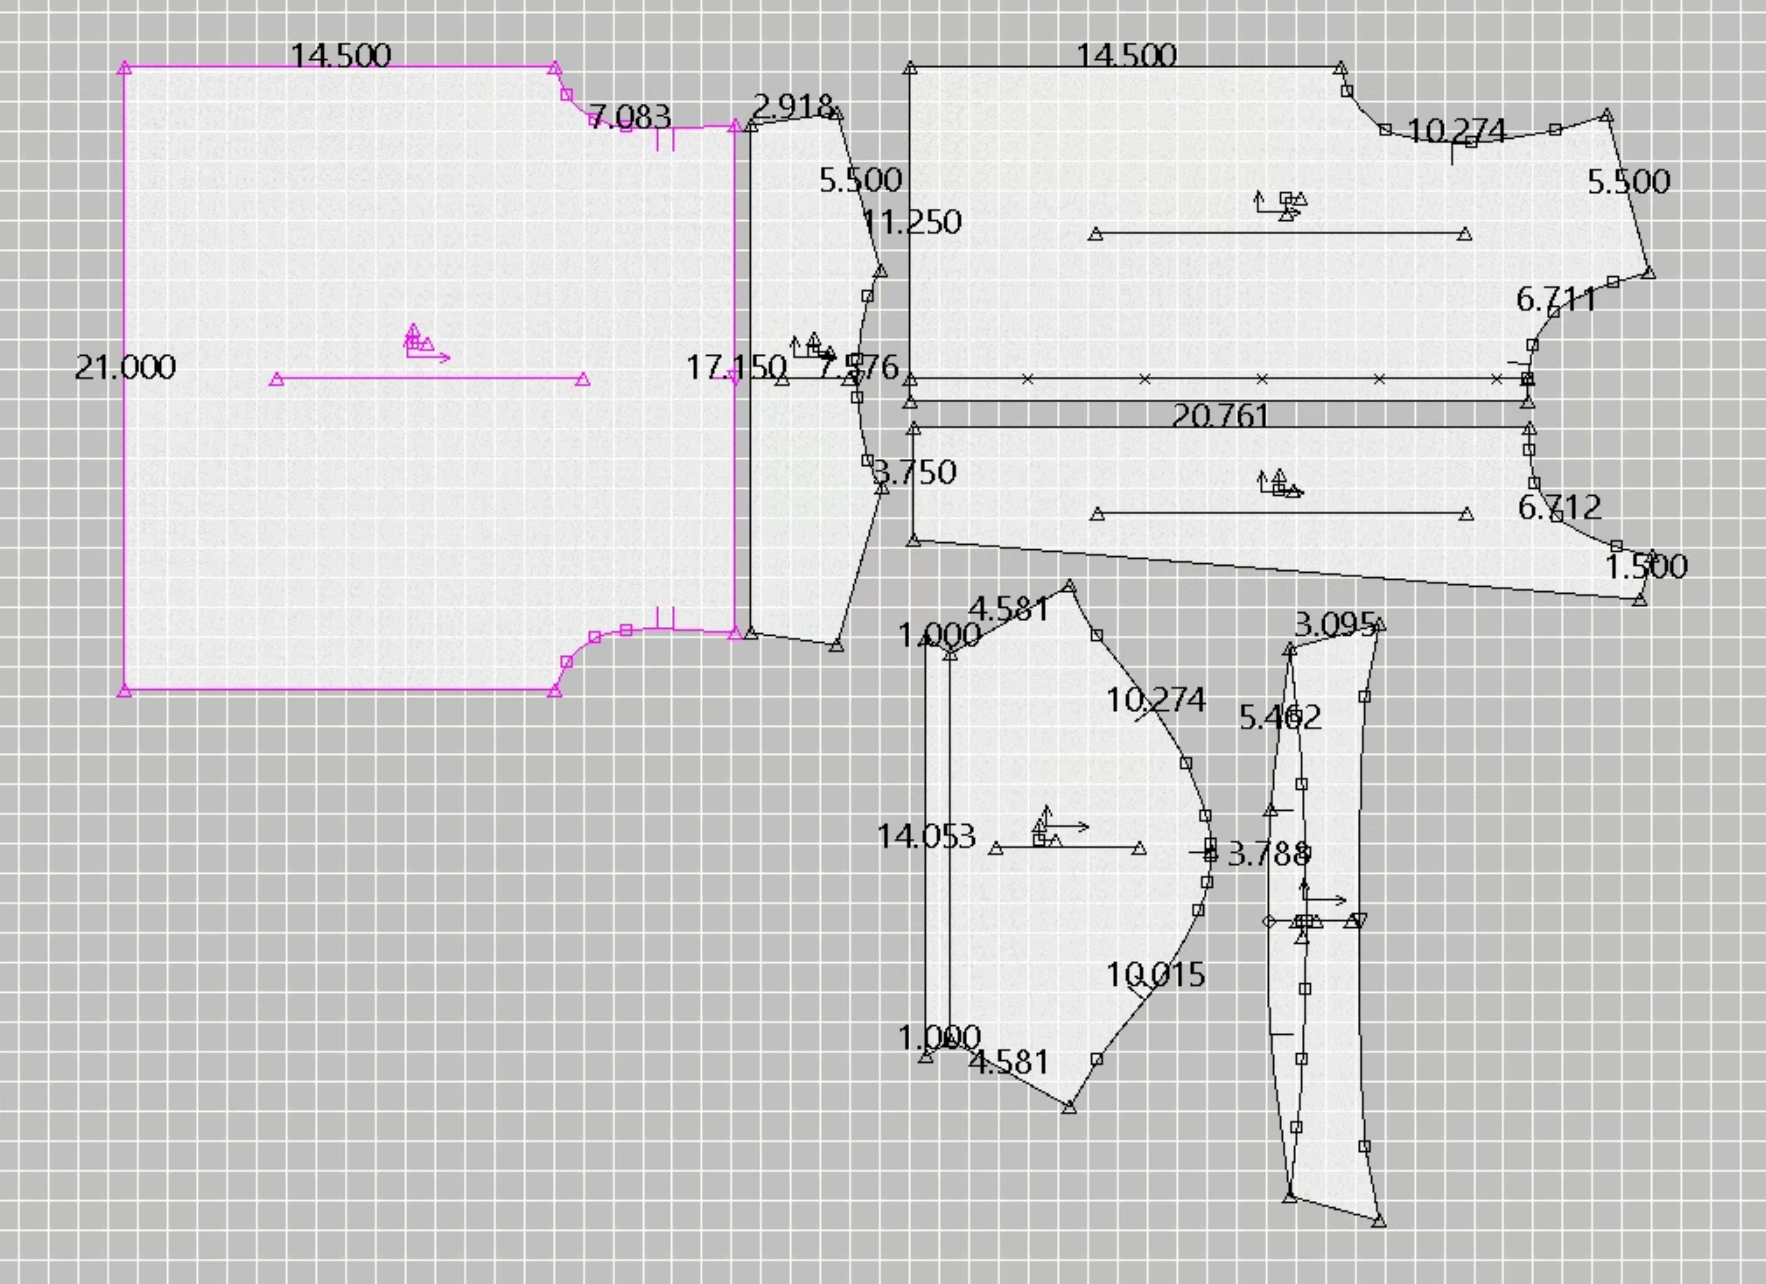
Final patterns in AccuMark
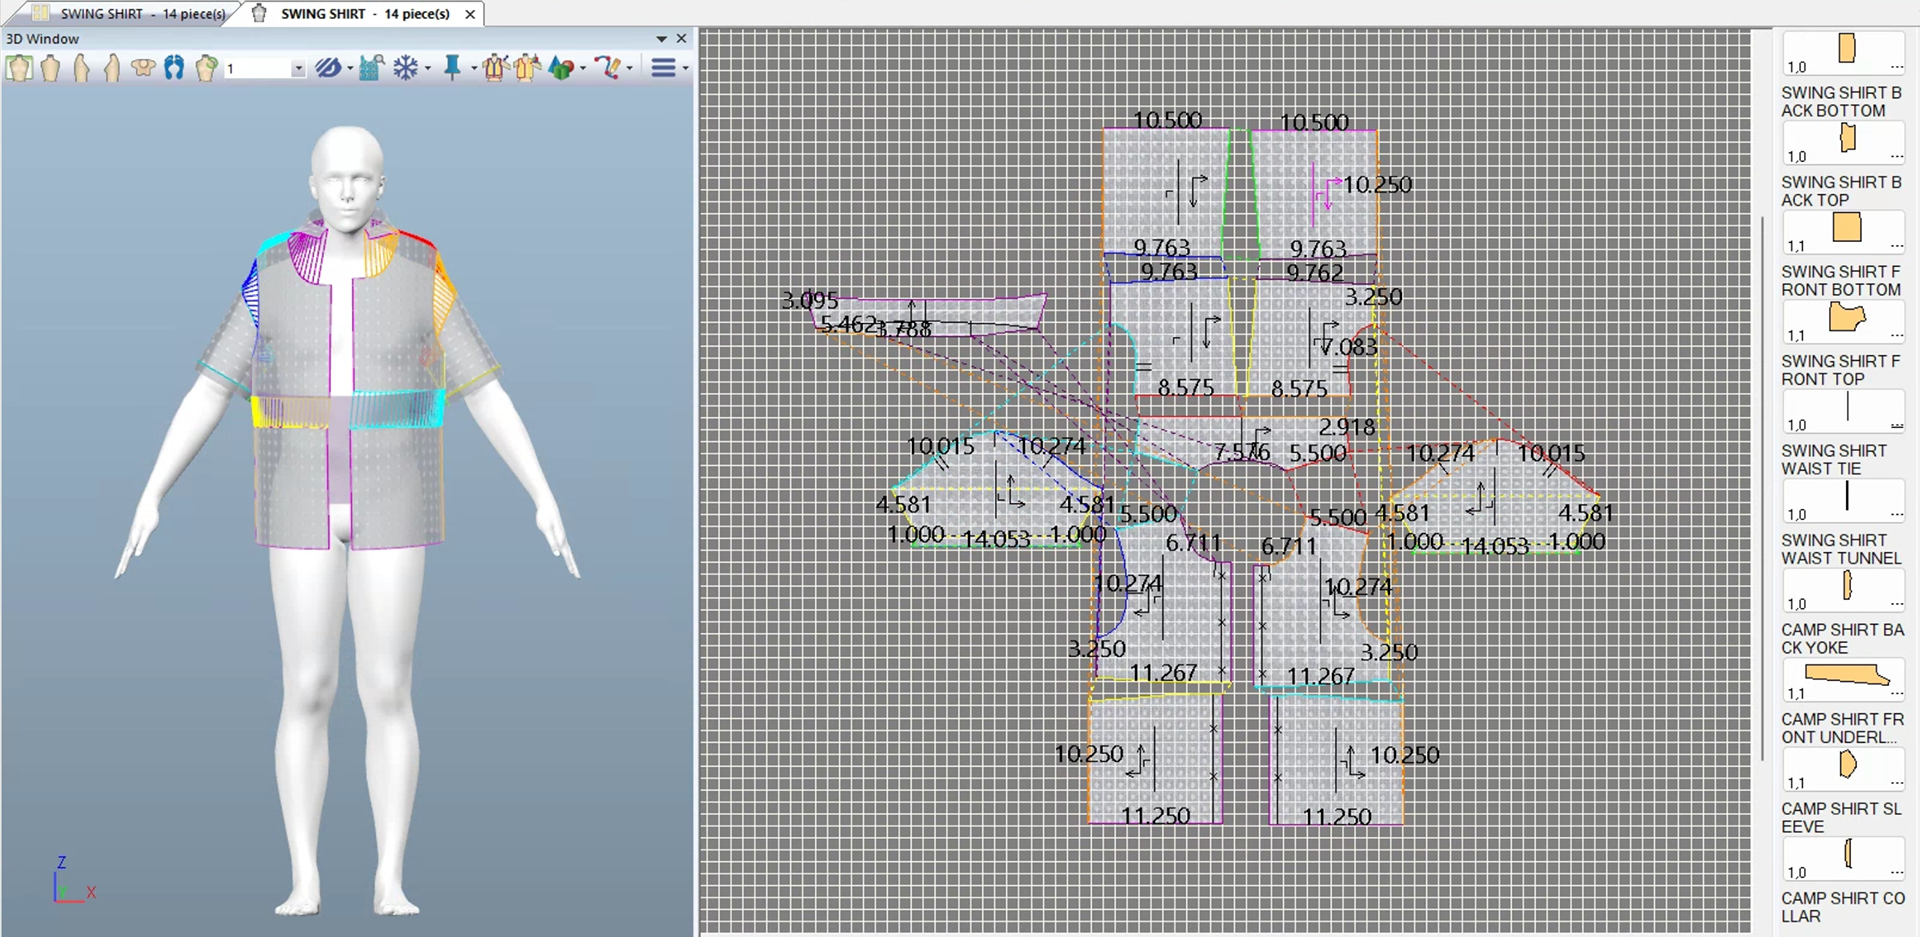
Test fitting in AccuMark 3D
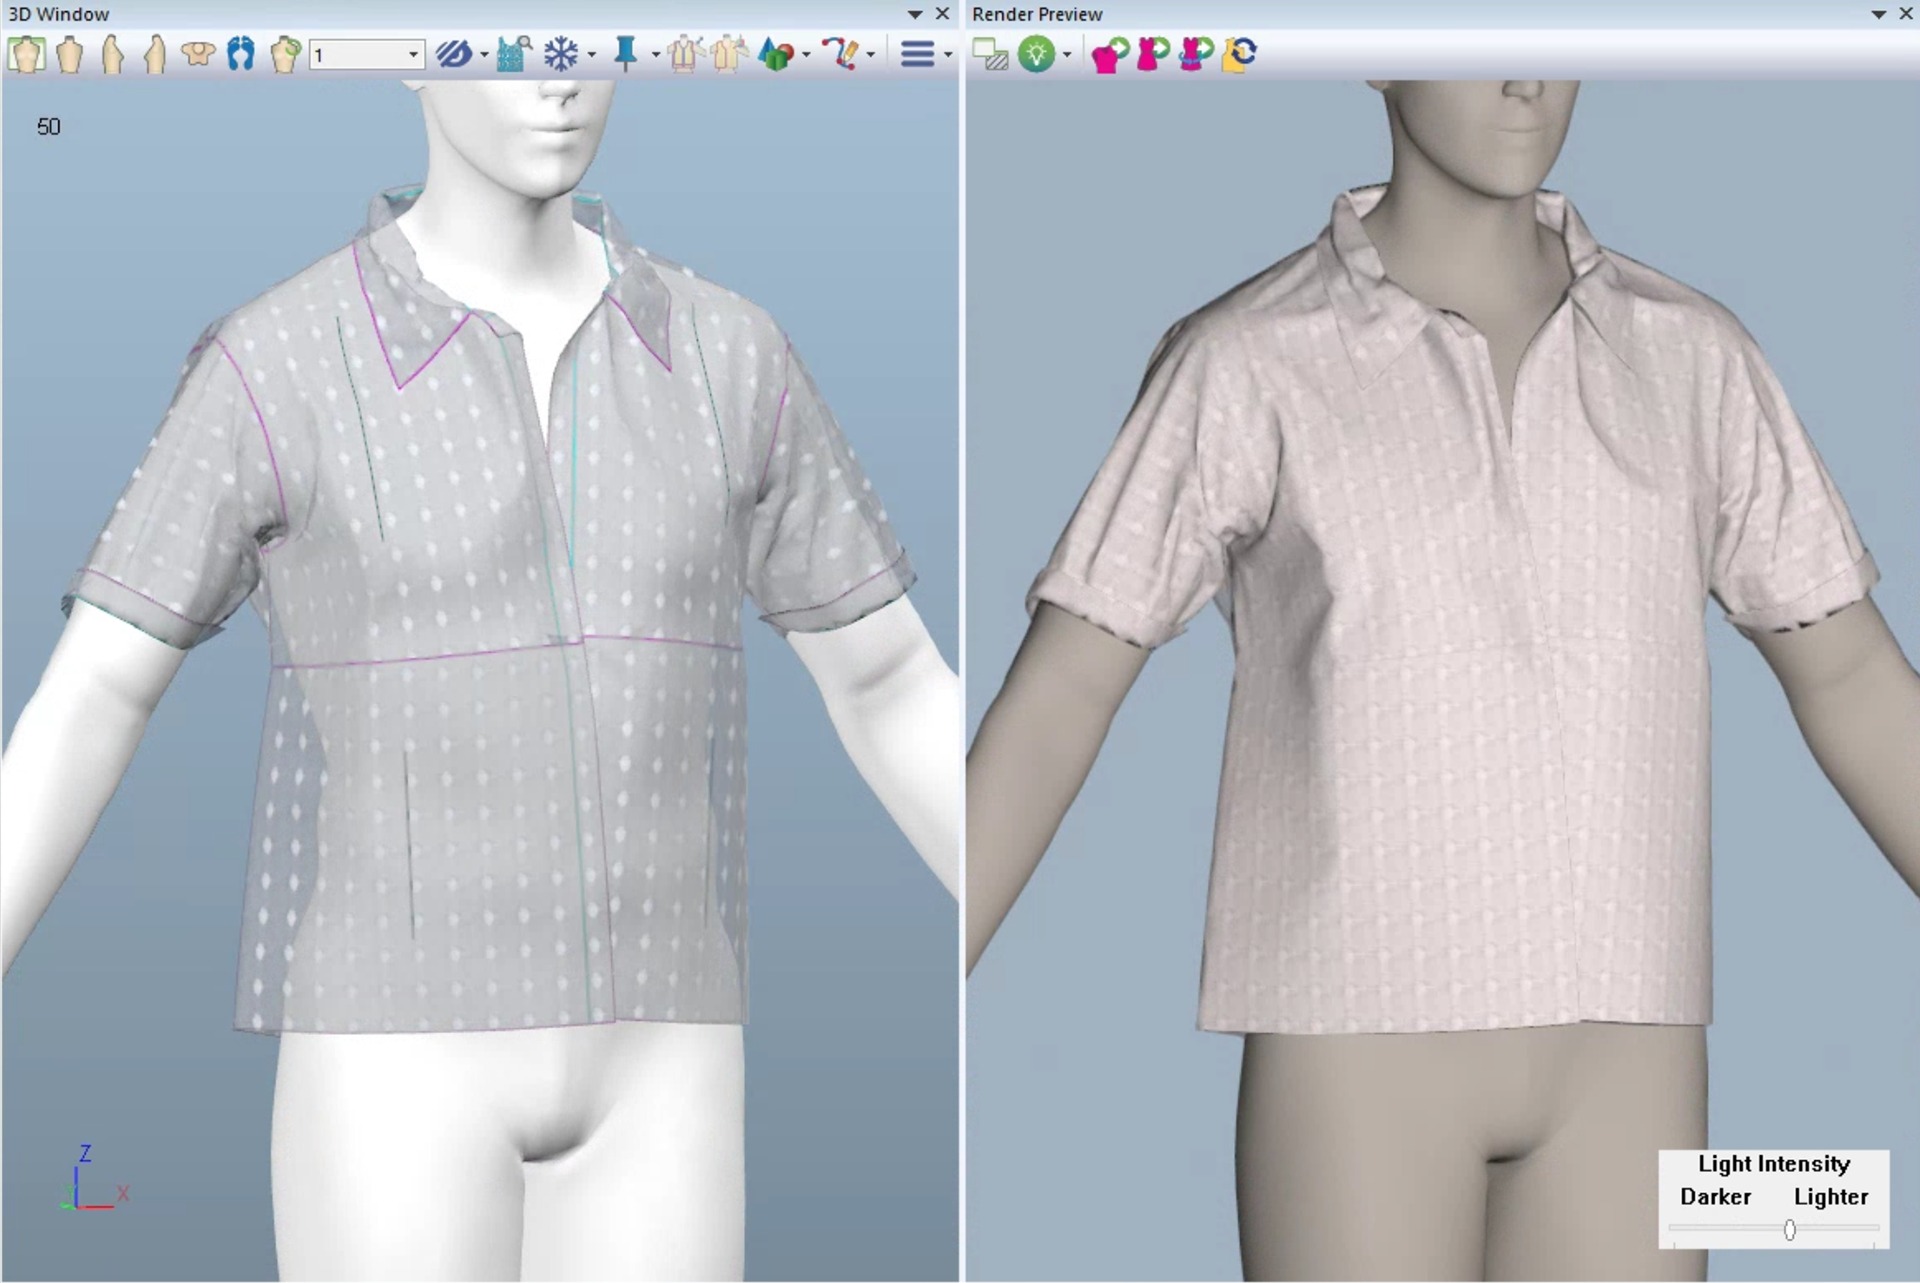
Test fitting render
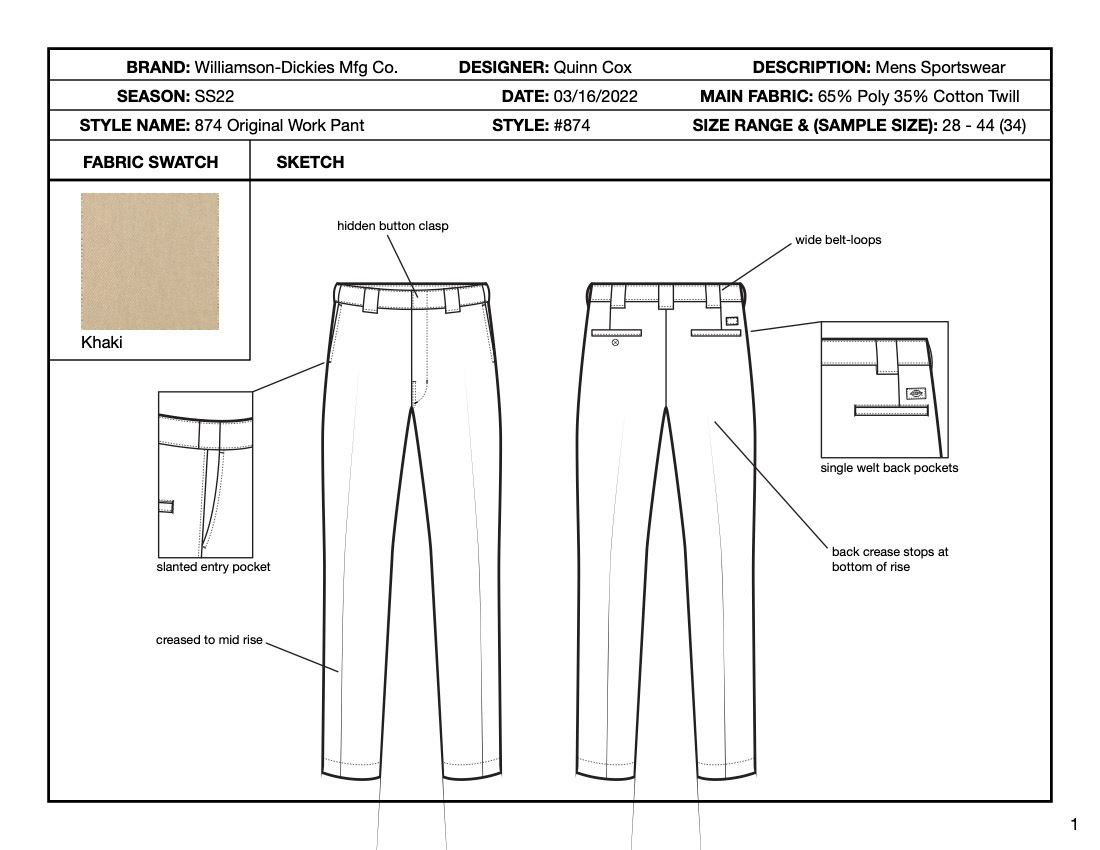
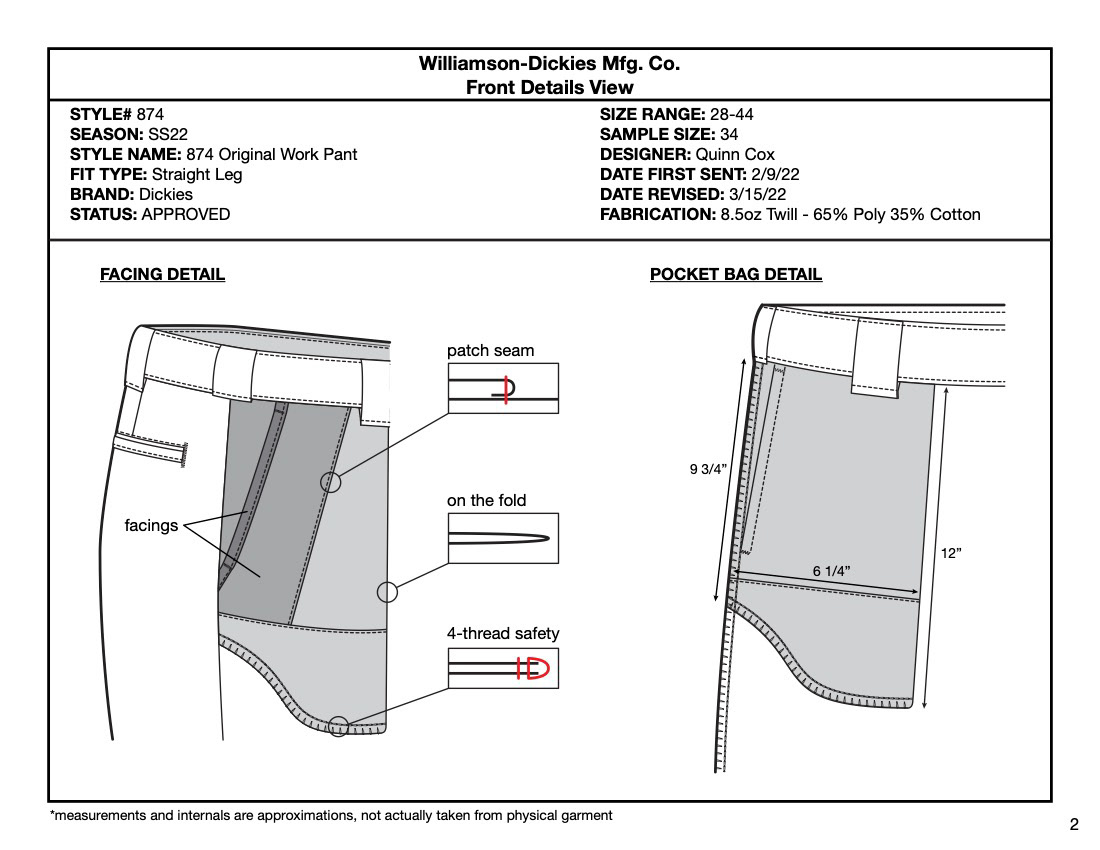
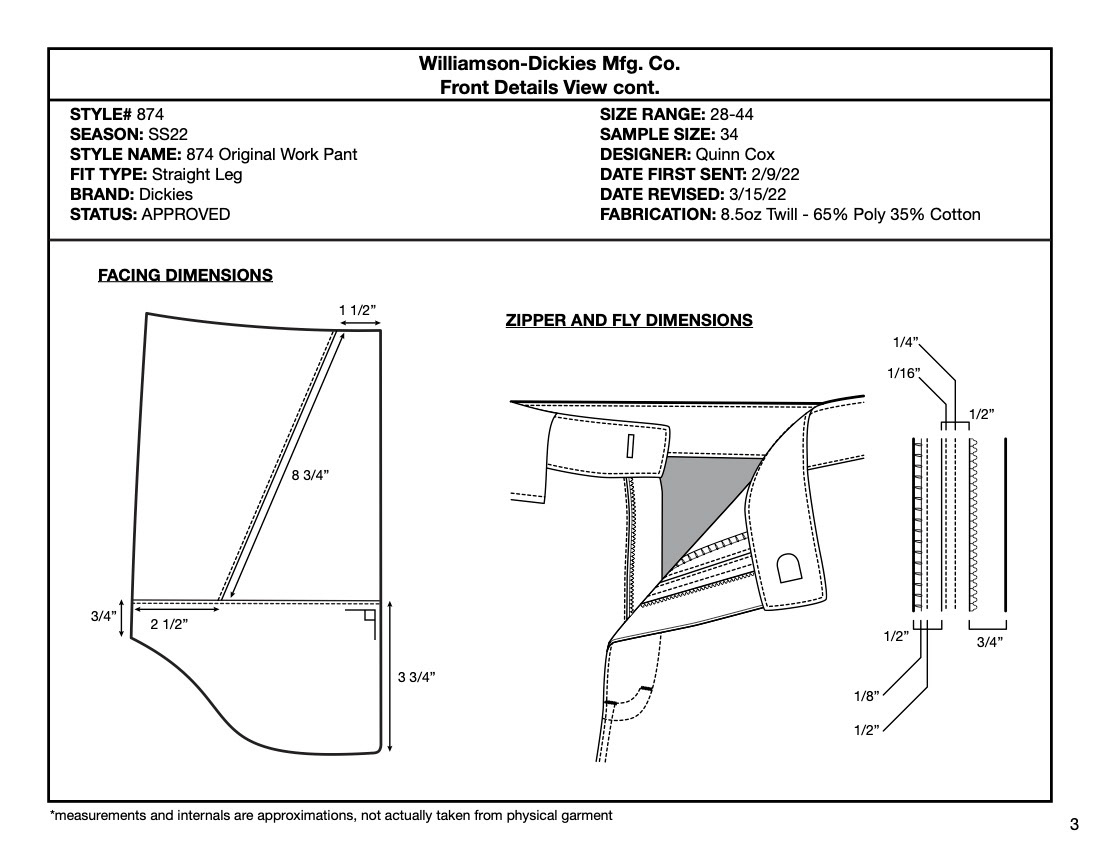
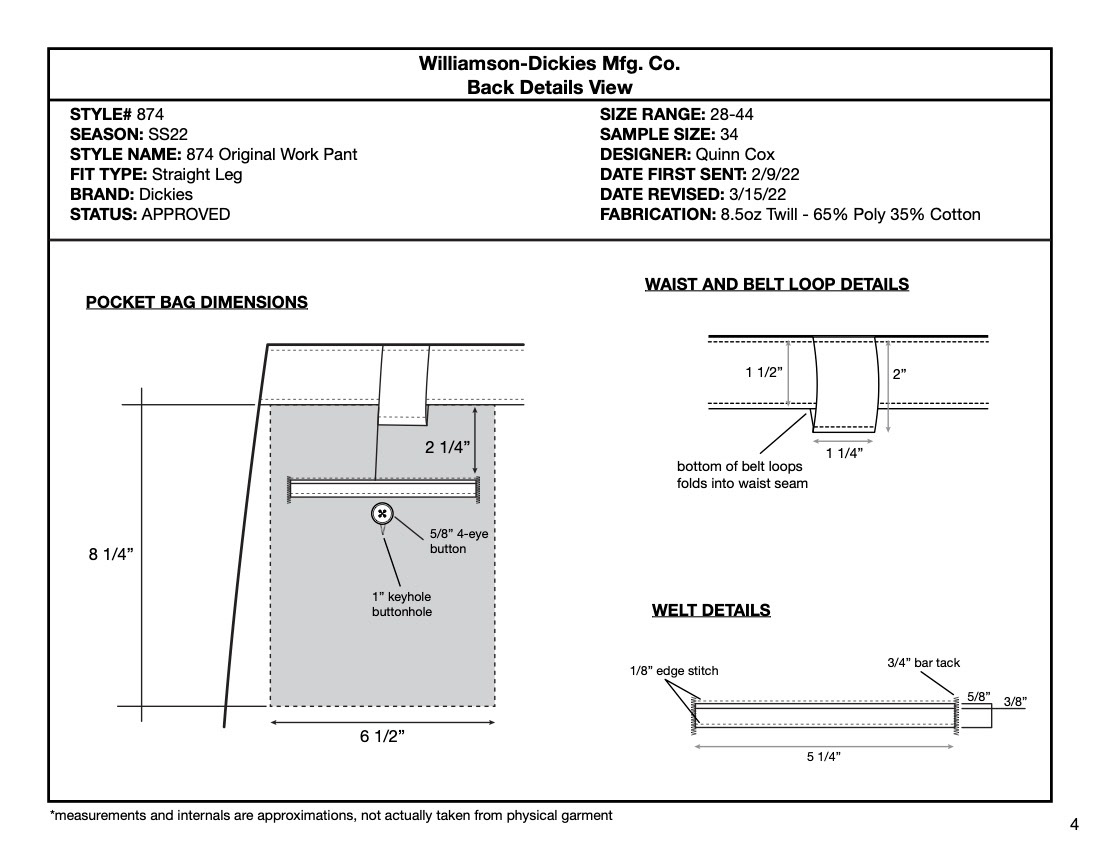
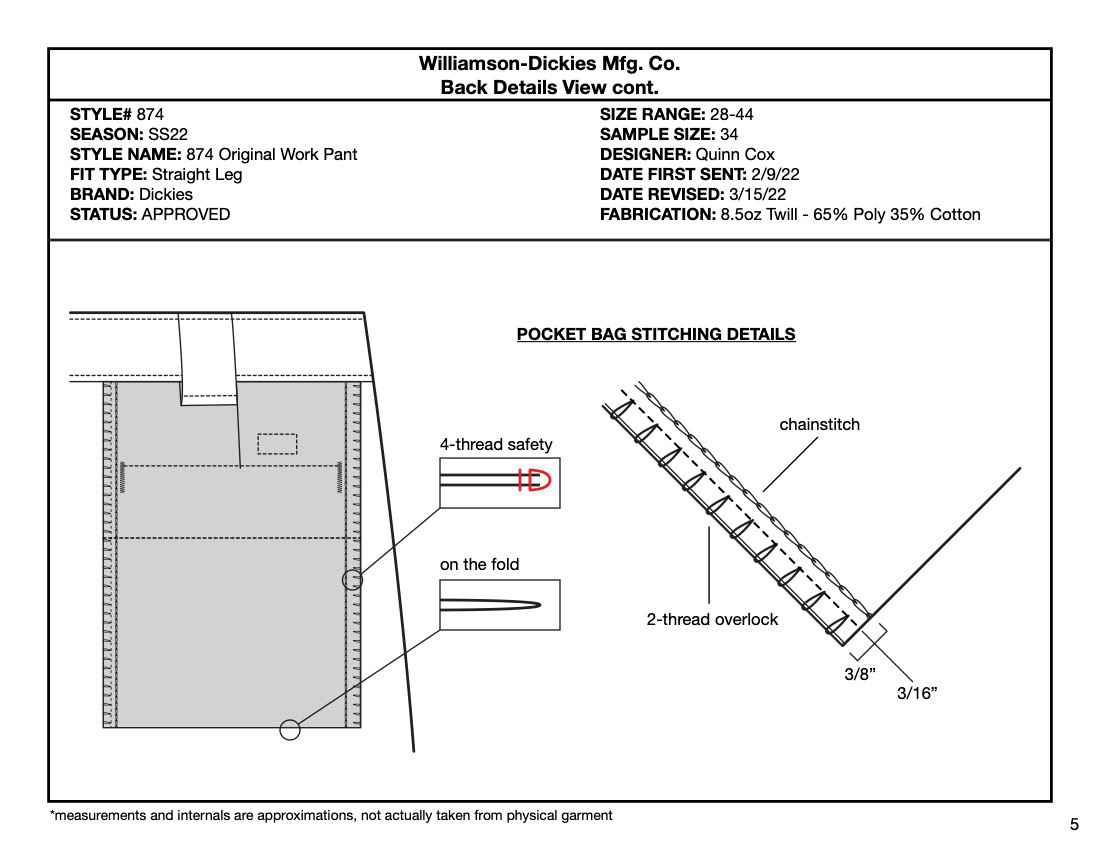
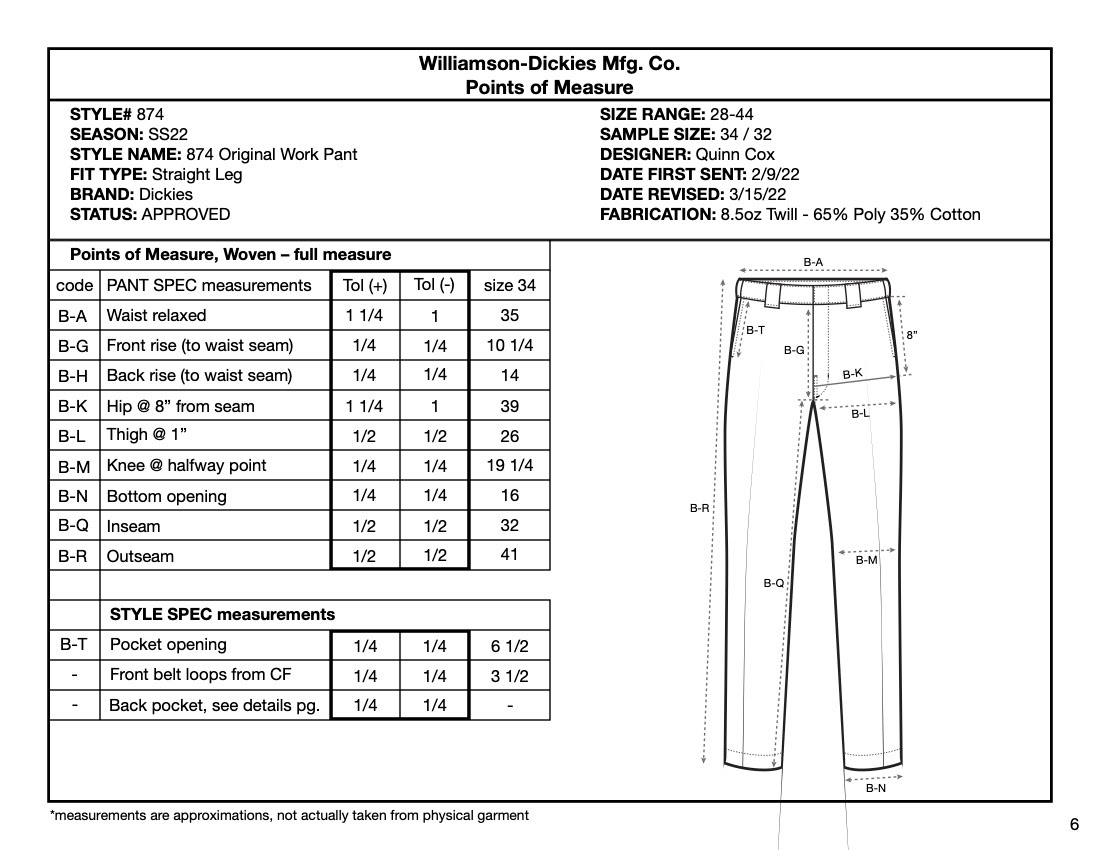
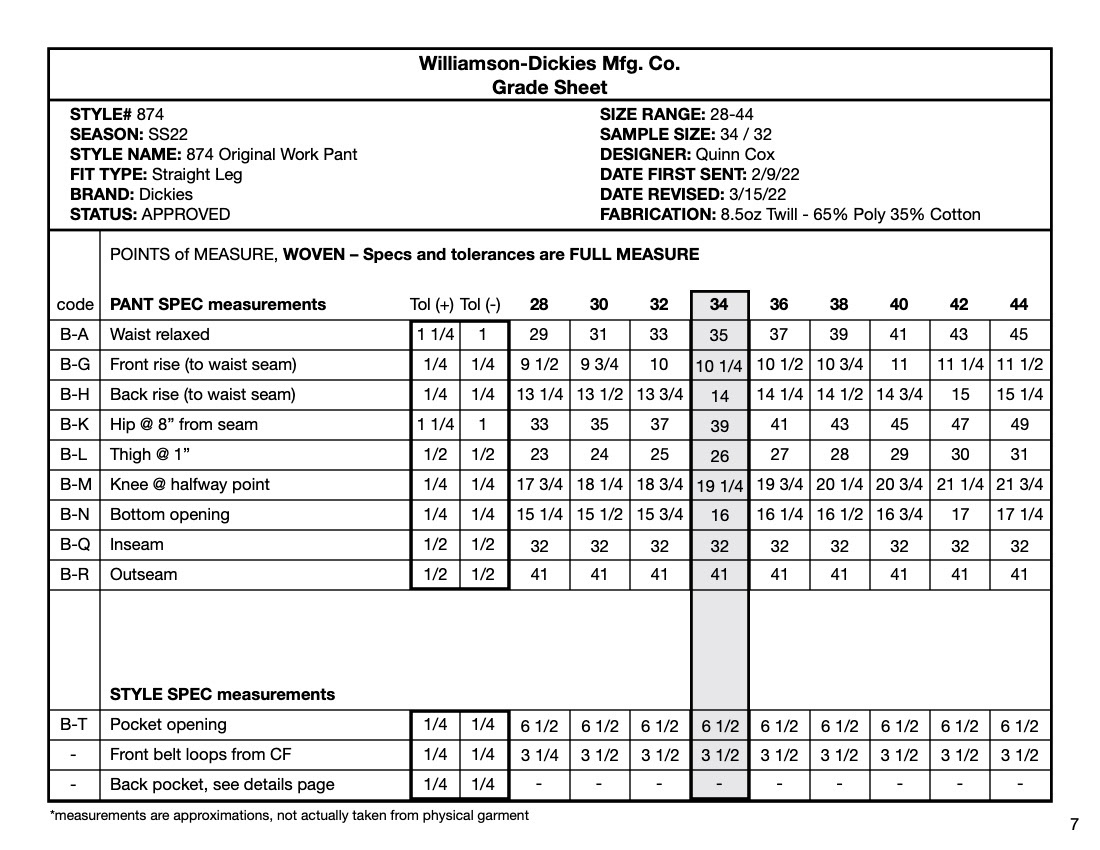
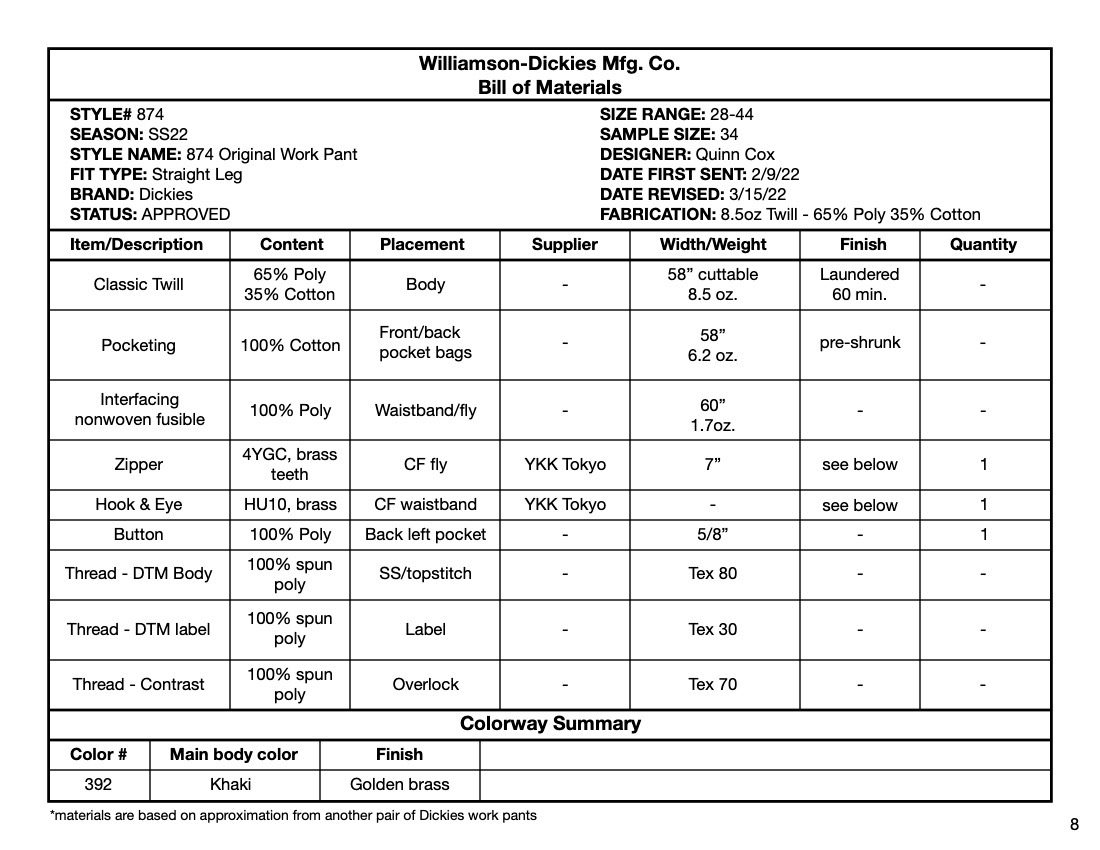
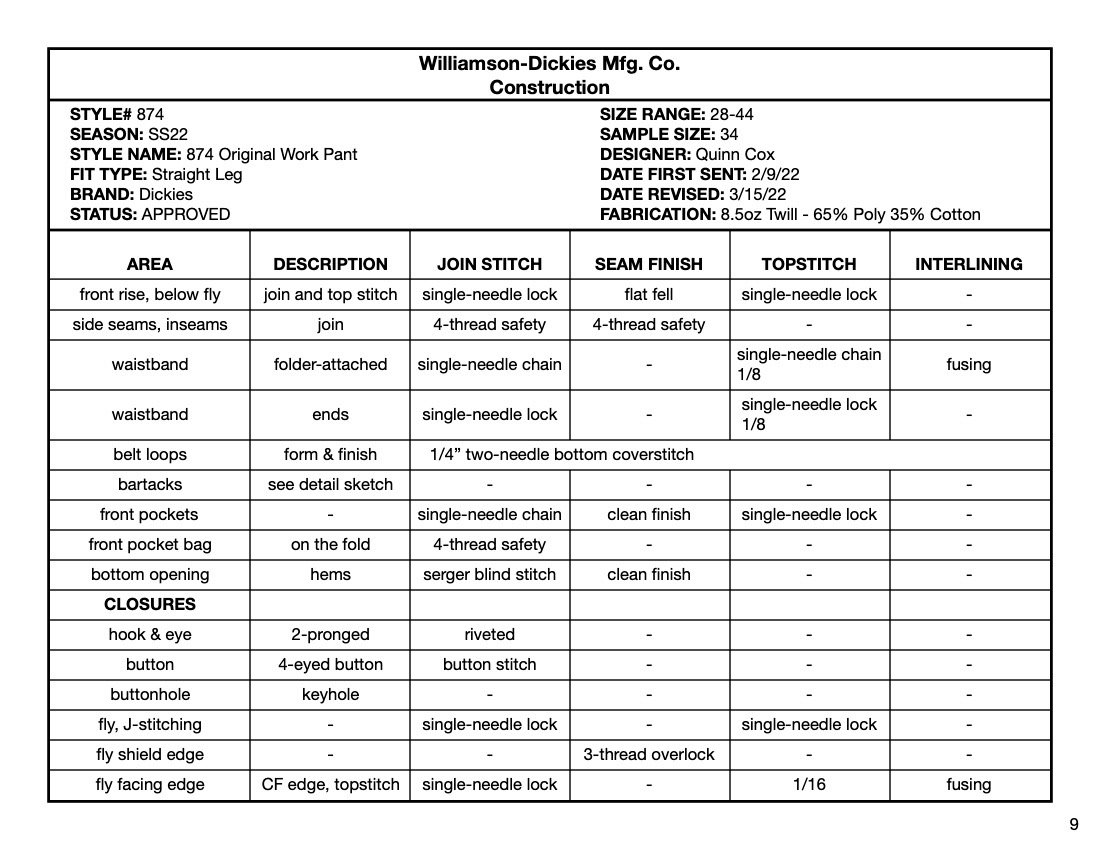
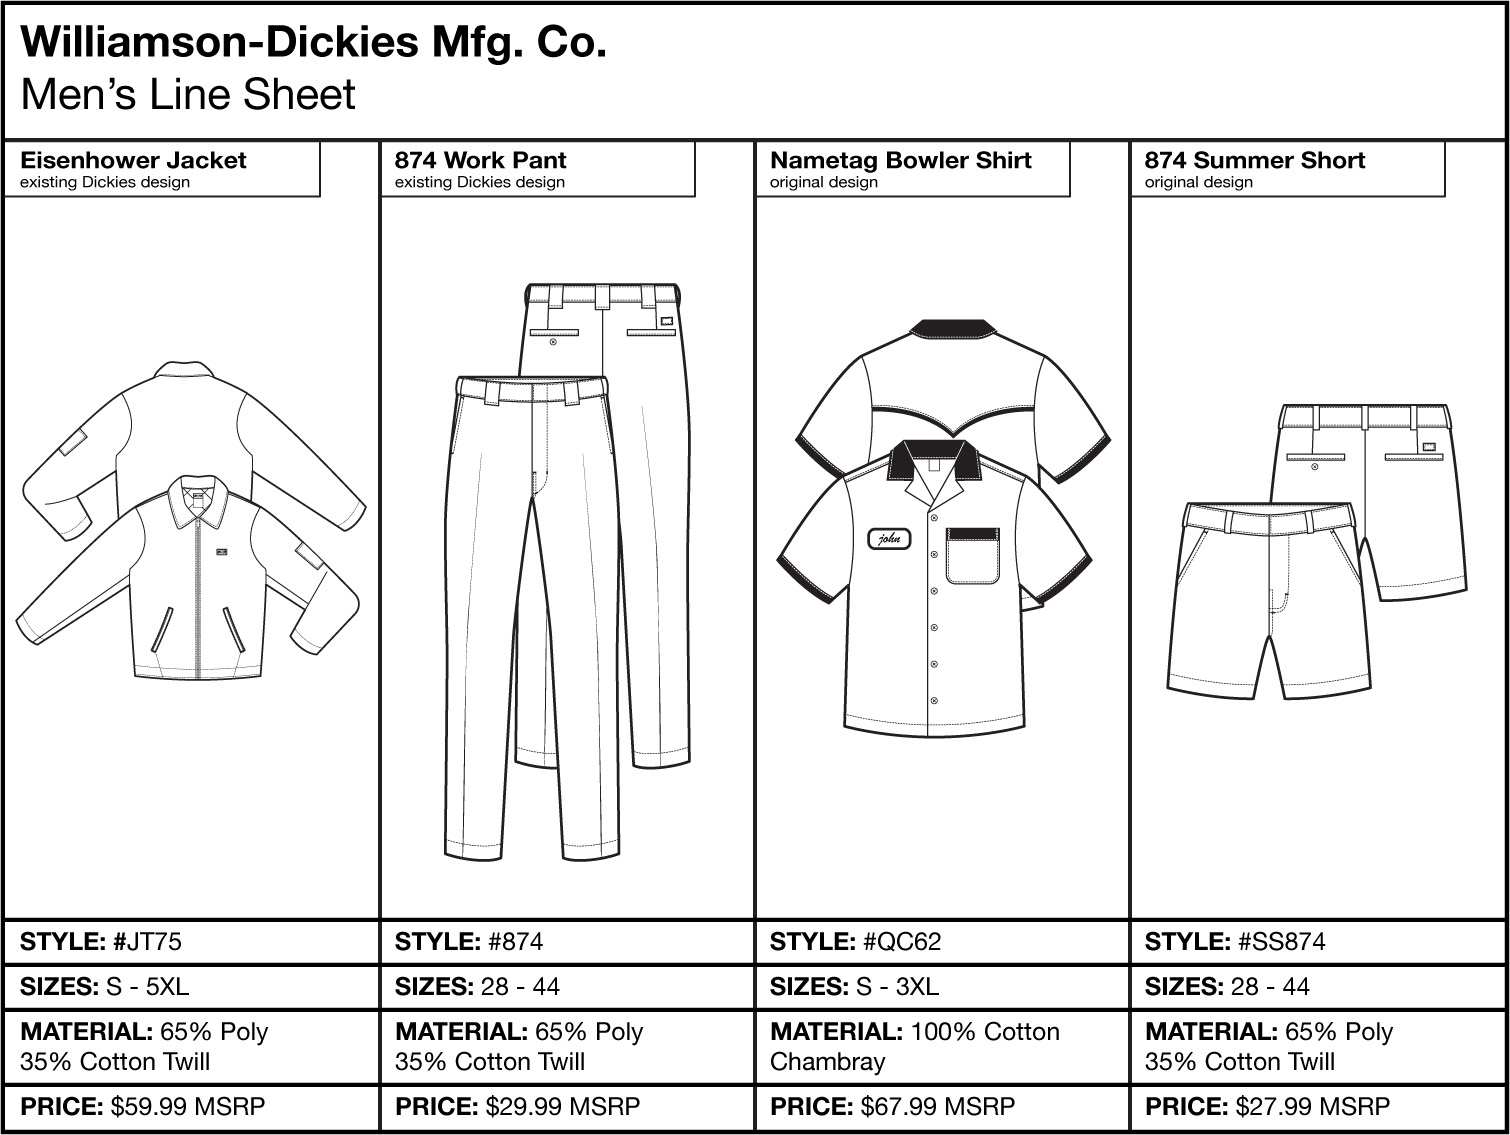
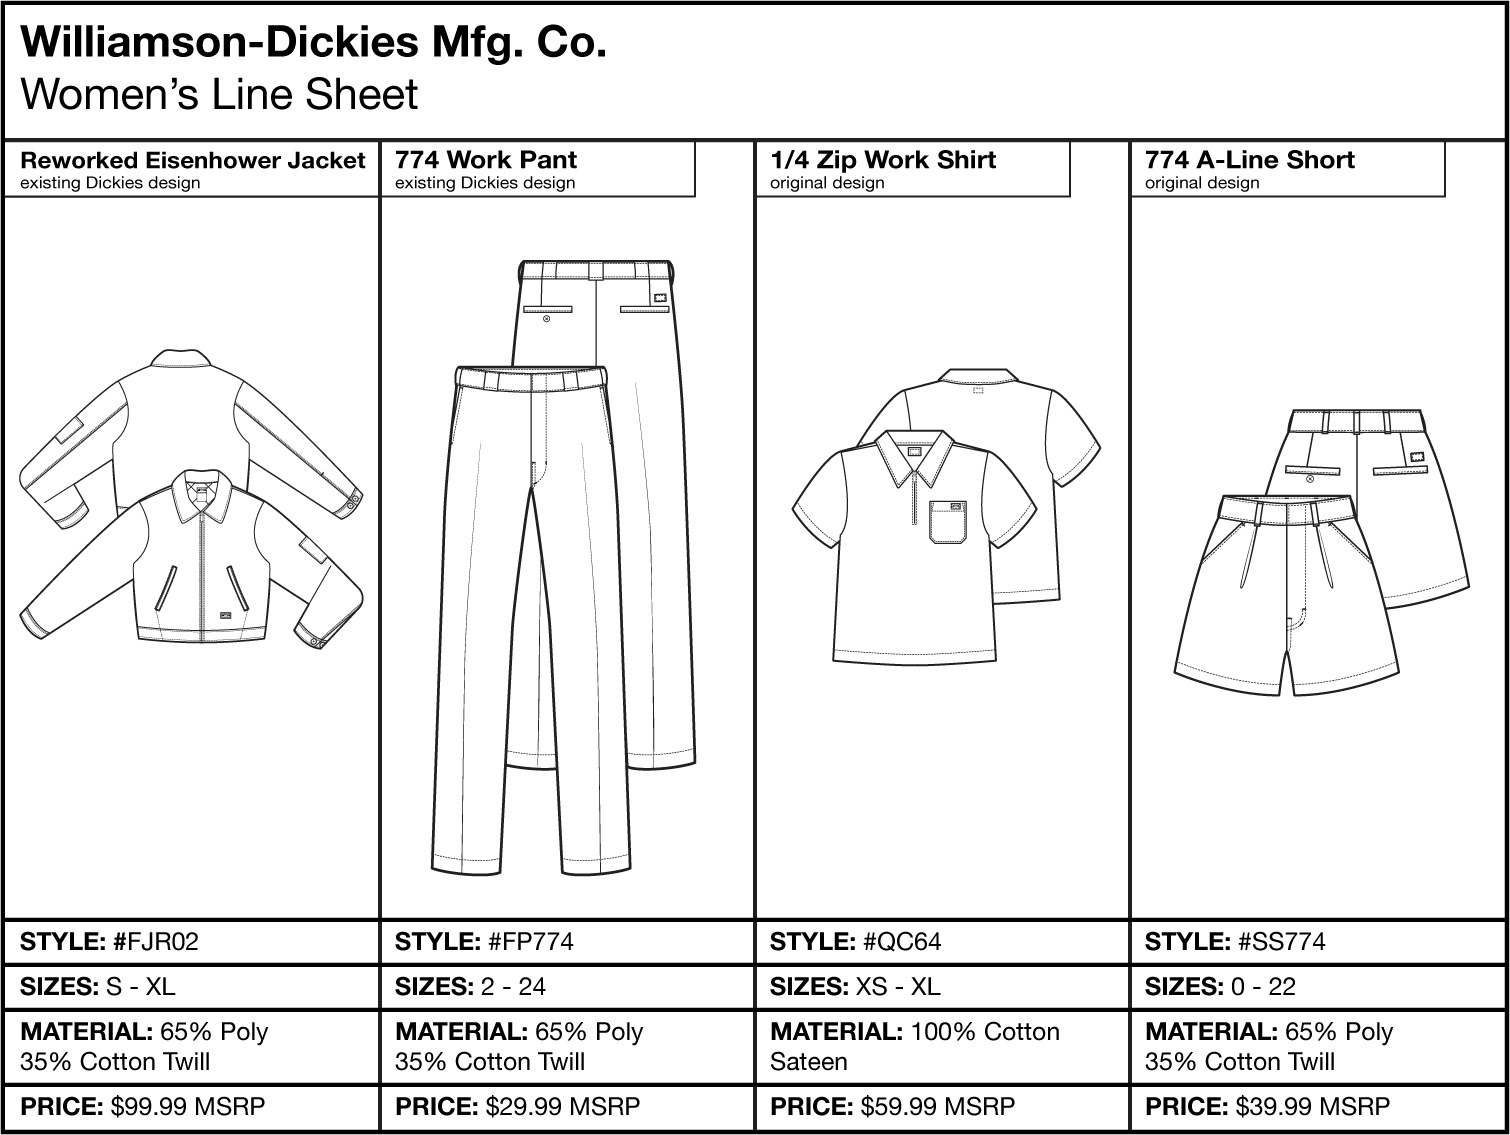
DICKIES TECH PACK
I created this tech pack to showcase my abilities in technical design and illustration for potential employers. Dickies is a brand with a lot of great basic pieces, but they are most well known for their pants and workwear. In addition to the tech pack for their 874 pant, I created a line sheet which includes 2 of Dickies' original designs as well as two of my own - a top and bottom for men and women.